The Cloud POS hardware is reliant on access to the internet via direct connection to your network so, with the exception of the barcode scanner, none of the hardware needs to connect into a PC or Mac.
Information is sent across the internet directly to the receipt and barcode label printers, so before you begin the set up process, you will need to inspect the locations where you intend to locate the equipment and ensure that you have sufficient free network points available.
If you find you do not have the necessary number of network points available, you may need to consider obtaining a network switch, also known as a hub. This is a device which expands the number of network ports available, similar to how a power socket extension lead provides additional power points. Basic network switches are relatively inexpensive and widely available. Also consider if you may need any additional, or longer, ethernet cables, to be able to locate the equipment in the positions you require.
Be aware that if you plan to use the Paymentsense integrated card processing solution with Cloud POS, you will also require a network port for each card terminal, as these also connect directly into your network and not via connection to a PC or Mac.
Finally, keep in mind that on most network switches, one port will be used to connect the switch to your network, so a 5-port network switch, for example, will only actually provide four free ports.
Are you replacing a milestone printer?
If you are replacing milestone-based receipt and label printers, note that the milestone servers are not required with the Cloud printers - you can set the milestone units aside as they are not needed when you are using Cloud printers.
Once you have set up your new hardware as per the instructions below, you will need to change the printer types in the Cloud POS Back Office.
Navigate to Setup and then Registers & Barcode Label Printers, then click Edit next to the device you wish to update. Under the Printer Settings section, you need to make the following changes using the dropdown menu:
Receipt Printers: Change from 'Aures With Milestone' to 'Star CloudPRNT'
Barcode Label Printers: Change from 'Zebra Label Printer' to 'Star CloudPRNT Label Printer'
HARDWARE
Each standard till system comprises of the following:
- Cash Drawer
- Receipt Printer
- Barcode Label Printer
- Barcode Scanner
- 2 x Ethernet Cables
- 1 x Till Roll
- 1 x Roll of Labels
Use the following instructions to get set up and ready to go.
NOTE: Ensure that the power supply to the devices is switched off while working through the setup process.
Cash Drawer
- Remove the Cash Drawer from the box;
- The Cash Drawer does not need to be connected to a power supply;
- Ensure that you have the cash drawer keys. You will find these in a bag attached to the back of the unit. Keep these in a safe place, as replacements are not available.
Receipt Printer
- Unclip the black panel from the back of the unit to uncover the cable ports;
- Locate the single cable from the rear of the Cash Drawer and plug it into the port labeled Cash Drawer/Buzzer, located on the back of the Receipt Printer;
- One of the Ethernet Cables should be plugged into the port labeled LAN. The other end should be plugged into your Internet Switch/Router, thus connecting the printer to the internet;
- The AC Adaptor plugs into the socket labeled DC 24V;
- Ensure that the electricity is switched off at the wall and then connect the printer to a power supply.
The image below shows the correct cable routing into the back of the Receipt Printer:
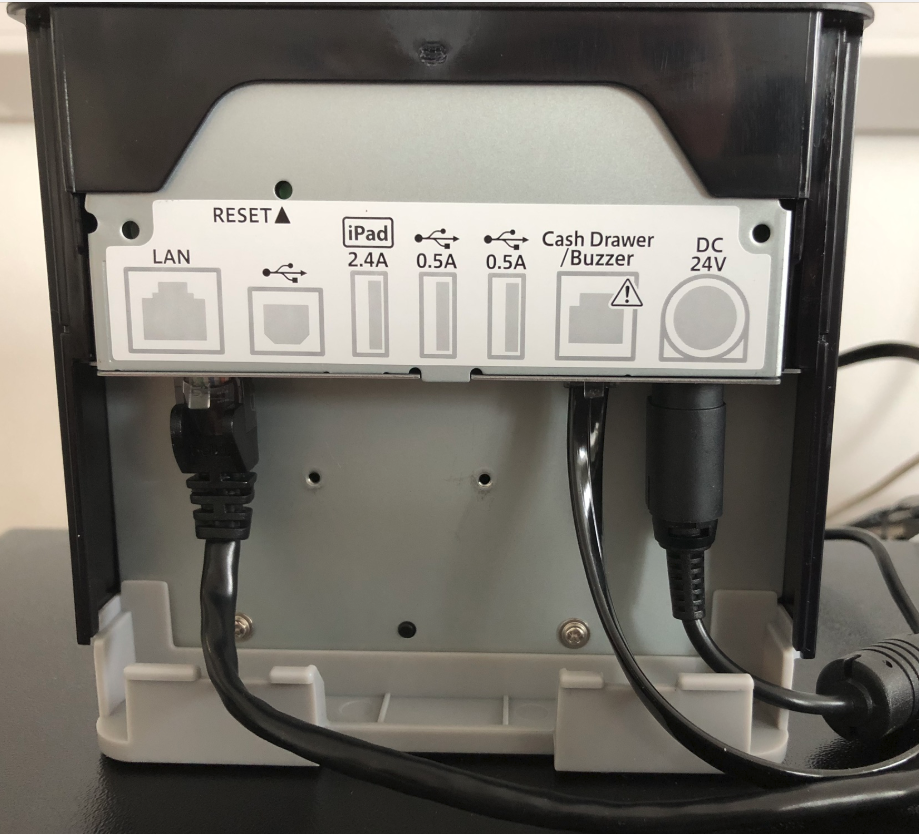
Once you have connected your printer as shown, press the power button to turn it on.
The power light should show in blue.
After a few seconds, you will then see the network light flashing green. This means the printer is establishing a connection to your network.
Once the light is solid green, your printer is ready to use. We would recommend printing a quick test receipt. To do this, you could process a transaction for a 0.00 value miscellaneous item.
Please Note
Your Cloud POS hardware will only work with your live Cloud POS group, and not your demo group. You will need to be logged into your live Cloud POS group in order to test the hardware.
If you do not have a solid power light (blue) and a solid network light (green) after one minute, please refer to this troubleshooting article: How do I troubleshoot my Star receipt printer?
Barcode Label Printer
- Using the second Ethernet Cable, connect the Barcode Label Printer to your Internet. See the image below to find the location of the port on the printer. The other end of the cable connects to your Router/Switch
- Ensure that the electricity is switched off at the wall and then connect the Barcode Label Printer to a power supply, using the AC Adaptor
The back of the Barcode Label Printer:
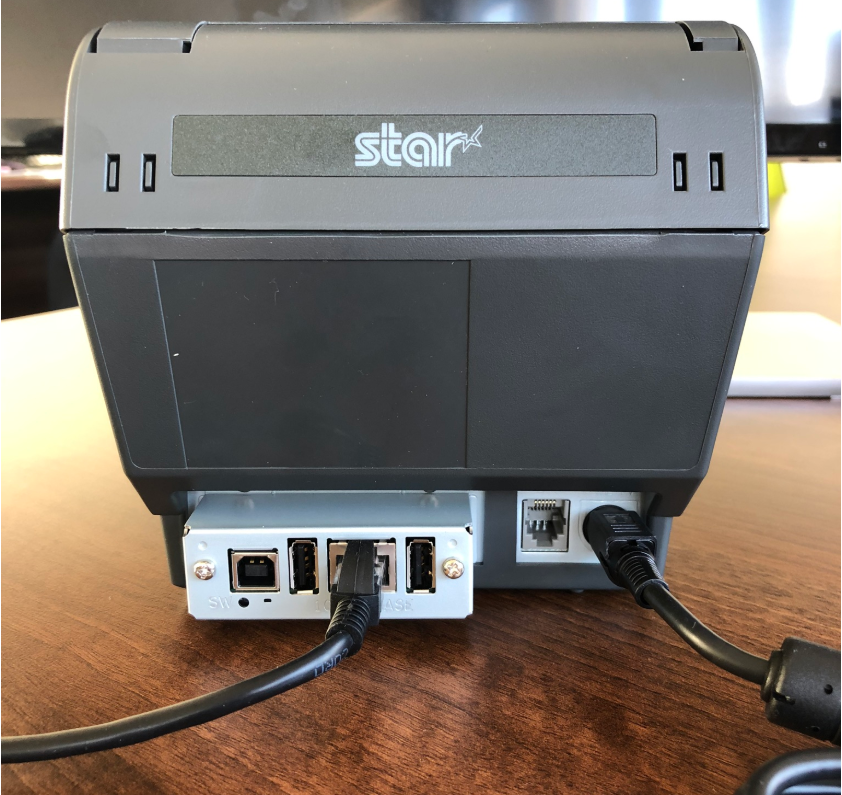
Once you have connected the printer as shown, use the power switch to turn it on.
The power light, on the left, should be a solid green.
The error light, on the right, should be off. If this light is orange or red, please refer to this troubleshooting article: How do I troubleshoot my Star barcode label printer?
We would recommend printing a test label. To do this, navigate to any Standard item record in the Cloud POS Back Office. Click into the ‘Labels’ tab. Print one or two test labels for the item. If you need further guidance on label printing, please refer to this article: How to Print a Price Label for an Individual Item
Please Note
Your Cloud POS hardware will only work with your live Cloud POS group, and not your demo group. You will need to be logged into your live Cloud POS group in order to test the hardware.
Barcode Scanner
- The Barcode Scanner connects to any available USB Port on your PC.
All your hardware has been tested and quality checked by our Hardware Team prior to being shipped. However, should you run into any difficulties during the setup process, please contact our Support Team via phone or Live Chat and we will be happy to assist.