This article explains how to sell, redeem and check balances for gift vouchers in Cloud POS.
If you have a Citrus-Lime Ecommerce site, customers are also able to buy and redeem gift vouchers online. If they wish, they can use part of their voucher balance on the website and part of it in-store.
This article covers the following topics:
- Setting up your voucher scheme
- Selling gift vouchers in-store
- Redeeming gift vouchers in-store
- Checking a gift voucher balance
- Processing a gift voucher purchased online
Setting up your voucher scheme
1) In the Cloud POS Back Office, navigate to Setup > Configuration.

2) Click on the Voucher Scheme tab.
3) Click Create My Voucher Scheme:

4) Choose your voucher expiry time. You can use the buttons on the screen, or type a custom number of days into the Expiry Time field.

5) Click Create Scheme.
6) You will see confirmation that your voucher scheme has been created. The following items will also have been created in your Cloud POS database:

These items cannot be edited from their item cards. However, you can edit voucher items via the Item Detail Wizard, with the exception of the Tax Rate, which cannot be edited.
You are now ready to begin selling gift vouchers in Cloud POS.
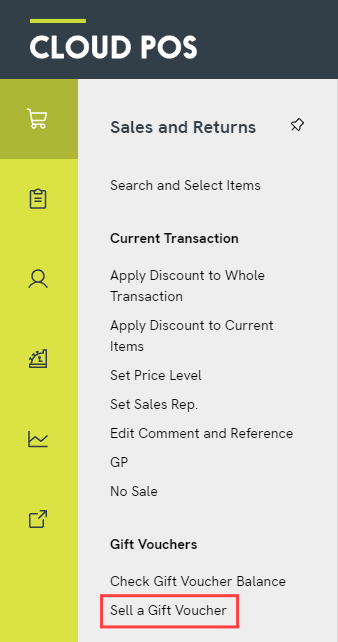
Selling gift vouchers in-store
1) Open the Sales & Returns menu then click Sell a Gift Voucher:
2) You will now be asked to set the value of the gift voucher. You can click one of the quick buttons, or set a custom value in the field and click Set Item Value to continue.

You will see that the item ‘GIFTVOUCHER’ has been added to the transaction, with the Price set correctly.
If the customer would like to purchase multiple gift vouchers, repeat steps 1 and 2.
Using branded gift cards
If you have branded gift cards that you would like to use, you can assign a specific code to the voucher (instead of having Cloud POS generate a voucher code for you). Here's how to do it:
- Add the voucher to the transaction and choose the value, as above.
- Click on the GIFTVOUCHER item line to expand it, then select ‘Gift Voucher Number’.

- Scan the barcode or type the number on the card into the box that pops up, then click ‘Apply Gift Voucher Number’:

3) You now need to set a customer on the transaction. This is required for all gift voucher sales.
Setting a customer
We would recommend setting the purchaser as the customer on the transaction. This allows you to make use of the ‘Email Voucher’ option described in step 10 below.
Gift vouchers are saved on customer records in the Cloud POS Back Office. Therefore, if the purchaser gives the voucher to a friend or family member, and they lose it, the recipient would be able to contact the store, provide the purchaser's name, and this would allow you to locate the voucher code on the relevant customer record and reissue it for them.
If a customer declines to give their information when purchasing the voucher, please refer to the FAQs below.
4) Click Tender.
5) Assign the tender type that the customer is using to pay for the voucher. For more help in tendering transactions, please refer to this article.
6) Click Continue with Transaction.
7) On the Transaction Options screen, choose your receipt options.
8) Click Complete Transaction.
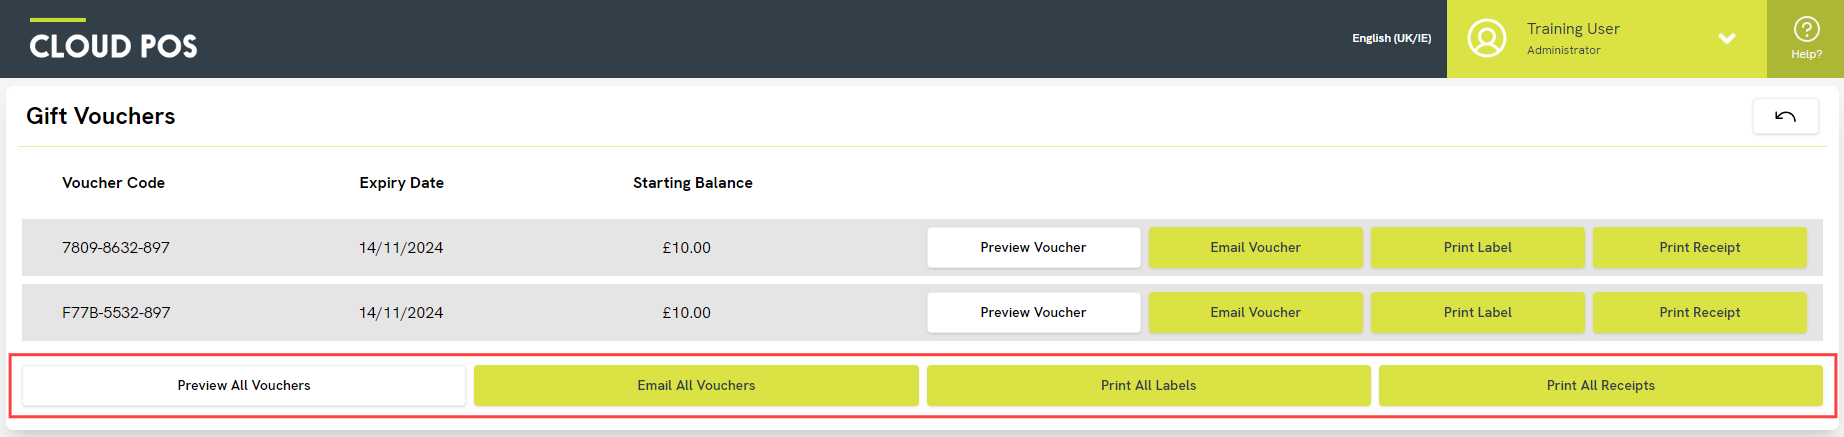
9) On the Transaction Summary screen, click View Gift Vouchers:

10) You will now see the voucher information and the options for viewing and printing the gift voucher for your customer.

- Preview Voucher: This will open a full-size voucher in a new tab of your browser. You could print this to a full-size printer if you have one in store.
- Email Voucher: This will email that full-size voucher as a PDF attachment to the customer set on the transaction.
- Print Label: This will print the voucher code and a scannable barcode onto a label from your Star label printer. You could then attach this label to a pre-printed flyer or card, to give to the customer.
- Print Receipt: This will print the voucher information from your Star receipt printer.
You can select multiple options if needed. For example, you might use ‘Print Label’ to give the customer a voucher card, but also use ‘Email Voucher’ to provide them with a back-up copy.
If the customer has purchased multiple vouchers, you will also see a row of buttons allowing you to apply the same action for all vouchers on the transaction:
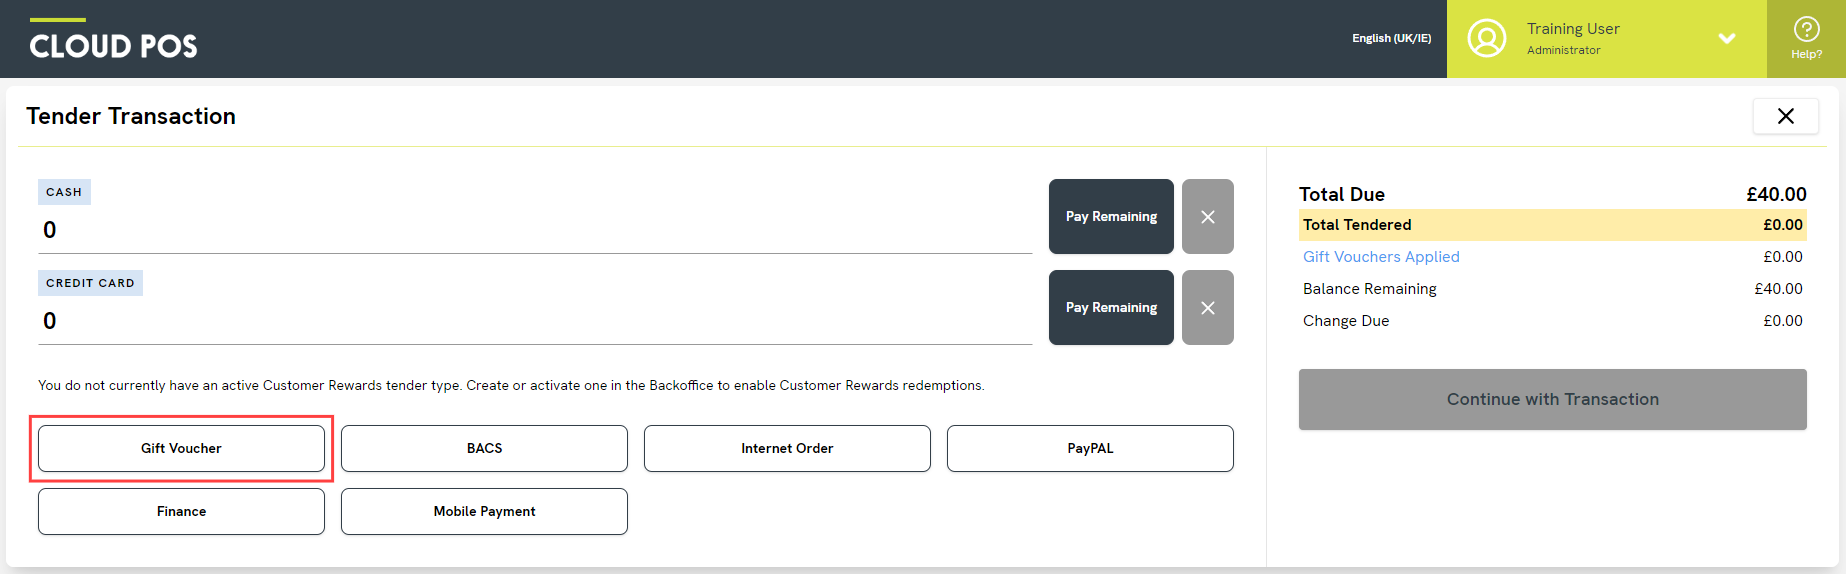
Redeeming gift vouchers in-store
When a customer visits the store and would like to use a gift voucher as part of their purchase, follow these steps.
1) Add the item(s) as usual. Setting a customer is optional.
2) Click Tender.
3) On the Tender Transaction screen, click the Gift Voucher tender type:
4) This will open a window where you can either scan or type in the customer's voucher code. By default, the total due for the transaction will show in the ‘Enter Value to Redeem’ field. This means Cloud POS will redeem as much as it can from the remaining voucher balance. If the customer wishes to redeem less than this amount from the voucher, you can amend it.
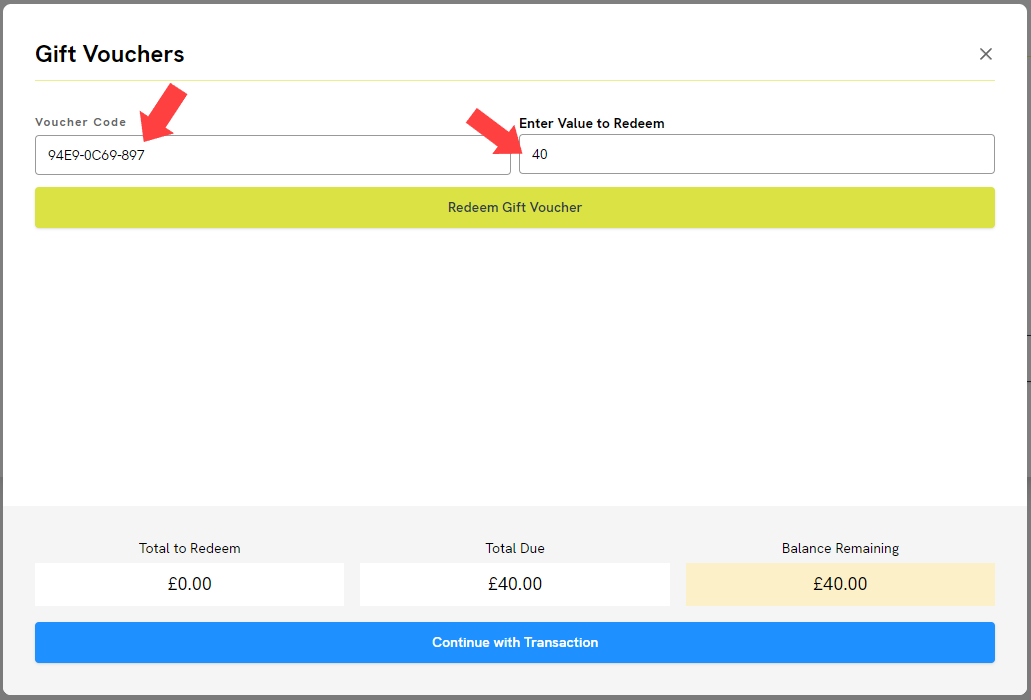
5) Click Redeem Gift Voucher to apply the voucher to the transaction.
6) You will then see the voucher code and the value that has been redeemed. If the customer would like to use another voucher, repeat steps 4 and 5. You can also cancel a voucher redemption using the red bin icon. Click Continue with Transaction when you are ready to proceed.
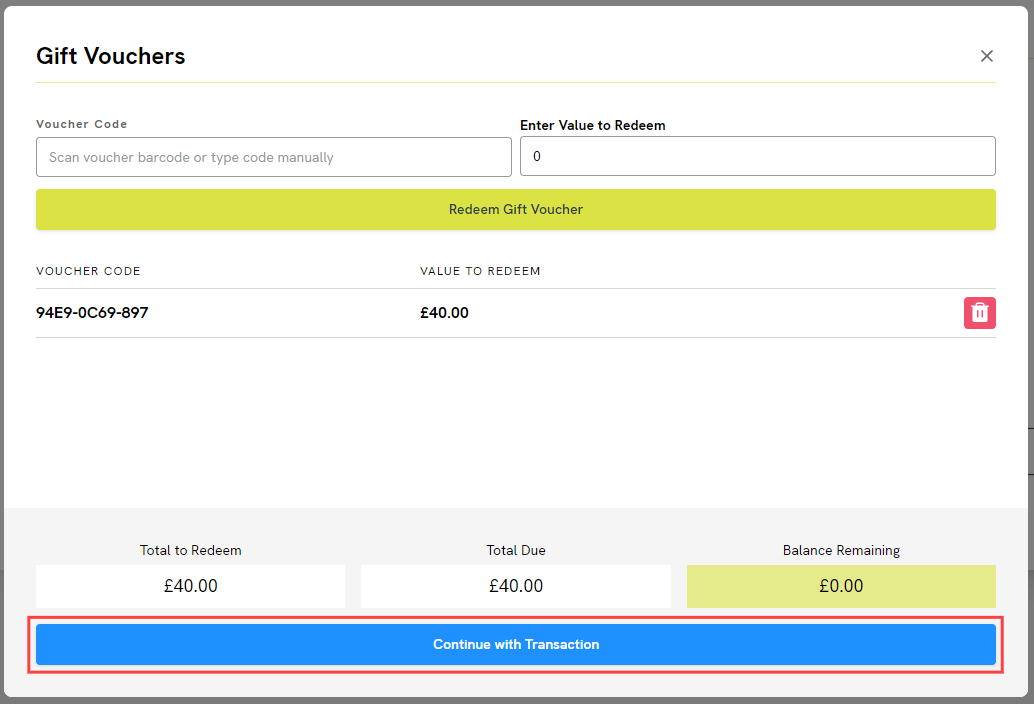
7) If the customer needs to ‘top up’ their voucher payment with another tender type, you can assign that amount using the Pay Remaining button(s).
8) Click Continue with Transaction.
9) Choose your receipt options on the Transaction Options screen.
10) Click Complete Transaction to finish.
Checking a gift voucher balance
You can check the balance of a gift voucher in the Point of Sale at any time.
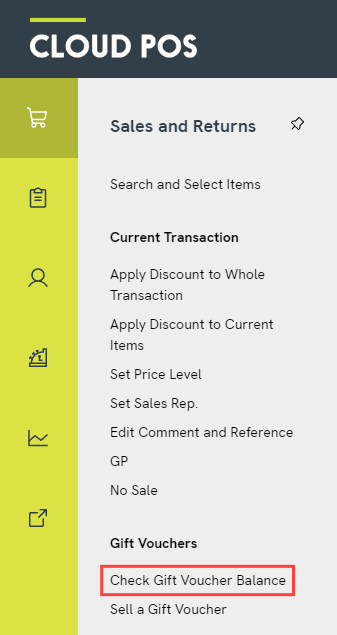
1) Open the Sales & Returns menu then click Check Gift Voucher Balance:
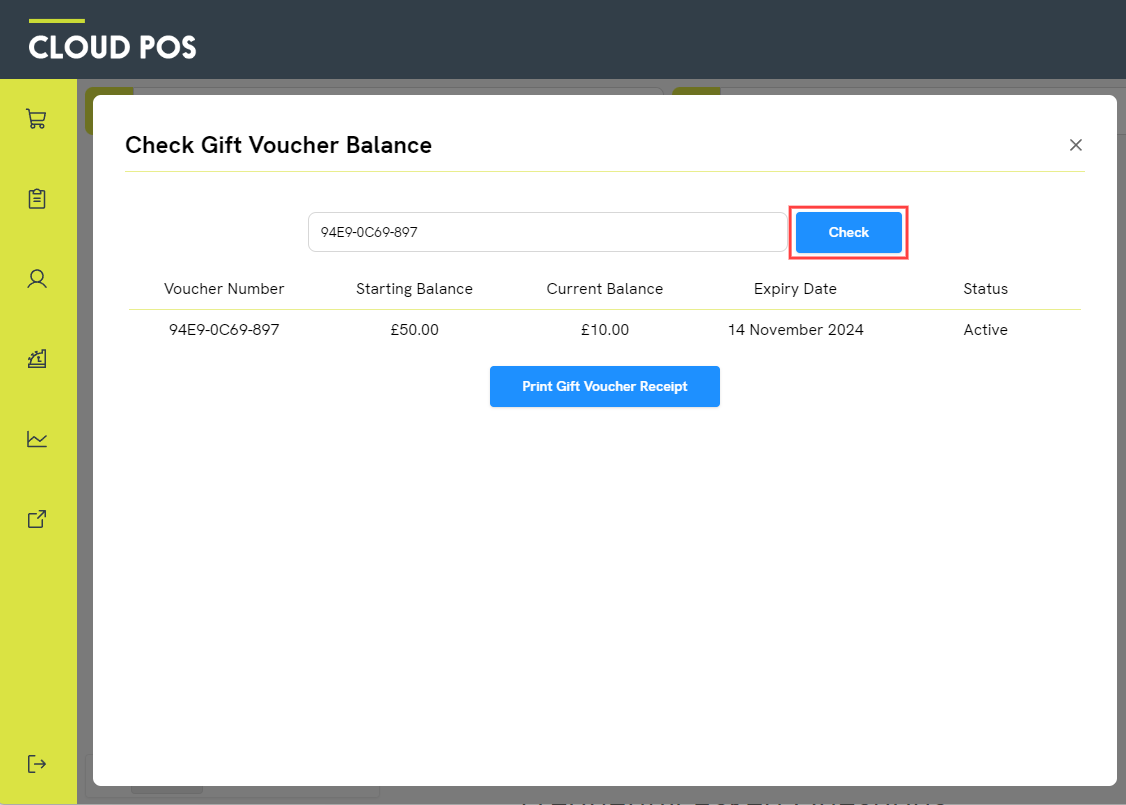
2) This will open a window where you can scan or type in the voucher code. Click Check to reveal the voucher information. You can also click ‘Print Gift Voucher Receipt’ to print a 40-Col receipt with this information for your customer.
Processing a gift voucher purchased online
You can sell gift vouchers of three different values on your Ecommerce site: 10.00, 20.00 and 50.00. For instructions on setting up these items online, please refer to this article: Cloud MT // How do I sell & redeem Cloud POS Gift Vouchers on my ecommerce site?
When a customer purchases one or more gift vouchers online, the voucher(s) they have purchased will automatically convert into the ‘GIFTVOUCHER’ item when the order downloads. Here are some examples:
Customer purchases ‘GIFTVOUCHER_CLOUDPOS20’ online > converts into ‘GIFTVOUCHER’, priced at 20.00
Customer purchases 2 x ‘GIFTVOUCHER_CLOUDPOS50’ online > convers into ‘GIFTVOUCHER’, priced at 100.00
Customer purchases ‘GIFTVOUCHER_CLOUDPOS10’ and ‘GIFTVOUCHER_CLOUDPOS20’ online > converts into ‘GIFTVOUCHER’, priced at 30.00
They will not receive their voucher code until you have tendered their order in the Point of Sale. Follow these steps to process the order.
1) Recall the order into the Point of Sale. You will be offered the option to ‘Scan Items for Pick-Up’. If the customer has purchased other products, beside the gift voucher, you may wish to use this screen. Otherwise, click the cross, top-right, to close.
2) Select the required items for Pick-Up.
3) Click Tender.
4) On the Tender Transaction screen, the customer's tender type will be automatically populated, according to the payment method they used in the checkout. Click Continue with Transaction to proceed.
5) On the Transaction Options screen, choose the receipts you would like to generate. Click Complete Transaction.
6) On the Transaction Summary screen, click View Gift Vouchers:
7) You will now see the voucher information, which is generated automatically by Cloud POS, and the options for viewing and printing the gift voucher for your customer.
- Preview Voucher: This will open a full-size voucher in a new tab of your browser. You could print this to a full-size printer if you have one in store. This is more likely to be used for Click & Collect purchases.
- Email Voucher: This will email that full-size voucher as a PDF attachment to the customer set on the transaction.
- Print Label: This will print the voucher code and a scannable barcode onto a label from your Star label printer. You could then attach this label to a pre-printed flyer or card, to give or send to the customer.
- Print Receipt: This will print the voucher information from your Star receipt printer. This is more likely to be used for Click & Collect purchases.
You can select multiple options if needed. For example, you might use ‘Print Label’ to produce a voucher card to send in the post, but also use ‘Email Voucher’ to provide them with a back-up copy.
Frequently Asked Questions
Can I set my vouchers to have no expiry date?
This is not possible, but you could set a very long expiry time for the scheme, for example 9999 days. This is the equivalent of over 27 years of validity. This expiry time is set on the ‘Setup’ > ‘Configuration’ page in the Cloud POS Back Office.
If a voucher expires, and you'd still like to honour it for the customer, you can simply adjust the expiry date on that voucher. First, find the voucher on the customer's record in the Cloud POS Back Office. (If you are not sure which customer the voucher is attached to, you could use the ‘All Gift Vouchers Report’ in Cloud Reports to search by the voucher code.) Once you have opened the correct customer record, click into the ‘Gift Vouchers’ tab. You will then see the option to ‘Adjust Expiry'.

What should I do if a customer doesn't want to provide their details when buying a voucher in-store?
You could use a generic customer record for this purpose. For example, the first name could be ‘Gift’ and the last name could be ‘Voucher’. You can then use this customer record if anyone declines to give their details when making a voucher purchase.
Can I customise the design of the full-size gift voucher?
At the moment, no. This full-size gift voucher, viewed when you click ‘Preview Voucher’, is generated from a standardised template. You can customise it with your store logo by uploading a logo to the ‘Setup’ > ‘Stores’ page in the Cloud POS Back Office.
However, we will be introducing multiple templates and customisation options for gift vouchers in future Cloud POS releases.
Can I sell other voucher values online, beyond the 10.00, 20.00 and 50.00?
It is only the Item Lookup Codes ‘GIFTVOUCHER_CLOUDPOS10’, ‘GIFTVOUCHER_CLOUDPOS20’ and ‘GIFTVOUCHER_CLOUDPOS50’ that will automatically convert into the ‘GIFTVOUCHER’ item when the order downloads to Cloud POS. If you would like to create other voucher amounts for your Ecommerce site, you can do this by creating additional non-inventory items and pricing them accordingly. However, your team would need to manually swap the purchased item for the ‘GIFTVOUCHER’ item when tendering the orders, so that a voucher code is created at tender. There is the potential for errors here.
Remember your customers can still purchase other values of vouchers by combining the amounts that are already available. For example, to purchase a 100.00 voucher, they can purchase two 50.00 vouchers in the checkout. These will be combined into a single 100.00 ‘GIFTVOUCHER’ when the order downloads to Cloud POS.