1) There are two ways to set up a Workshop Job in the Point of Sale.
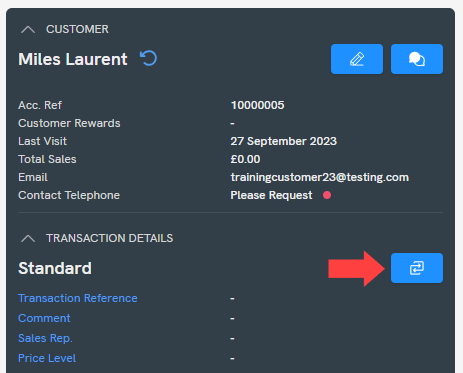
a) Click the Change Transaction Type button in the transaction summary panel:
OR
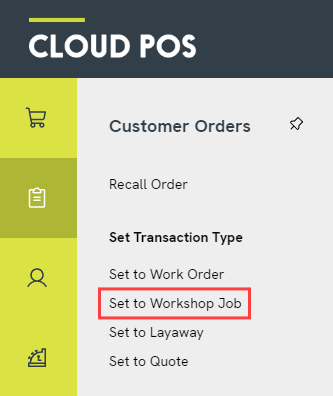
b) Click into the Customer Orders menu and click Set to Workshop Job in the list:
2) Once you have chosen your transaction type, you will see a window prompting you for some details about the job.

You can complete these options as fully as you like. These are not required fields.
Set Reference: A reference is a title for your Workshop Job. You will be able to search for the job by its reference. You might want to provide a brief job summary, such as ‘Bronze Service - Diverge Elite'. Alternatively, you might have your own system for creating order references, such as using a particular abbreviation at the start.
Set Order Status: The default order status is ‘None’. Choose one of the other options from the dropdown if required – you can create your own order statuses in the Back Office. The statuses are shown in the transaction summary panel on the Point of Sale screen. You will also be able to filter by order status when viewing your full order list in the Cloud POS Back Office, and there are icons and columns for different statuses in the Workshop Module.
Set Due Date: This is the date by which you aim to complete the work for the customer. It does not need to be the exact day the service team will complete the work. You will be able to filter by due date when viewing your full order list in the Cloud POS Back Office, and there is an icon for overdue jobs in the Workshop Module.
You can set the due date using one of the quick date buttons (Today, Tomorrow, +3 Days etc.), or click on the date to expand a calendar view.
Service Item: Once you have set a customer for the Workshop Job, you can set the make and model of bike that the job relates to. This allows you to build a service history for the bike within the customer's record and also allows you to schedule future service reminders. For more guidance on these features, please refer to the following article: How do I use the Service Items functionality?
Storage Slot: You can specify the location in the store or the workshop where this bike is being kept, e.g. Hook 1, Middle Shelf (Blue Racking).
Tick box if customer is dropping off items for workshop job now: Ticking this box will mark the bike as ‘checked in’. There is an icon for this in the Workshop Module, so that the service team can see which bikes are in the store ready for action. Marking a bike as ‘checked in’ also prevents any further booking reminders from sending to the customer.
Tick this box if you are planning to build or P.D.I. a new bike: Ticking this box will categorise the job as a build / Pre-Delivery Inspection. There is an icon for this in the Workshop Module.
Set Comment: Comments can be used to make general notes about the job. For example, if the customer has discussed a particular concern about their bike, or if they have asked to delay their collection date due to a holiday. Comments will be printed on the receipts related to the Workshop Job. If you need to make notes for internal access only, you can use the Order Notes instead.
3) Once you have entered the required order details, click Apply and Close.
4) You will return to the Point of Sale screen. Make sure that you have set a customer and added the required item(s).
5) You can choose if you would like to take a deposit. This is optional.
Would you like to take a deposit?
Please refer to the following article for guidance: How do I take a deposit for an order? Once you have entered your deposit amount, the ‘Save Order’ button will change to ‘Tender’, so that you can take the deposit payment from your customer.
Click ‘Tender’ once you are ready to proceed.
Once you have added the item(s) to the order, set the customer and entered any required order details, click ‘Save Order’.
6) When saving a Workshop Job, you will proceed to the Transaction Options screen, so that you can print and/or email receipts to your customer, if required. You may wish to print a receipt to attach to the bike.
7) On the final Transaction Summary screen, you will see the option to Preview Full Size Invoice, if required.
The Workshop Job will appear in the Workshop Module and will await scheduling by the staff responsible for managing the workshop calendar.
The following articles cover subsequent Workshop Job processes: