
How often are you interrupted by the phone ringing? It’s great when customers call for a bike service, but having to stop what you’re doing to book in the job can be a pain.
It’s inconvenient for your customers too. They have to remember to call during open hours, maybe nipping out from work just so they can book their bike in.
That’s why we’ve created an easy online workshop booking feature called Book My Bike In.
Book My Bike In reduces the number of interruptions and makes it easier for your customers to book a service. It’s convenient, cuts out admin and gives you flexibility and control.
What do I need?
You'll need a Workshop Module license for each store you would like to include on the Book My Bike In platform.
Please contact our Success Team if you would like to add a Workshop Module license to your Cloud POS group.
You will also need the Workshop Labour item with item lookup code 00000 active in your Cloud POS database:

NOTE: This is a default item in Cloud POS, but you should still check to confirm it is present and active in your database.
When you've confirmed you have a Workshop Module license and the Workshop Labour item is present in your database, please contact Citrus-Lime and let us know which stores you would like to be included on Book My Bike In.
Setting up Book My Bike In in the Back Office
There are several sections to complete in the Back Office. The information you provide here will help your customers with general information about your workshop locations, the services you are able to offer, and what's included in the work you carry out.
Adding your workshop details
The first section to complete is to provide details about the workshop facilities you have available.
This is done on a store-by-store level, so if you have more than one store you can be specific about what's available at each location.
From the side menu in the Back Office, expand the Workshop heading, then click on Workshop Configuration.

Click on the store you wish to set up, and you'll see four separate sections on this page. The one we're interested in is the Book My Bike In – Workshop Details And Features section, but I'll briefly cover the others as well.
Workshop Work Hours
In this section, you set the hours that your workshop is available to accept bookings, and whether staff can schedule jobs outside of those hours.
The Workshop Work Hours section isn't used by Book My Bike In. Instead, the platform uses the store opening hours, since customers using Book My Bike In are only scheduling a date to drop off their items for service, not choosing when their items will be worked on.
We've got a guide on how to set your Workshop Work Hours here.

Workshop Scheduler Hours
These hours are used to set the start and end times on your Workshop Module scheduler i.e. the visible hours when jobs can be scheduled. You'll want this to reflect your earliest start time and latest end time from the Workshop Work Hours (see above).

Workshop Booking Reminders
To reduce the chance of missed appointments, you can use this section to send email and SMS booking reminders to your workshop customers a certain number of days prior to the date they'd arranged to drop off their items for service or repair.
In the example below, we have opted to send workshop booking reminders two days before the booking:

NOTE: Workshop Booking Reminders are enabled by default. They will be sent for all workshop jobs which are not marked as 'Checked In', not just those created via Book My Bike In.
Book My Bike In – Workshop Details and Features
Here you can use the Mechanic Count field to provide information about the number of mechanics working at the store.
The Extended Description section allows you to add some general information about the workshop at this location.

Anything you add in Workshop Features will form a list on the store's detail page on Book My Bike In, which shows what is or is not available at this location's workshop.
If you leave the Is Included? tickbox blank, this will create an entry in the list that shows something which is not available at this workshop.

The screenshot below illustrates how this would be presented on Book My Bike In:

When you've updated the information on this page, remember to click Save Pending Changes in the bottom right of the screen.

Manage your Online Workshop Services
Now you've completed the details which give customers an overview of your workshop, the next stage is to create the services which they'll be able to book online. Setup is a two-part process.
Firstly, you create the services you will offer for online booking, and you decide at which stores you will offer the different services.
Secondly, you specify what is included in each service.
From the side menu in the Back Office, expand the Workshop heading, then click on Workshop Services:

To create a service, click the blue New button in the Workshop Services section.
You now need to complete the following fields:
Service Title: The name you wish to give this specific service.
Price: How much you charge for this service.
Active: Ticking this box will mean this service appears as an option on Book My Bike In. The service will not display if this box is unticked (so, by unticking this box you can remove a service from Book My Bike In, if you need to do so in future).
Description: In this section, give a brief outline of this service. You don't need to specify here what tasks the service includes.

Click Save to save this service, and the panel will expand to let you choose which stores have this service available (it will automatically tick every store that's registered for Book My Bike In):

You can click on the blue pencil icon next to any store and select or deselect the Service Available checkbox, depending on whether you want to display that particular service as being available at that location.
You can now repeat the above process for each service you intend to offer. The image below gives an example of how you might set this up:

Once you've created the different services you intend to offer, you can now move on to adding information about what each service does or does not include.
Click on the Workshop Service you want to start working on to highlight it, then in the section titled Workshop Service Features, click on New.

You now need to complete the following fields:
Description: Add an individual task that makes up part of the overall service.
Display Order: This dictates where in the list you would like the task to appear. 1 is at the top of the list.
Is Included?: Ticking this box means this task will display as being included in the service. Leaving it unticked will indicate it is not part of the service.

Click Save to save this service feature.
Continue with this process until you have added all the tasks that make up this particular service, and anything you want to specify is not included.
Here's an example:

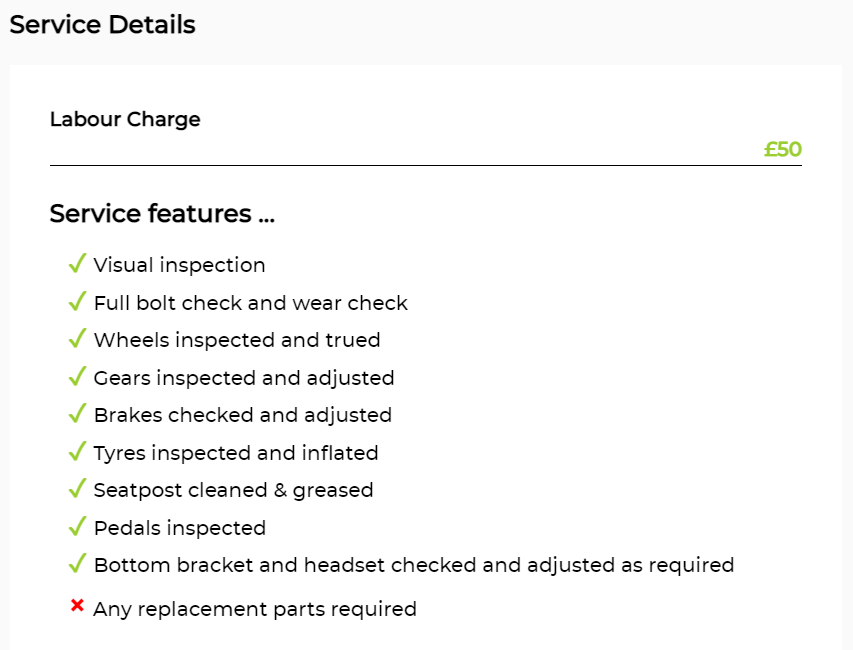
We can see in the example above, we have listed what is included, and also added an entry which indicates that any replacement parts required are not included in the cost of the service.
When this service is viewed on Book My Bike In, it would be displayed as below:
You now need to repeat this process for each of the different services you created in the Workshop Services section of the grid.
Here's an example of how a completed set of workshop services may look:

In this selected example, we are looking at the Gold Service and we can see what features are included (and not included) in the service.
NOTE: On smaller screens, the Workshop Service Features section may appear below the Workshop Services section, instead of to the right.
Setting up in the Workshop Module
If you've followed this guide from the beginning, then you'll have set up your workshop information and created the different workshop services you wish to offer on Book My Bike In.
The final step is to set a lead time for workshop bookings made via Book My Bike In, and how many jobs you're willing to accept through the platform per day.
This is done within Cloud POS Workshop. Access the Workshop for the store you want to set up, then click on the Book My Bike In Settings tab:

You'll be able to see the configuration options that are currently in place. Please note that you cannot amend these settings unless you have Administrator level access in Cloud POS.
You can now specify the following:
Lead Time in Days: This dictates the Next Available Date, which is the soonest date a customer can book an item to be serviced.
At busy periods, you may wish to increase the Lead Time in Days to reflect your team's availability.
Max Drop-Offs Per Day: The maximum number of drop-offs per day that you wish to accept through Book My Bike In.
Dates will be unavailable to select for drop-off in Book My Bike In if the max number has been reached for that date.
The Next Available Date will be calculated based on the lead time against the store, and then the date will be incremented if the max number of drop-offs has been reached on the following days.
If any dates are unavailable because the max number of drop-offs has been reached, this will be displayed:

Click Save if you have made any amendments to the details.
These controls only affect workshop bookings made through Book My Bike In. They do not have any effect on the lead time or the number of workshop bookings you manually create in the Point Of Sale.
You can also adjust these settings as often as you required, and that in turn will update on the Book My Bike In site.
So, for example, if you have a busy period and your workshop calendar is looking full for the next couple of weeks, you can extend the lead time or reduce the number of bookings per day (or both) to ensure that you can manage the workload.
Locating these settings in the Workshop Module itself allows each workshop to have a degree of control over the workload, and react to the number of workshop bookings in the calendar at any one time.