Payment Links allow you to generate a link from the Point of Sale for the partial or full value of a transaction (or customer order) and share this link with your customer by text or email. Your customer can then follow the link and make the payment. This allows them to pay remotely anytime, anywhere.
You will receive an SMS / text message in the Point of Sale to notify you that payment has been made. You will also be able to see the payment status in the CitrusPay Payment Link History page in the Cloud POS Back Office.
You can then tender that payment against the transaction/order, using a Tender Type of your choice.
Or, if you prefer, you can set up Payment Links so that when the customer makes the payment, those funds will be automatically assigned to that customer's account as credit. You can then tender the order/transaction through to the customer's account, even if they don't have an Account Type set in the Back Office. If you'd like to set this up, you can follow the steps in this guide:
What is Payment Link Auto-Assignment and how do I use it?
Skip to a section…
- Setting up your SMS message template
- Creating a Payment Link in the Point of Sale
- What will my customer see? (including customisation)
- Receiving payment notifications and tendering the amounts
- Managing Payment Links in the Cloud POS Back Office
- Frequently Asked Questions
Not a CitrusPay user?
If you are not already a CitrusPay user in store or online, you can still use Payment Links, but we will need to create a CitrusPay account for you.
Please note that the fees for any Payment Link transactions may differ from the fees on your in-store card terminal and/or your Ecommerce site.
If you are interested in this setup, please contact the Support Team.
Setting up your SMS message template
You can set a default SMS message template for Payment Links in your store configuration. This message will pre-populate the SMS field each time you share a Payment Link, saving time and helping to reassure your customers that the link is genuine.
1) To set this up, go to Setup in the Back Office, then Stores.

2) Click on the store you'd like to configure, then find the Payment Link Setup section and enter your preferred message in the SMS Message Prefix field.

You can personalise the message using placeholders, which will automatically be replaced with the relevant details when the SMS is sent. Click on one of the placeholders to add it to your message:
- First Name – the customer's first name
- Last Name – the customer's last name
- Store Name – your store name
- Value – the payment amount
The maximum message length is 255 characters.
This template is set per store
If you have more than one store, you can set the SMS message template separately for each store in its own Configuration settings.
Creating a Payment Link in the Point of Sale
You must set a customer on a transaction/customer order if you would like to use a Payment Link.
You will then see the option to Share a Payment Link, just above the Tender/Save Order button:

If the customer isn't due to pay the full value of the transaction now, we'd recommend saving the transaction as a Special Order or Layaway, so you can recall the order in future and take the remaining payment. We would also recommend setting the transaction as a Special Order or Layaway if the customer isn't likely to pay via the Payment Link straight away.
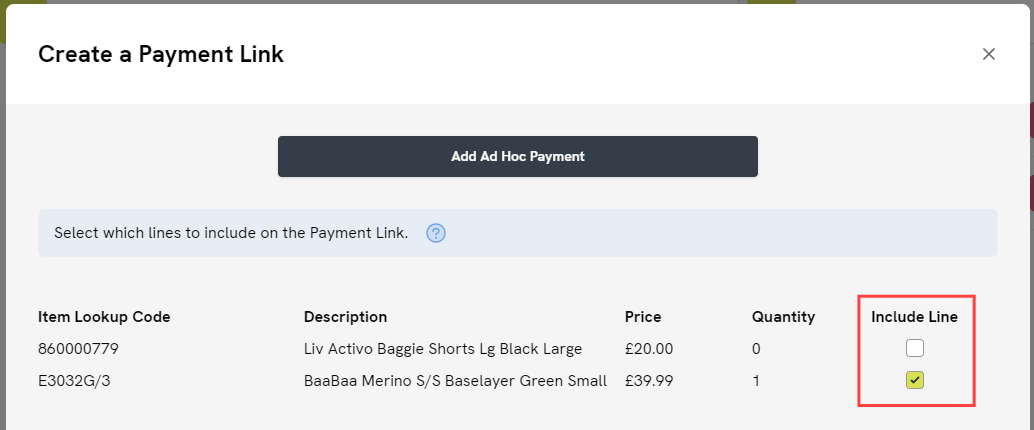
Clicking Share a Payment Link will open a window where you can select the items for the Payment Link. Use the Include Line to indicate the items you'd like to include. For example, here we are asking the customer to pay for the baselayer but not the shorts:
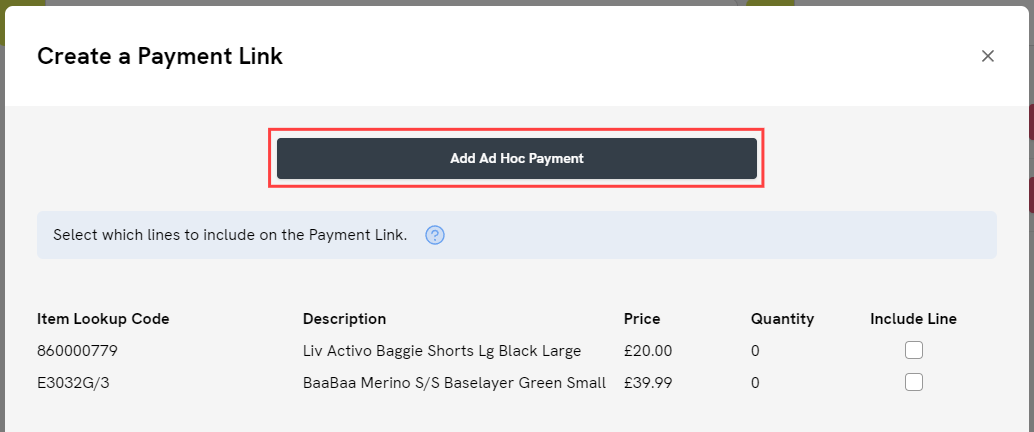
You can also use Payment Links to ask the customer to pay an ad hoc amount against the transaction/order. For example, if the customer is going to pay a deposit on their order. To do this, click Add Ad Hoc Payment:
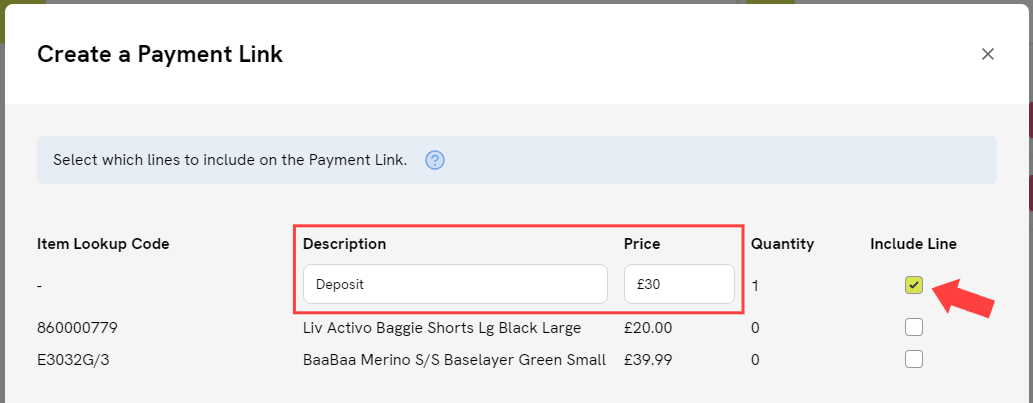
This will add a new line to the screen, where you can enter the Price for your ad hoc amount. The default Description will be 'Ad Hoc Payment', but you can rename this if you like so that it's clear to the customer when they open the Payment Link. The maximum number of characters is 250. Make sure that Include Line is ticked:
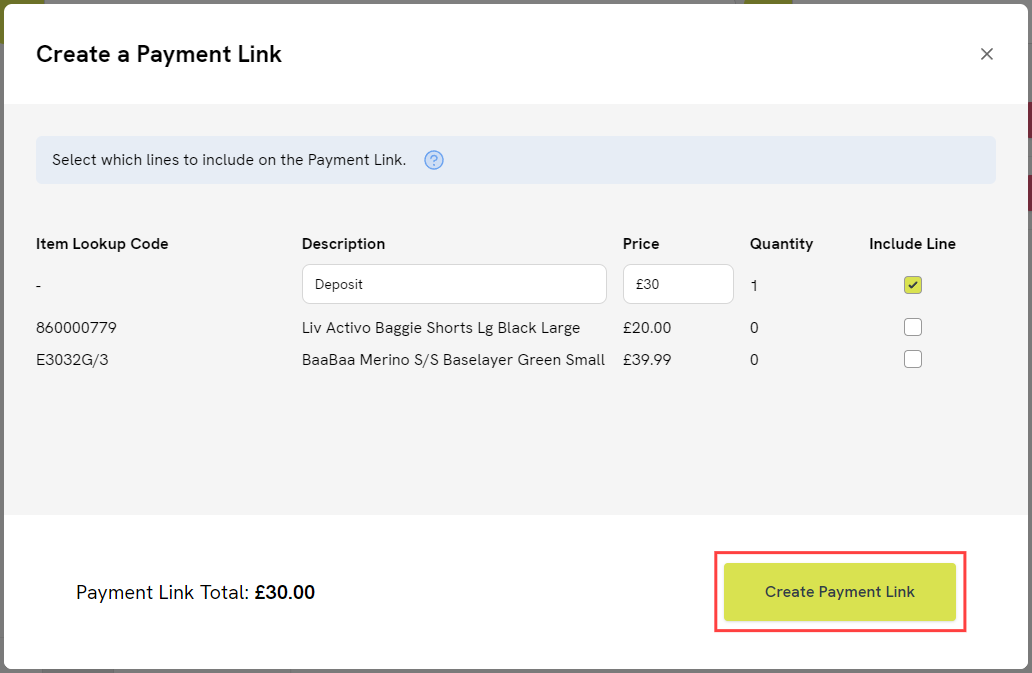
When you're ready to proceed, click Create Payment Link:
A new window will open. From here, you can either copy your Payment Link URL and share this with the customer via email, or you can click the button to Share with SMS. If you are sending via SMS / text message, the message will be pre-populated using the SMS template you have set up for your store. You can still edit this before sending if you wish:
We would recommend that you don't tender that amount against the customer's order unless they are going to pay via the link straight away. You can save the order and then recall it to record the payment once you have received confirmation that the payment has been made.
What will my customer see?
The customer can open the Payment Link in their browser. First, they will see the Terms & Conditions, which they need to accept in order to proceed.
Then they will see a grid where they can enter their card details:

Once the customer has submitted their payment information and clicked Pay, they'll see confirmation on screen if the payment has been successful.
Failed Payments
If a customer has 5 failed payment attempts against a singular Payment Link, the Link will automatically expire. This is a safety for you, the retailer, to protect against potential fraud.
If you wish, you can customise the payment screen with the following:
- your brand logo, which will display top-left
- a small ‘favicon’ image that will show in the customer's browser tab (typically your logo again)
- your store name, which will display as the payee
If you would like to add this customisation, please reach out to the Citrus-Lime Support Team via phone or Live Chat. You will need to be ready with:
- a brand logo of file type .JPG, .JPEG or .PNG, max. size 5MB
- a favicon logo of file type .JPG, .JPEG or .PNG, max. size 50kB
- the name you would like to use as the payee
If you have more than one store, you can choose to apply the same settings across all your locations, or you can provide different payee names etc. per store. Just let the Support Team know which you prefer.
Receiving payment notifications and tendering the amounts
How this works depends on whether you choose to tender your payment links manually, or if you use the payment link auto-assignment feature.
Manual Tender
There are two ways to see that a Payment Link has been paid.
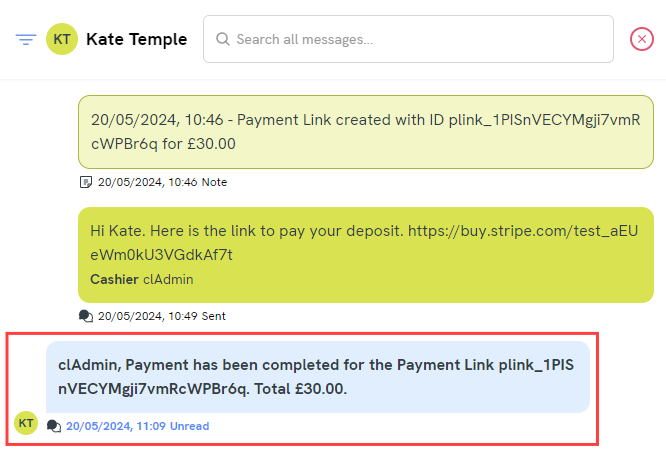
a) You will receive an SMS / text message notification in the Point of Sale:
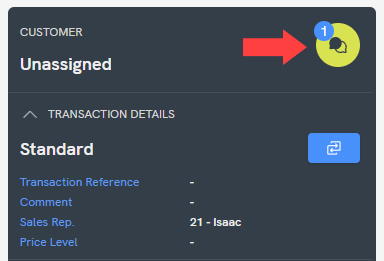
Click on this notification to see the customer that the message relates to. Click on that customer's name and you will see the confirmation message (this will also set that customer in the Point of Sale):
To quickly recall the customer's order and tender this Payment Link, click the button to the left of the 'Scan to recall open order' field:

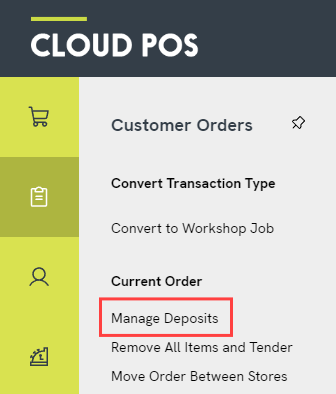
Once you've recalled the customer's order, you can tender their payment against it. If the Payment Link was for one or more items on the order, select those items for Pick Up. If the Payment Link was for a deposit, click into the Customer Orders menu and then Manage Deposits to add it to the order:
We would recommend creating a Tender Type for Payment Links, so that you can account for these separately in Cloud Reports.
Once you have tendered the payment against the order, you can click on the notification message text to change it from 'Unread' to 'Read'. You should also mark the Payment Link as complete in the Back Office — please see the next section for further guidance on this.
b) You can see when Payment Links have been paid by customers from the CitrusPay Payment Links page in the Cloud POS Back Office:

From here, you can see if a Payment Link is 'Paid' or 'Not paid':

Once you can see that the payment has been made, you can click the Order ID to recall the order in the Point of Sale, so that you can tender the Payment Link:

If the Payment Link was for one or more items on the order, select those items for Pick Up. If the Payment Link was for a deposit, click into the Customer Orders menu and then Manage Deposits to add it to the order:
We would recommend creating a Tender Type for Payment Links, so that you can account for these separately to other cash/card payments in Cloud Reports.
Funds Paying Out
Funds sent via Payment Links can take up to 3 business days to be paid out to your bank account – you can see your Payment Link Payouts on the CitrusPay Payouts page in the Back Office. We've got a guide on using this page here.
Auto-Assigned
1) You can see when Payment Links have been paid by customers from the CitrusPay Payment Links page in the Cloud POS Back Office:
2) From here, you can see if a Payment Link is 'Paid & Assigned' or 'Not paid':

3) You can also see the credit that has been applied on the Customer's account:

4) You can then recall the order and you will see the customer's Available Funds displayed in the transaction summary panel. This shows the amount of credit the customer currently has on their account.

The customer can use this credit as part or full payment for their transaction. To do this, simply tender the sale using the Customer Account tender type, the same way you would for any other store credit transaction.
Managing Payment Links in the Cloud POS Back Office
The CitrusPay Payment Link History page in the Cloud POS Back Office has lots of useful features to help you to manage your Payment Links.
1) Once you have tendered a paid Payment Link against a customer transaction/order, you can click Actions, then Mark as Complete. This will let everyone in the business know that the Payment Link has now been tendered in the Point of Sale.

Clicking Mark as Complete will also change the Requires Action? box to unchecked. You can filter this column to view Payment Links that do/do not require action in the Point of Sale. You could also click Actions, then Mark as Requiring Attention to reverse this status.
2) If needed, you can copy the Payment Link from the Actions menu on this page and resend it to the customer:

3) You can deactivate any Payment Links that are no longer needed. For example, if you created a Payment Link for a customer, but then they decided to come into the store to pay instead. To deactivate a Payment Link, click on Actions, then Deactivate. Please note that this status is not reversible — once a Payment Link has been deactivated, it cannot be used again.

Any deactivated Payment Links are hidden from the page by default. To show deactivated links, select the Display Inactive Payment Links switch above the main grid.
4) You can click on Actions, then View Security Info for any completed payments:

This will open a new window providing more information about the security checks that were carried out for your customer's card:

5) You can process refunds for payments made via Payment Links. Click on Actions, then Manage Refunds to begin this process:

This will open a new window. Here, you can set the amount to refund. The minimum refund amount is 0.01. The maximum amount will reflect the amount remaining against that payment. For example, if the customer paid 50.00, but you have already refunded 20.00, the maximum amount you can refund today will be 30.00.
Enter your chosen refund amount and click Issue Refund:

Once the refund has been processed, you will see a success message at the top of the page. The Payment Status will change to either 'Partially Refunded' or 'Refunded', depending on the amount chosen. The 'Value Refunded' column will also be updated.

You also need to record this refund in the Point of Sale
If you have created a new Tender Type in Cloud POS to tender these payments initially, we would suggest using the same Tender Type to record the refund. That will mean your overall Payment Link totals are correct within Cloud POS and Cloud Reports.
Once a refund has been issued, clicking Manage Refunds will also show any refunds that have been issued previously:

Frequently Asked Questions
Is there a maximum value for Payment Links?
There is not a maximum value for Payment Links. However, Payment Links cannot contain more than twenty item lines. If the transaction contains more than twenty items, you will need to use the option for an Ad Hoc amount.
Which Tender Type should I use for Payment Link payments?
We would recommend creating a new Tender Type for this purpose. You could call it 'Payment Link' or 'CitrusPay Payment Link', for example.
Remember that you should only create a new Tender Type when all your batches are closed.
Can I reactivate a Payment Link?
No. If you have chosen to deactivate a Payment Link in the Back Office, you cannot reactivate it again. You would need to generate a new Payment Link for the customer.
Do Payment Links have an expiry date?
Yes – unpaid payment links will expire after 30 days if they are not paid or deactivated.