La herramienta de importación de artículos permite la creación rápida y masiva de artículos en la base de datos de Cloud POS.
Esto se puede usar en situaciones como, por ejemplo, cuando necesita agregar al sistema elementos que no están disponibles a través del Módulo de integración de proveedores, o si se está mudando a Cloud POS desde otra plataforma minorista y desea incorporar su actual datos del producto.
Tenga en cuenta: la herramienta de importación de artículos debe utilizarse con cuidado. Los cambios son permanentes y no se pueden deshacer.
Prerrequisitos
Siempre recomendamos usar la plantilla de importación generada dentro de Cloud POS, ya que contiene los campos correctos que se requieren para la importación. La plantilla también se completa previamente con los departamentos y categorías, marcas y temporadas que ya existen dentro de su grupo de Cloud POS, por lo que puede seleccionar fácilmente estos campos para cada artículo que desee importar.
También recomendamos procesar las importaciones de artículos en lotes pequeños (es decir, hasta 1000 artículos), ya que esto hace que sea más manejable lidiar con cualquier error que pueda aparecer después de cargar los datos en la importación.
Generando una plantilla de importación
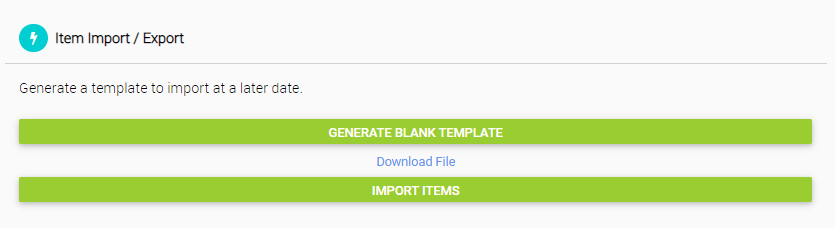
1) Desde el menú principal en el backoffice de Cloud POS, navegue hasta Crear y administrar elementos , luego Importar herramientas .
2) Debajo del encabezado Importar / Exportar artículo , haga clic en el botón para Generar plantilla en blanco , luego haga clic en Descargar archivo para guardar el archivo de plantilla en su computadora. El formato de archivo de la plantilla es un archivo de Microsoft Excel (.xlsx).
Comprender la plantilla de importación de artículos
Dependiendo del tipo de elementos que esté creando, ciertos campos dentro de la plantilla son obligatorios y deben completarse.
Para crear artículos estándar, serializados y que no son de inventario, los campos obligatorios son:
ItemLookupCode
Descripción
Departamento / Categoría
Tasa de impuesto
Proveedor

En el ejemplo anterior, la importación aquí crearía tres artículos estándar individuales.
Para crear elementos de Matrix, además de los campos obligatorios enumerados anteriormente, los campos obligatorios son:
Código de búsqueda de elementos de matriz (ILC de matriz)
Tamaño
Color
Si no está seguro de si sus elementos deben formar parte de un elemento de matriz, lea el artículo relacionado "¿Cómo creo un elemento de matriz?"

En el ejemplo anterior, la importación aquí crearía tres elementos estándar, agrupados dentro de la matriz SSTB matriz.
Una descripción / guía completa de todos los campos de la plantilla están disponibles en este PDF: itemfields.pdf
Nota: Si no se incluye un nombre de estilo, se completará a partir de la descripción.
Si bien recomendamos incluir la mayor cantidad de datos posible en la plantilla de importación de elementos, los campos no obligatorios se pueden dejar en blanco en la plantilla y los registros se establecerán con los valores predeterminados (como se indica en el PDF de campos de elementos).
Las marcas y temporadas usan selecciones desplegables basadas en las marcas y temporadas que ya existen en su grupo de POS en la nube. Sin embargo, ingresar una marca o temporada que no existe actualmente en su sistema creará la nueva marca / temporada cuando se complete la importación.
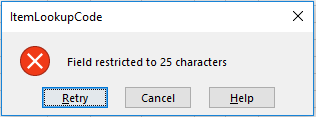
Las plantillas de importación de artículos contienen validación de datos, es decir, longitud máxima de caracteres y selecciones desplegables. Se le mostrará un mensaje de error dentro de Excel si los datos no son válidos para la importación.
Cuando haya ingresado todos los datos necesarios en la plantilla, guarde el archivo en su computadora; el formato de archivo debe ser Excel para que la importación funcione.
Importar la plantilla de importación de elementos
Una vez que haya preparado y verificado su plantilla de importación de artículos, ahora puede importar los datos al sistema Cloud POS.
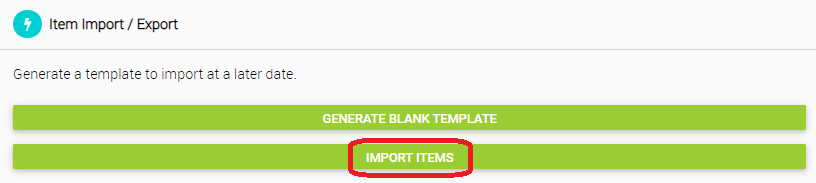
1) Desde el menú principal en el backoffice de Cloud POS, navegue hasta Crear y administrar elementos , luego Importar herramientas .
2) En el encabezado Importar / Exportar artículos , haga clic en el botón Importar artículos:
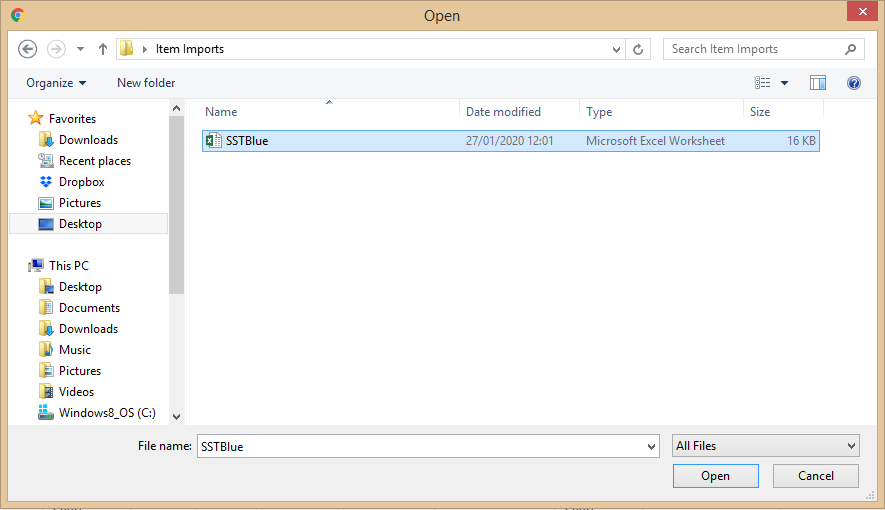
3) Haga clic en Examinar para buscar y seleccionar el archivo de su máquina local:

4) Seleccione el archivo y haga clic en Abrir :
5) Haga clic en Cargar :

6) La cuadrícula ahora se completará con los registros de elementos según su plantilla:
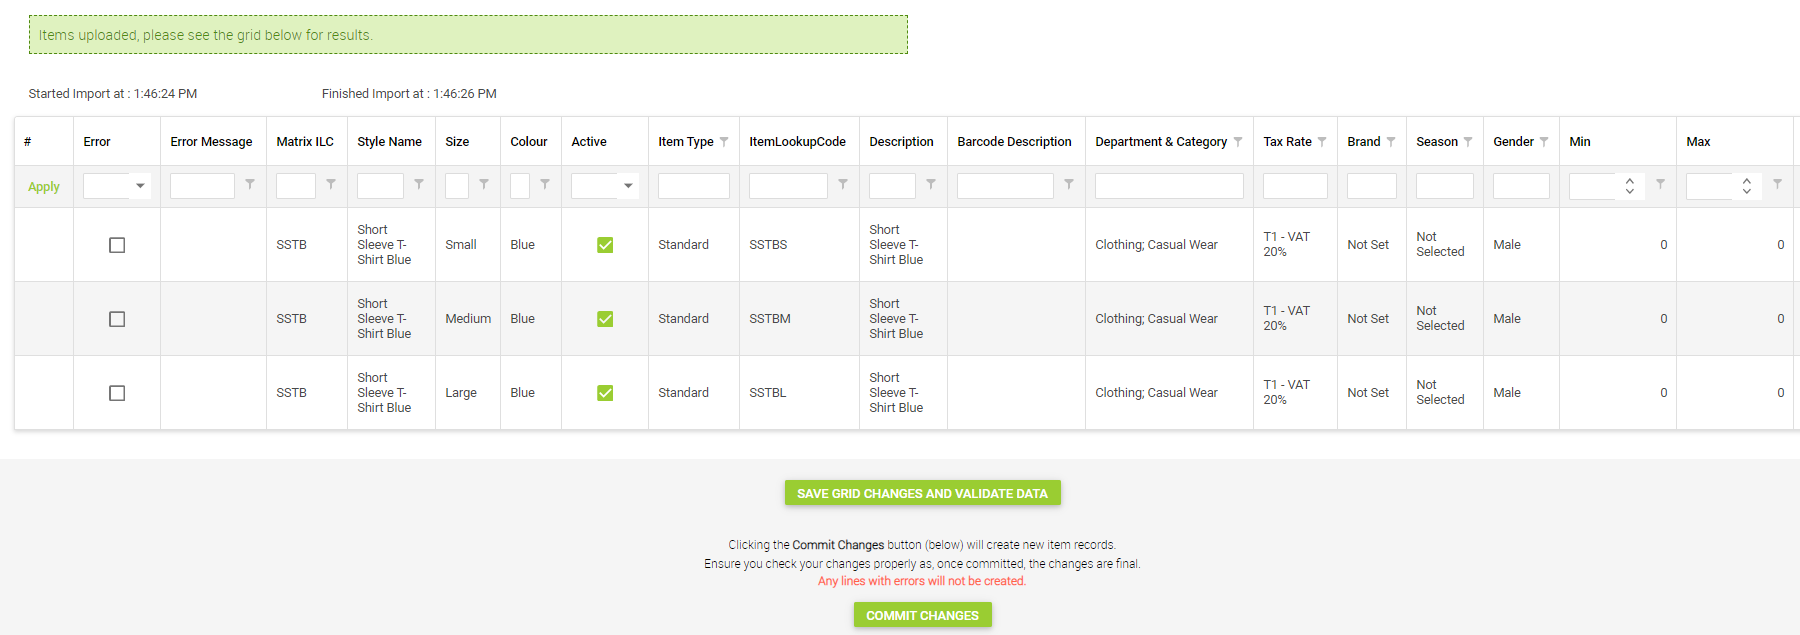
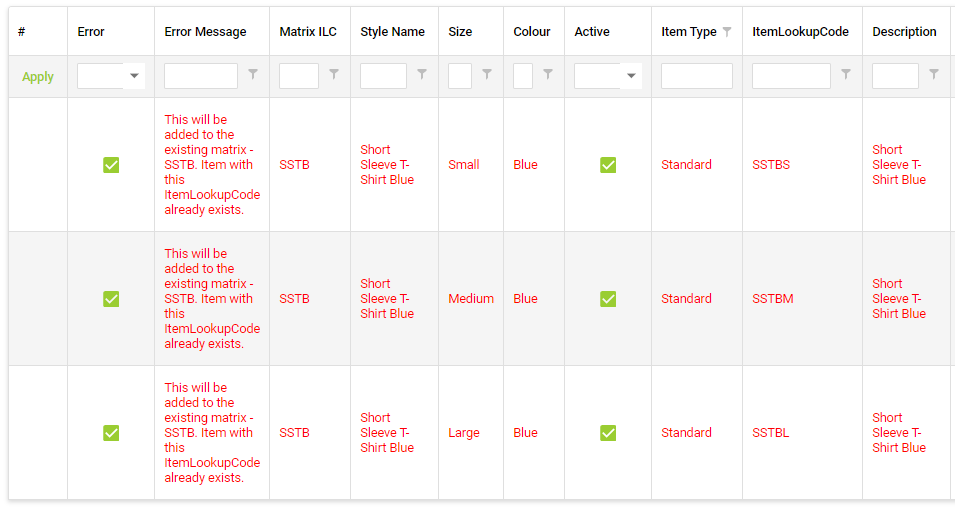
Los registros se marcarán como Error si hay algún problema con los datos, y la columna Mensaje de error dará una descripción del problema:
Si hay registros con errores, estos no se importarán y el proceso de importación omitirá estas líneas. El sistema comprueba si hay datos no válidos:
- El número de caracteres en un campo es mayor que el máximo permitido;
- ItemLookupCode ya está en uso;
- El código de barras / alias ya está en uso;
- Falta tamaño / color para elementos de matriz;
- El departamento / categoría no existe en su grupo de POS en la nube;
- El proveedor no existe en su grupo de POS en la nube;
- Si ingresa una ILC de Matrix que ya existe, todos los elementos de la plantilla de importación que utilicen la misma ILC de Matrix se agregarán a la matriz existente, por ejemplo, "Esto se agregará a la matriz existente - SSTB".
7) Si hay errores, puede realizar cambios directamente dentro de la cuadrícula para corregir cualquier problema. Haga clic en el campo que desea editar y escriba la nueva información.
Alternativamente, puede editar la plantilla en Excel y cargarla nuevamente siguiendo los pasos anteriores. Esto reemplazará los datos que cargó anteriormente en el Paso 5.
8) Una vez que haya realizado cambios para corregir los errores, haga clic en el botón Guardar cambios de cuadrícula y validar datos . Esto volverá a validar la información en la cuadrícula (es decir, haga otra verificación de esos datos para asegurarse de que estén bien para la importación). Puede repetir este paso tantas veces como sea necesario.
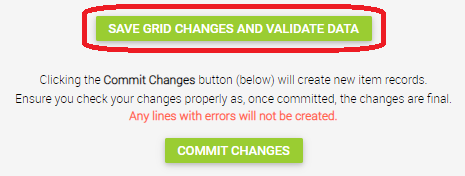
Asegúrese de verificar los cambios a fondo ya que, una vez confirmados, los cambios son definitivos.
9) Cuando esté completamente satisfecho con los nuevos registros de elementos que va a crear, haga clic en el botón Confirmar cambios . Esto creará los registros de artículos en su base de datos de POS en la nube.