An introduction to Task Pad
Task Pad is designed to speed up everyday tasks by providing quick access to the products that you access the most via a simple-to-navigate category tree.
Task Pad is perfect for cafés and bars, as it allows you to browse, select and personalise products in a clear manner, building an order as you go.
Task Pad transactions can be tendered immediately or reviewed in the standard Point of Sale screen before completing. Task Pad transactions can also be assigned to a customer, as well as being saved as a Work Order or Layaway.
Before you get started…
For the purposes of this article, we will discuss Task Pad in the context of a café environment.
However, Task Pad is a great feature for improving the speed with which other item sales can occur, particularly for non-inventory items such as hire charges or rug laundering services. It can also be great for sales of animal feed.
We would recommend starting by listing the products that you will offer and the ways in which you will allow those products to be modified by your customers (e.g. with extra coffee shots in drinks or with a helmet hire alongside a bike hire).
We would strongly recommend that you do this on paper first (or in a spreadsheet). It is easier for you to review your plan, share your work with others and refine your structure before committing to the set-up time in Cloud POS.
Understanding Task Pad terminology
It is a good idea to start by listing all the items you want to sell through Task Pad.
‘End Products’ are the products your customer purchases from you. For example, a medium latte.
‘Modifier Options’ allow a customer to personalise those products (or services).
There are two types of Modifier Options:
- ‘Price Modifiers’ are personalisations that affect the price of the final product. For example, an ‘extra shot’ would be a Price Modifier because it will come with an additional charge.
- ‘Note Modifiers’ do not affect the price of the final product. For example, ‘oat milk’ would be a Note Modifier because you wouldn't typically charge a customer extra for that personalisation.
‘Modifier Templates’ group the Modifier Options together. For example, ‘Shots and Syrups’ would be a Modifier Template containing Modifier Options such as ‘hazelnut syrup’, ‘extra shot’ and ‘oat milk’.
For the purposes of this example, let's say that
- a medium latte is priced at 2.40,
- an extra shot is priced at 0.40 and
- a hazelnut syrup is priced at 0.25.
If your customer requests a "medium latte, oat milk, extra shot with hazelnut syrup", then they have requested an End Product + Note Modifier + 2 x Price Modifiers.
Let's review this :
- End Product: medium latte @ 2.40
- Note Modifier: oat milk (no extra charge)
- Price Modifier: extra shot @ 0.40
- Price Modifier: hazelnut syrup @ 0.25
The final price of this personalised latte is 3.05.
Planning your Task Pad Categories
Once you have listed your End Products and Modifiers, designing your Task Pad Categories should be a relatively simple process.
Task Pad Categories create a hierarchical, step-by-step menu that leads the user towards a group of Cloud POS items.
You are building a structure of categories that gets gradually more specific, like this:
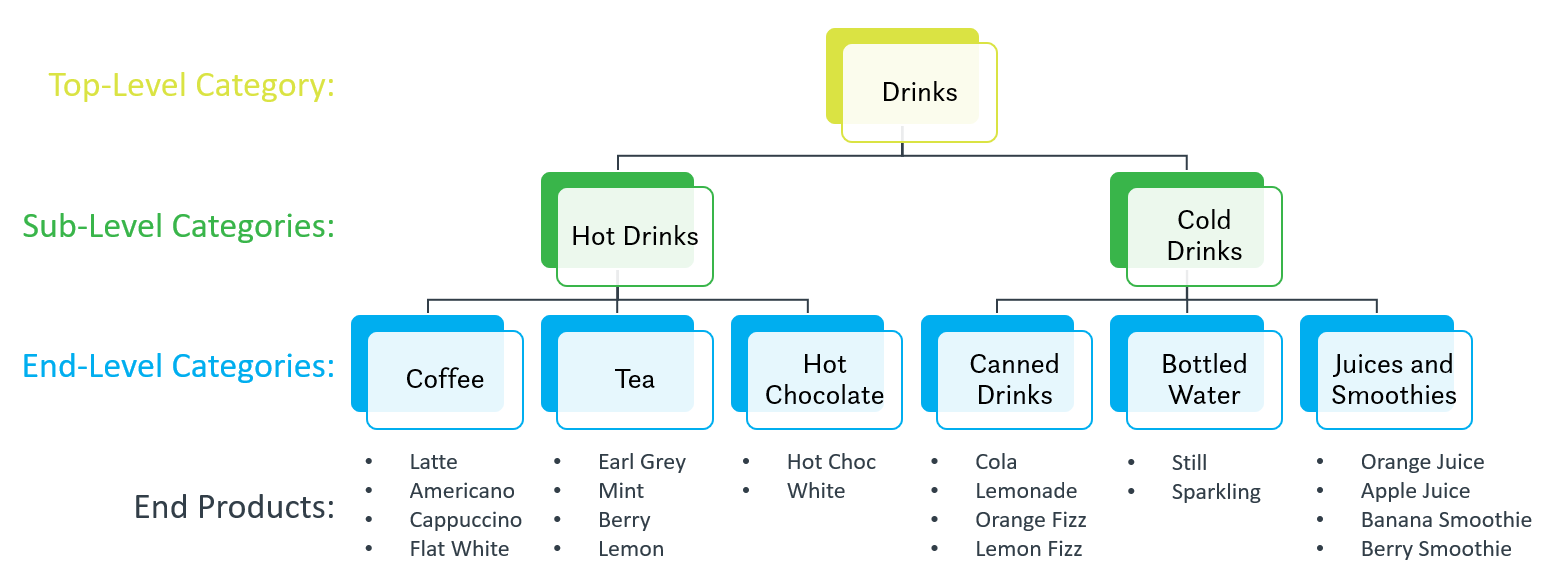
Limits to numbers of categories
Each level of your Category hierarchy is restricted to 8 Categories.
This means you can create up to 8 Top Level Categories and each of those can have 8 Sub-Level Categories. Each of the Sub-Level Categories can have up to 8 Sub-Level Categories and so forth.
The last level of categories you create are referred to as End-Level Categories.
End-Level Categories are where you normally link the End Products that wish to make available via Task Pad.
Within each End-Level Category, you can link up to 40 Cloud POS products.
Setting up your Task Pad Categories
Once you have your structure planned, you are ready to start setting it up in the Cloud POS Back Office.
Navigate to Setup > Task Pad Setup.
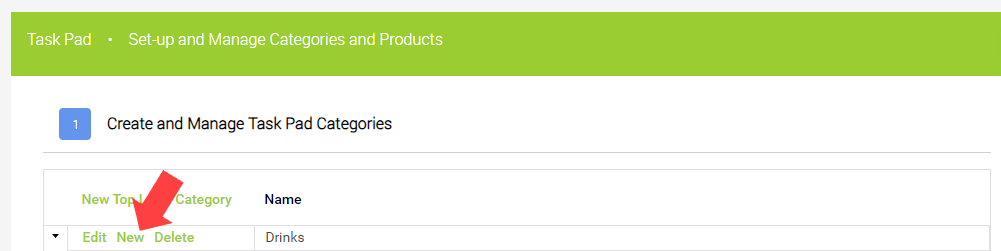
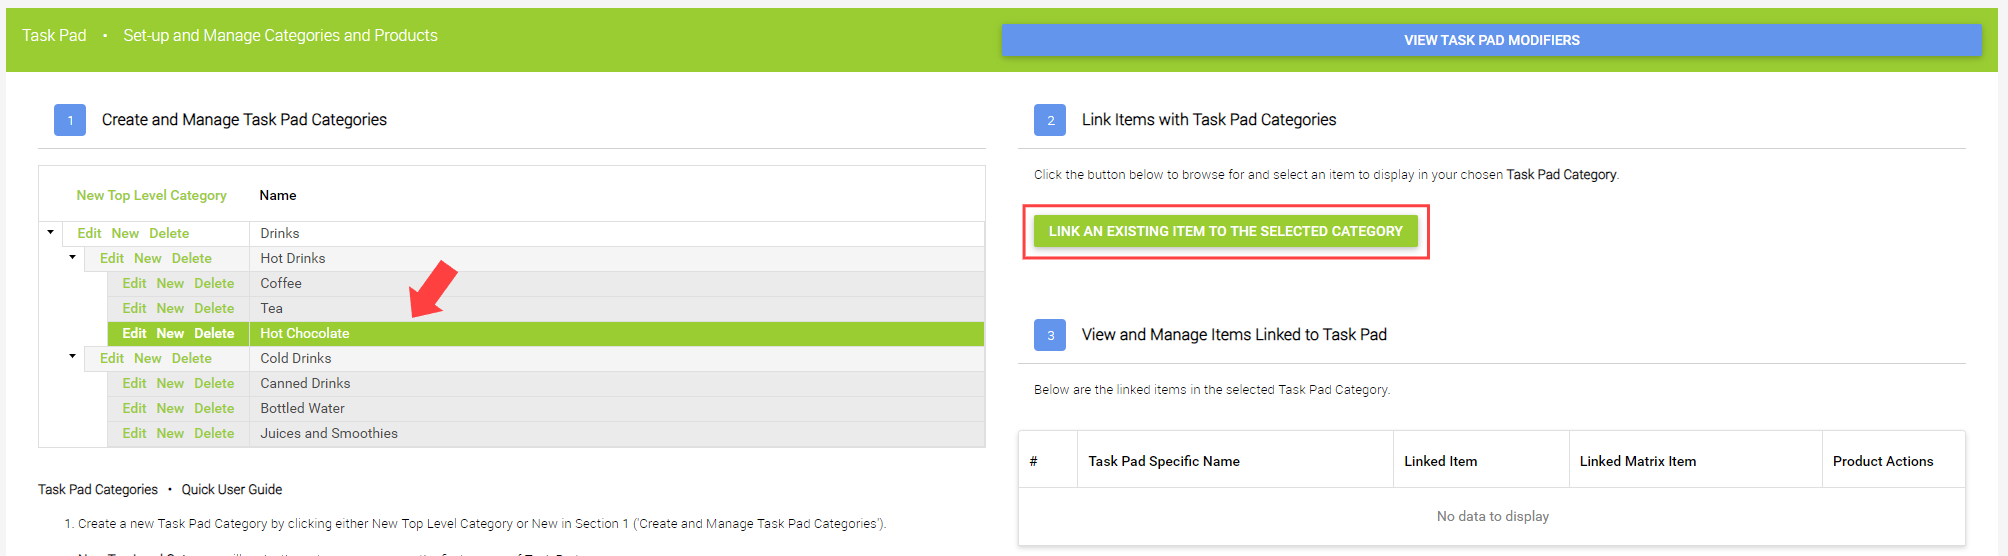
On the left is section 1, ‘Create and Manage Task Pad Categories’. This is where you will build your Task Pad structure:
To begin, click the New Top Level Category link.

A dialog box will be presented for you to name your category. Enter the name in the field provided and then click Create Task Pad Category.
Your newly created Top Level Category will be shown in the grid.
Repeat this process to create each of your Top Level Categories (up to a maximum of 8).
Once you have created all your Top Level Categories, you can begin the Sub-Level Category creation process.
To create a Sub-Level Category, select the Top Level Category that you wish to create Sub-Level Categories in. The Top Level Category will highlight in green. On the Top Level Category, click New:
Similar to the Top Level Category creation process, a dialog box will be presented for you to name your Sub-Level Category.
Enter the Name of your Sub-Level Category in the field provided and then click the Update button.
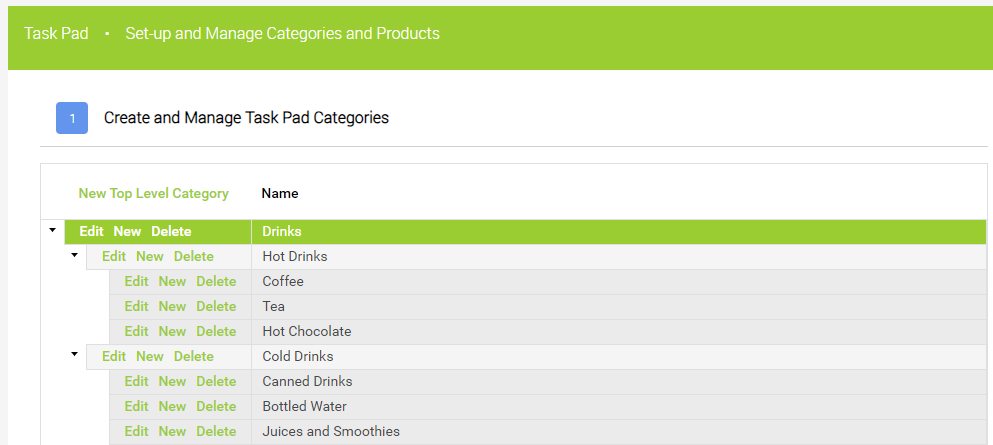
Repeat this process to create all your Sub-Level Categories (up to a maximum of 8 at each level).
You should end up with a structure like this:
Creating End Products for use with Task Pad
The type of items you create for Task Pad will depend on your setting.
For example, in a café setting, there will typically be a mixture of ‘made to order' (e.g. a ham sandwich) and ‘pre-packaged’ (e.g. a can of coke) items on the menu.
Typically, items that are ‘made to order’ are not inventory-tracked in the same way, so they could be created as non-inventory items. The pre-packaged items, however, could be created as standard items.
If size is a consideration, you might consider grouping your items into a matrix.
Top Tip
Remember that Cloud POS Items can be deactivated but not deleted. We would recommend planning your items on paper/in a spreadsheet before you start creating them in the Cloud POS Back Office.
If you have lots of End Products to create, you might find the Item Import Tool helpful. Please refer to this article for further guidance on this bulk-creation option: How do I use the Item Import Tool?
You can also use the ‘Create New Item’ button on the Items page in the Cloud POS Back Office.
Once you have created all your End Products, you are ready to move on.
Setting up your Modifier Templates and Modifier Options
In the Cloud POS Back Office, navigate to Setup > Modifier Template Setup.
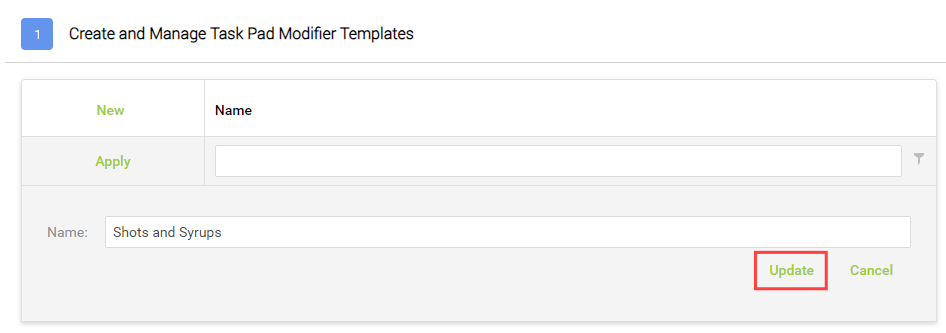
To create a Modifier Template, click New within Section 1 of the Modifier Template Setup screen.
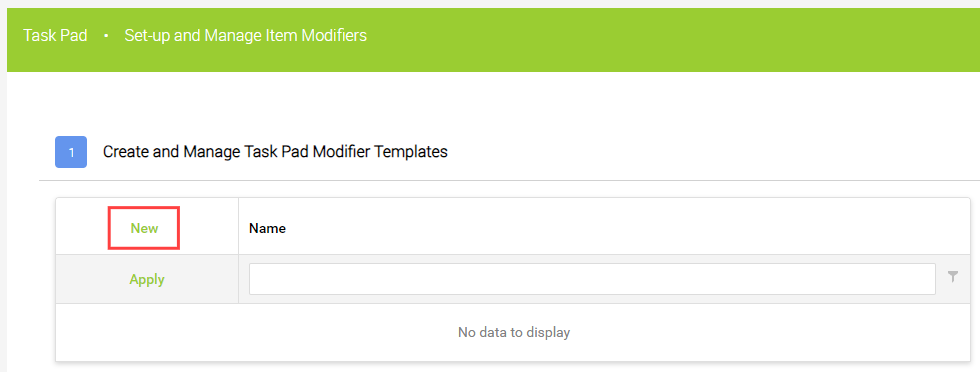
Once clicked, a panel will be displayed directly beneath. Enter a Name for your Modifier Template (for example, ‘Shots and Syrups’), and click the Update link to complete the creation process.
Repeat these steps as required.
Deleting Modifier Templates
If you want to delete a Modifier Template from your Task Pad, locate the correct Modifier Template from the grid in Section 1 and click the ‘Delete’ option provided.
Please note that deleting a Modifier Template will also delete all the Modifier Options that have been linked with it. It will also remove the association with any Cloud POS Items that have been linked with it.
To create the Modifier Options within a Modifier Template, first locate your chosen Modifier Template within the grid in Section 1 and click to select it (the grid row will highlight in dark blue).
Once selected, the grid in Section 2 ('Create and Manage Task Pad Modifier Options') will refresh.
To create a new Modifier Option, click the New option in the top-left of the grid.

A panel will then appear as follows:
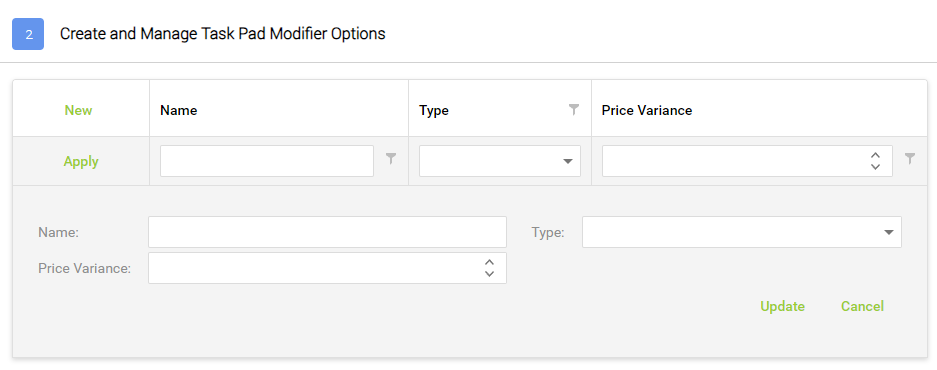
1) Enter a Name for your Modifier Option.
2) Select the Type of Modifier Option you wish to create (Price or Note) from the drop-down list provided. (Remember, Price Modifiers will adjust the price of the End Product. Note Modifiers do not affect the price.)
3) If you are creating a Price Modifier, enter a Price Variance into the field provided. For example, if your Price Modifier attracts a 0.70 surcharge, enter your Price Variance value as "0.70".
For example:
- Name = “Hazelnut Syrup”
- Type = “Price”
- Price Variance = “0.40”
Click the Update option to save and continue.
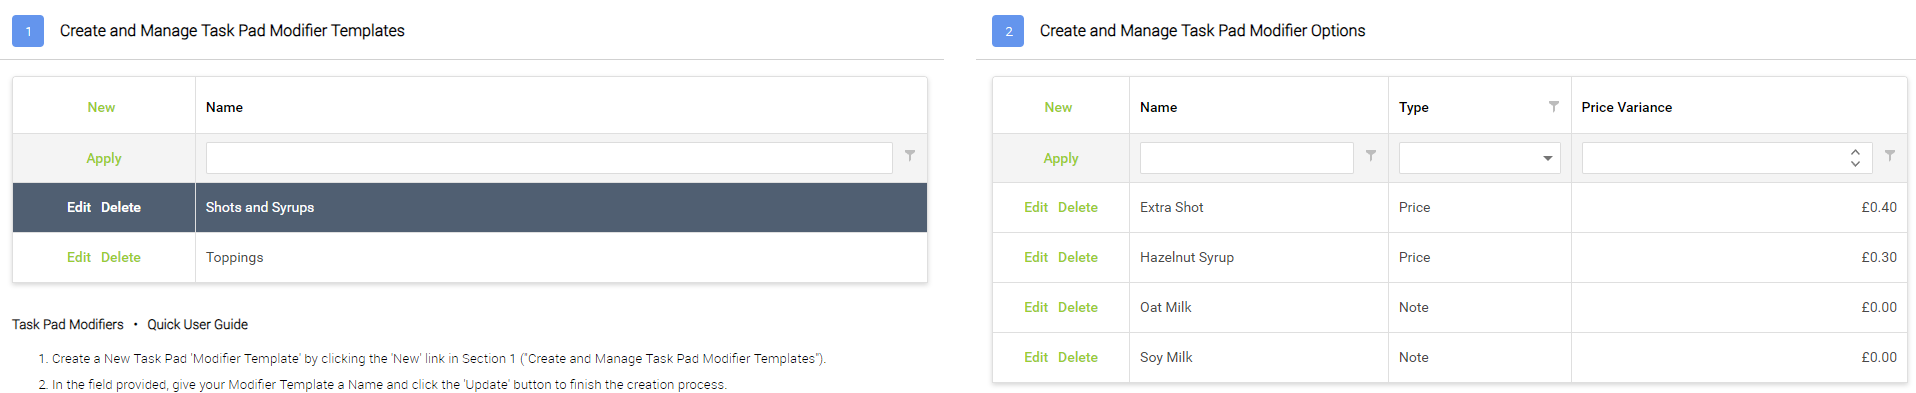
Repeat the New Modifier Option steps as required. You should then have a list of modifiers for each template, like this:
Applying Modifier Templates to End Products
1) First, open the item record in the Cloud POS Back Office.
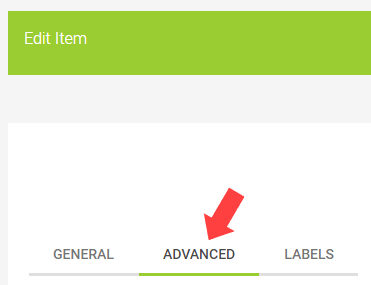
2) Click the Advanced tab on the item record and scroll towards the bottom of the screen to locate the Item Modifiers section. (Note: on a Matrix Parent record, this section is at the bottom of the item record, below the grid of child items.)
3) Select a Modifier Template from the drop-down.
4) You will then see the Modifier Options within that Template in a grid. This is view-only.

5) Click to Save the item record.
To change the applied Modifier Template, simply make another selection from the Modifier Template drop-down on the Edit Item screen.
To remove an applied Modifier Template, select the None option from the drop-down, and then Save that change.
For Modifier Templates applied to Matrix Parent Items, the Replace or Remove steps will be applied to all Matrix Component Items automatically.
Linking your End Products to your Categories
The final step is to link your End Products with your Categories.
1) Navigate to Setup > Task Pad Setup in the Cloud POS Back Office menu.
2) To link an End Product with a Category, first select the End-Level Category in Section 1, on the left of the screen ('Create and Manage Task Pad Categories').
3) On the right of the screen, click the button to Link an Existing Item to the Selected Category:
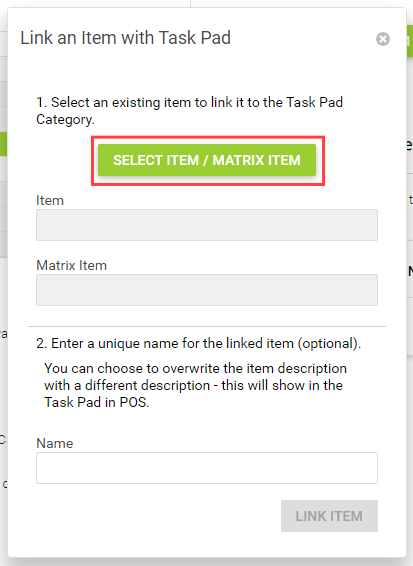
4) A window will appear inviting you to browse active items in your Cloud POS database. Click the Select Item / Matrix Item button.
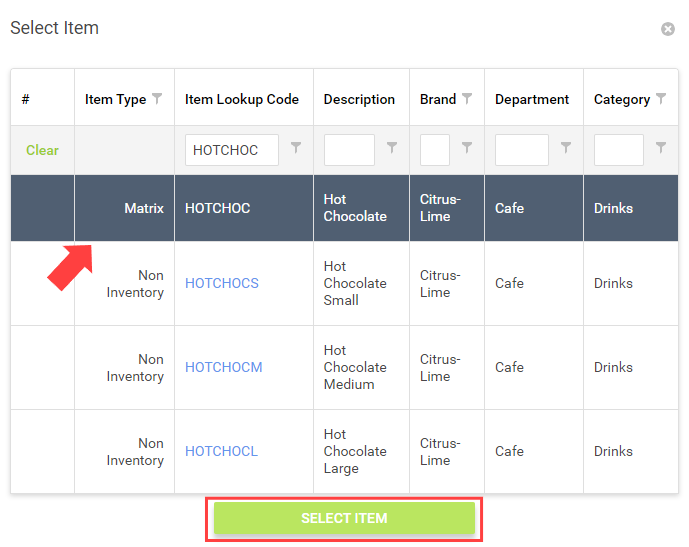
5) A second window ('Select Item') will be displayed. You can search and filter to locate the item you wish to link.
6) Click on the item row (it will highlight in dark blue). You can choose a standard/non-inventory item, or choose a matrix parent to link all of its child items.
7) Click the Select Item button.
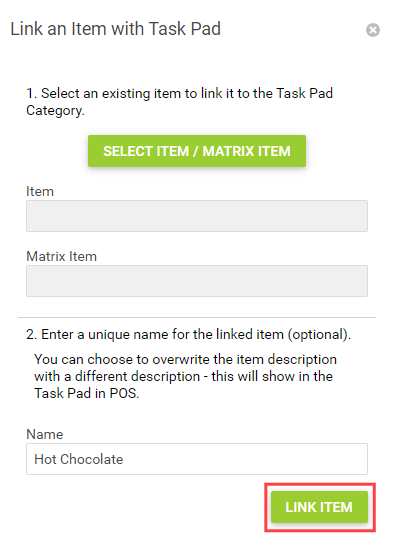
8) If you wish, you can assign a different Name to the item for presentation in Task Pad.
9) Click the Link Item button.
Repeat the steps for linking items as required (remember to select the relevant categories as you progress through the items you wish to link with Task Pad).
All items linked with Task Pad Categories can be viewed and managed via the ‘View and Manage Items Linked to Task Pad’ section of the Task Pad Setup screen.
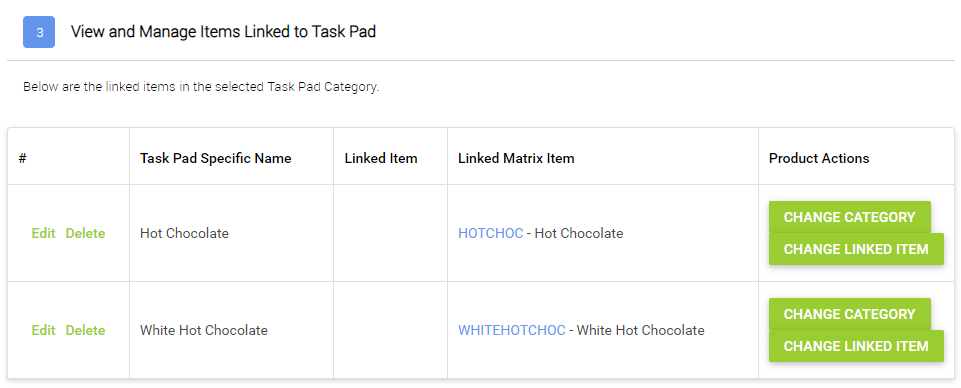
If you need to, you can:
- Edit the name of the item as displayed in Task Pad
- Delete to unlink the item from the selected Task Pad category
- View the Task Pad Specific Name, Linked Item (or Matrix Item) and associated Item Lookup Code
- Change the Task Pad Category for the selected item
- Change the Linked Item to another active item in your Cloud POS database
- Navigate directly to the item record by clicking the Item Lookup Code links
Using Task Pad in the Point of Sale
To switch to the Task Pad view, either use the keyboard shortcut (Alt + T) or click into the Till menu and select Task Pad.
This will open your Task Pad. You will see your Top-Level Categories on the left of the screen.
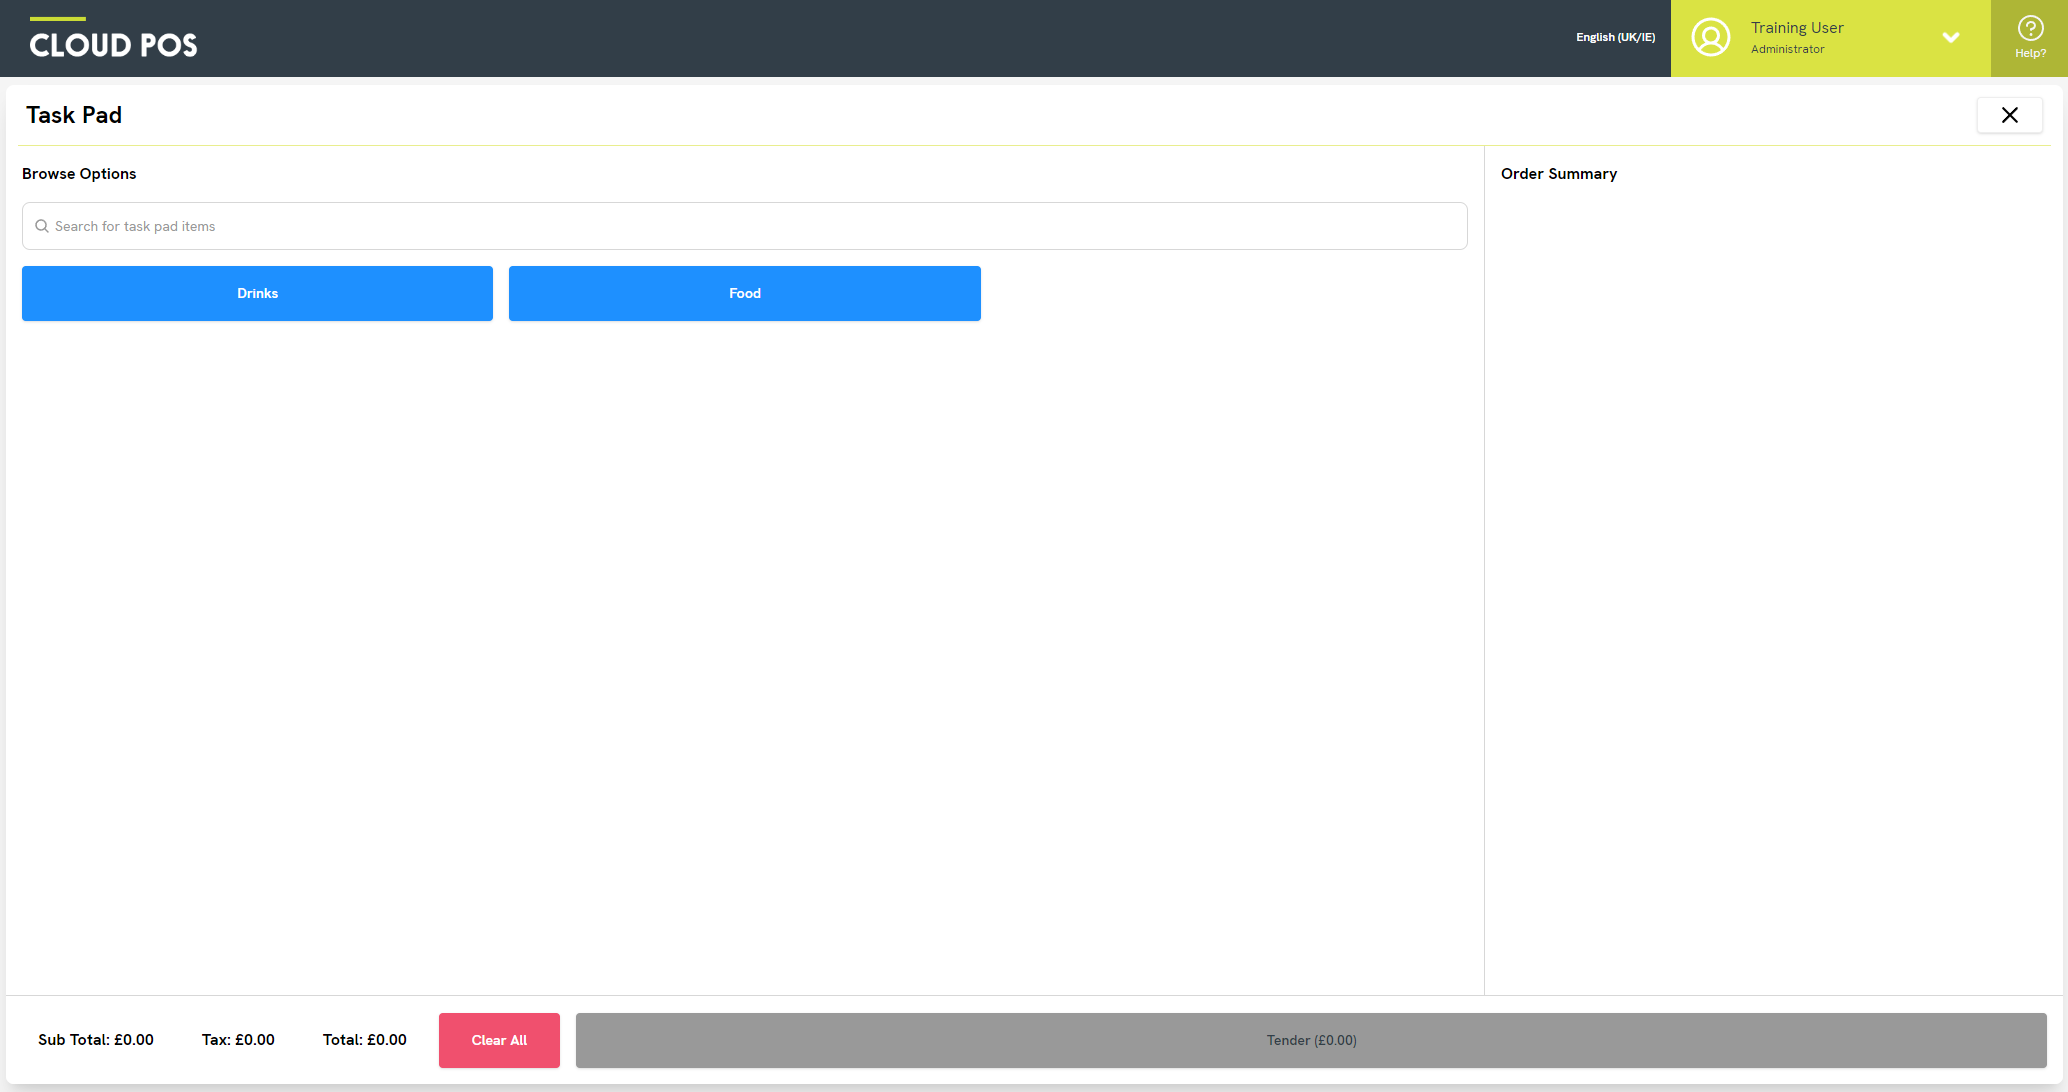
Use the buttons to proceed through your Category structure and select your End Product.
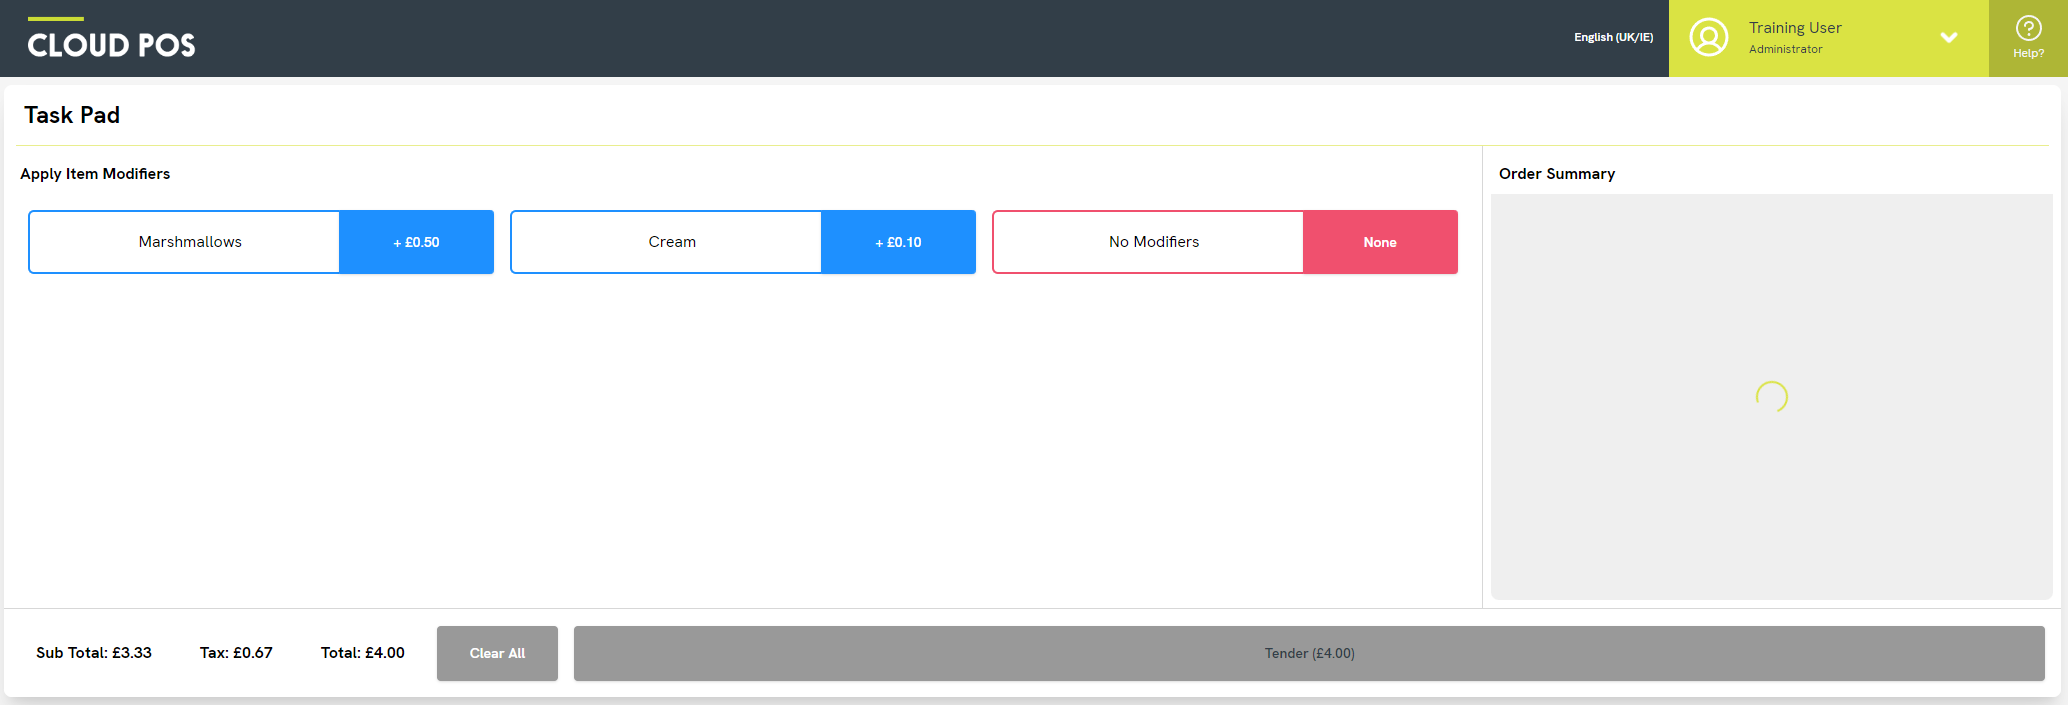
After selecting an End Product, you will see the Modifier Template appears (if a Modifier Template has been applied to that item):
The End Product then appears on the right of the screen, along with any selected Modifier. To add further Modifiers, click the Add Modifier button:
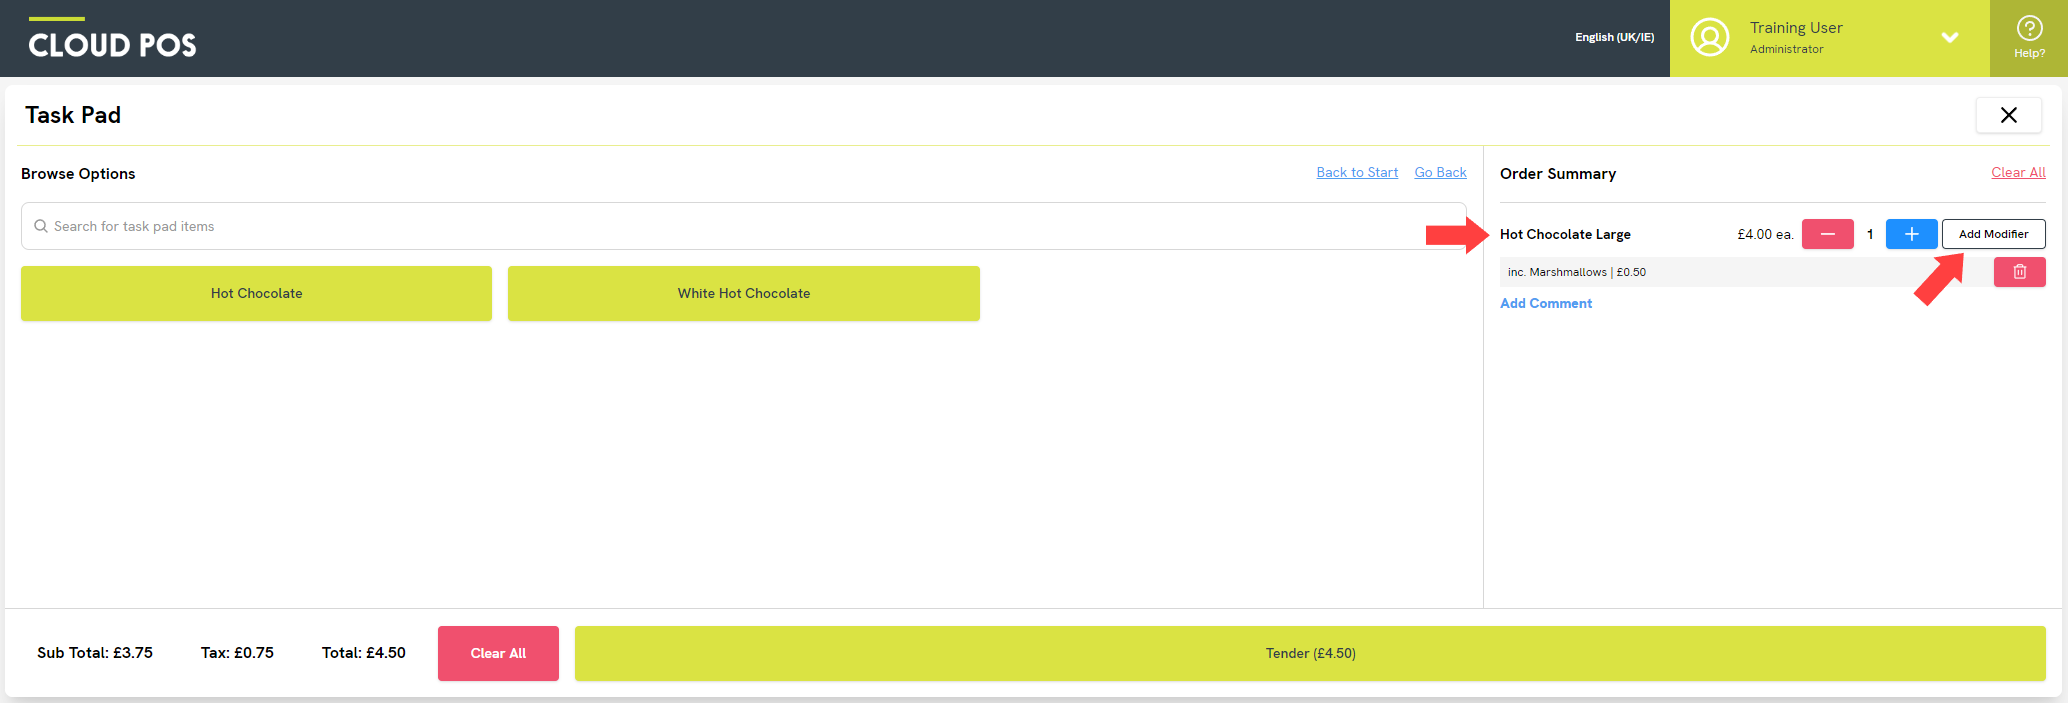
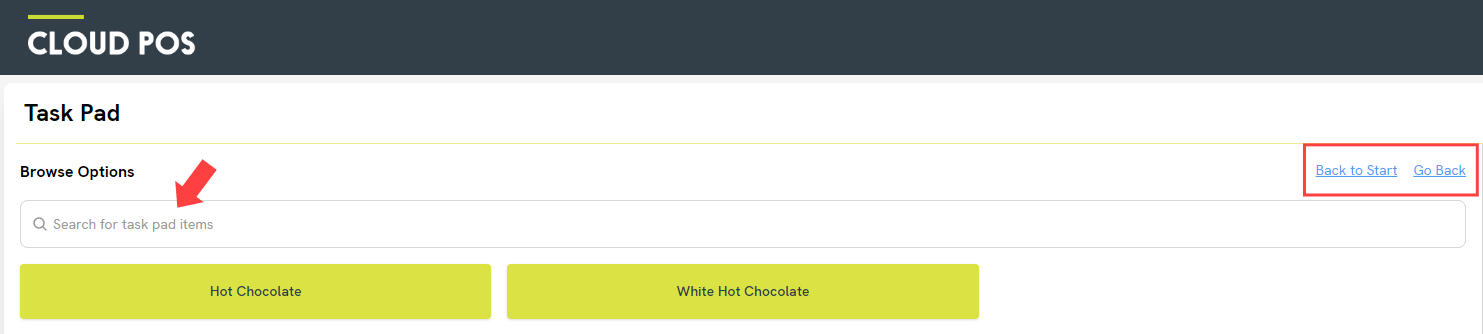
Repeat these steps to add further items to the transaction. You can use the Go Back button to return to the previous category level, or click Back to Start to return to your Top-Level Categories. You can also use the Browse Options search bar to quickly find any End Product.
You can return to the main Point of Sale layout at any time by using the Close button on the top-right of the screen.
To proceed to payment, click Tender.
Frequently Asked Questions
Can I set up my register/till to always use Task Pad?
Task Pad can be configured as the default layout for a particular register. This is convenient if you have one or more registers for use in your café (or other Quick Service Environment).
1) In the Cloud POS Back Office, navigate to ‘Setup’ > ‘Registers & Barcode Label Printers’.
2) Click ‘Edit’ beside the register you wish to configure,
3) Within the ‘Settings’ section, check the box for ‘Show Task Pad Automatically’.
4) Click ‘Save’.
You will need to reload the Point of Sale for your changes to take effect.
What is the keyboard shortcut to open and close Task Pad?
The keyboard shortcut to open Task Pad is 'Alt + T'. The keyboard shortcut to close Task Pad is 'ESC'.
I've made some changes to my Task Pad structure, but it hasn't updated yet. Why?
Task Pad is loaded when the register is selected and doesn't update until the register is loaded again. To view any changes you make to Task Pad in the Back Office, including new Categories or Linked Items, you must reload your browser session or return to the register selection screen.
How can I put café items on a tab?
It's common for customers in a café environment to open a tab and pay when they leave. For a recommended process for handling tabs, please refer to this article: How can I keep a tab for customers in my café?