Introduction to Task Pad
Task Pad is designed to speed up the everyday tasks by providing quick access to the products that you access the most via a simple to navigate tree of categories.
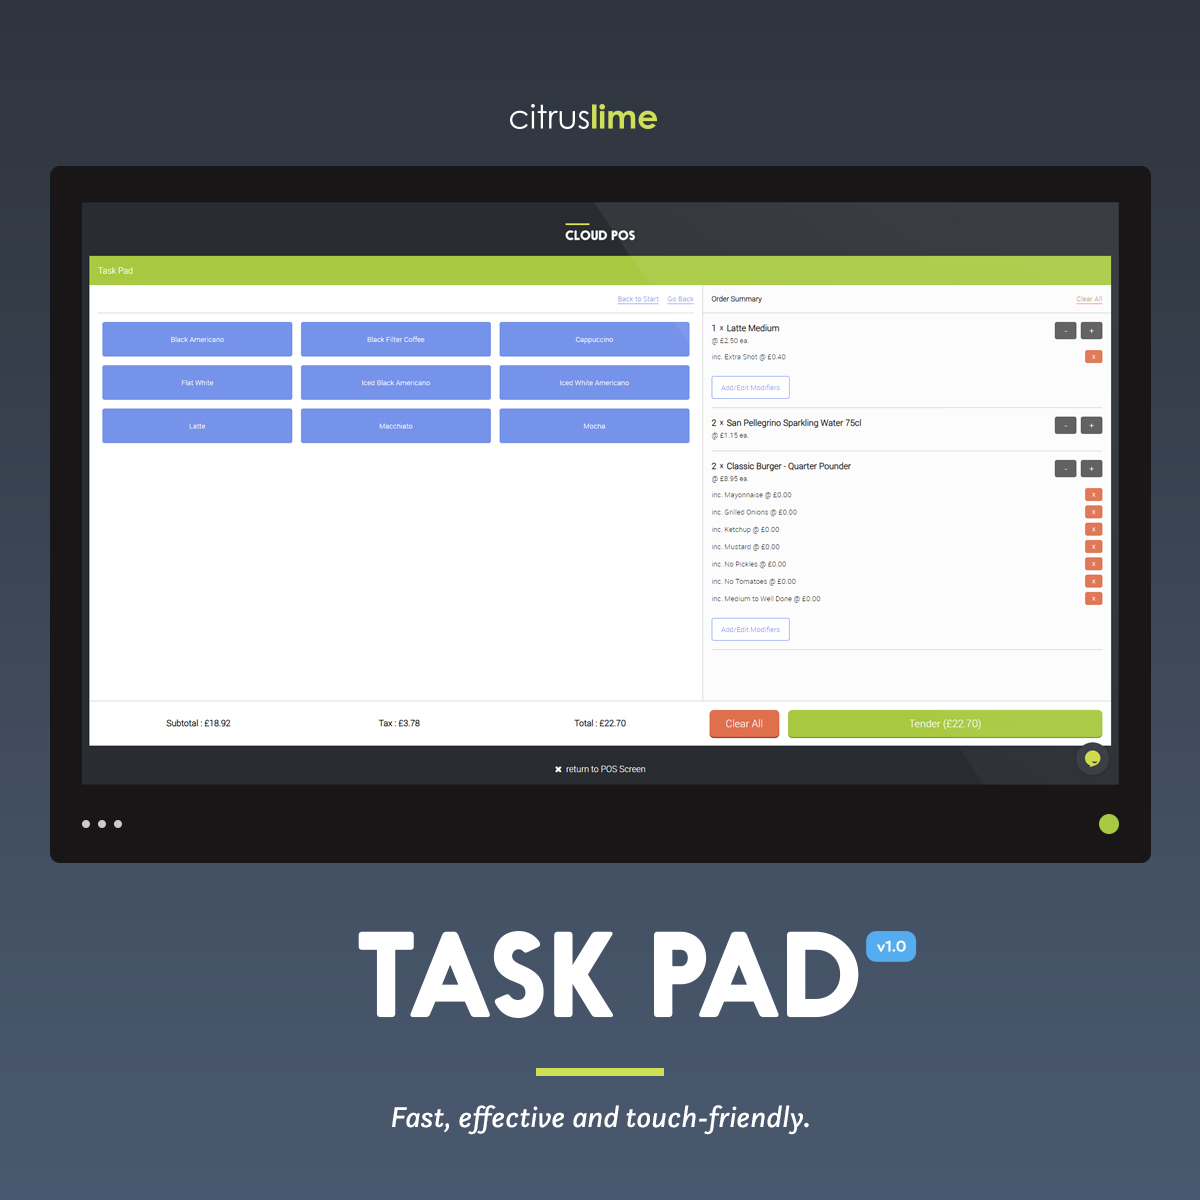
Touch-friendly by design, Task Pad is perfect for Cafes, Bars and other Quick Service Environments as it allows you to browse, select and even personalise selected products in a clear manner; building an order as you go.
Task Pad orders can be tendered immediately or reviewed in the standard Cloud POS screen before completing. Task Pad orders can also be assigned to a Customer as well as being stored away as a Work Order for future recall and processing.
Don't Skip This! Before you get started ...
For the purposes of this HOWTO, we will discuss Task Pad in the context of a (imagined) Cafe environment.
That decision is almost entirely based on the litany of high street coffee shops and eateries within a stone's throw of the Citrus-Lime MCR Office (where I'm writing this from and my worryingly deep knowledge of their respective menus).
It's also because an increasing number of our Retail customers are introducing this type of experience into their physical stores and Task Pad is direct response to supporting this offering.
However, Task Pad is a great feature for improving the speed with which common items sales can occur (particularly items sales for which you don't or wouldn't typically track inventory, such as Service items - think Wheel True or Brake Bleed as part of a Bike Service).
Task Pad can make light work of these transaction types, too.
"Every minute you spend in planning saves ten minutes in execution”
- Brian Tracy. CEO of Brian Tracy International
If you're nodding in approval ... that's a good sign. As tempting as it is to just dive straight in, planning how you will structure your Task Pad Categories, Modifier Templates and Modifier Options before undertaking the keyboard time is strongly advised.
My recommendation is to begin your planning by listing the End Products that you will offer in your Cafe and also the ways in which you will allow those products to be modified by your customers.
I would strongly recommend that you do this on paper (or in a spreadsheet). It's easier for you to reflect on your approach, share your work with others and refine your structure before committing the set-up time in Cloud POS.
What is meant by "End Products"?
For example, let's consider a "Latte". There's different ways to approach this but, in my opinion, I would consider a "Latte" to be a Product Type, not an End Product. In traditional Cloud POS parlance, a Latte would be a Matrix Parent. The Matrix Components of Latte would be relative to the Size.
Matrix Parent :
- Latte
Matrix Components :
- Small
- Medium
- Large
- Extra Large
So, to my mind, a 'Large Latte' is an End Product. But, in this "Have It Your Way" age, you still need to be able to tailor this End Product to how your customer wants to slug their morning caffeine.
That's where Task Pad Modifier Options come in to play.
Task Pad allows you to create and manage Modifier Templates, into which you create Modifier Options.
An example of a Modifier Template would be "Coffee Shots & Syrups".
Modifier Options can be thought of as the means with which to personalise a product (or service) for your customer. Modifier Options are not inventory-tracked Cloud POS Items and come in two forms ... Notes and Price Modifiers.
Notes Modifiers do not effect the final price of the End Product; Price Modifiers do. When creating Modifier Options, you simply select the type of modifier you need to use from a drop-down list and, if it is a Price Modifier, you also enter a price that will be added to the End Product price.
Let's say that a customer electing to have their Large Latte as "Skinny" is a non-price-modifying selection. You would create this as a Note Modifier.
Let's also say that the customer also requests their Large Skinny Latte comes with an Extra Espresso Shot and a Hazelnut Syrup flavour enhancer, and that both of these options carry an additional charge. You would create these Modifier Options as Price Modifiers.
For the purposes of this example, let's say that :
- a Large Latte is priced at £2.40;
- an Extra Espresso shot is priced at £0.40 and
- a Hazelnut Syrup shot is priced at £0.25.
If your customer requests a "Large Latte, Skinny, Extra Espresso Shot w/ Hazelnut Syrup", then they have requested an End Product + Note Modifier + Price Modifiers.
Let's review this :
Matrix Component Item : Large Latte @ £2.40
Note Modifier : Skinny (No charge applied)
Price Modifier : 1 x Extra Espresso Shot @ £0.40, 1 x Hazelnut Syrup @ £0.25
All told, the final price of this personalised coffee is £3.05.
Designing your Task Pad Categories
Once you have your End Products and Modifiers designed, designing your Task Pad Categories should be a relatively simple process.
Task Pad Categories can be thought of as a means with which to create a hierarchical, Step-by-Step Menu that leads the user towards a logically-grouped set of Cloud POS items.
Vital Information
It is important to note that each level of your Category hierarchy is restricted to 8 x Categories at each level.
This means you can create up to 8 x Top Level Categories and each of those can have 8 x Sub-level Categories. Each of the Sub-level Categories can have up to 8 x Sub-level Categories and so on ... and so on ...
The last level of categories you create are referred to as End-level Categories.
End-level Categories are where you normally link the Cloud POS products that wish to make available via Task Pad.
Within each End-level Category, you can link up to 40 x Cloud POS products.
Continuing with the Latte theme, if Latte is a type of Coffee and Coffee is a type of Hot Drink and Hot Drink is a type of Drink, then your Task Pad Category structure should likely be as follows :
Drinks > Hot Drinks > Coffees
This approach gives a clear sign-posting to the Task Pad user and leads them cleanly towards a manageable set of End Products.
An example :
Drinks > Hot Drinks > Coffee
Drinks > Hot Drinks > Tea
Drinks > Cold Drinks > Carbonated Drinks
Drinks > Cold Drinks > Bottled Water
Drinks > Cold Drinks > Juices and Concentrates
There are simpler ways to design your Task Pad but ...
If you're thinking "Are there are simpler ways to design my approach to Task Pad set-up?" ... then the answer is "Yes".
Task Pad is purposefully designed to be flexible to your intended use.
For example, you could simply create a Standard Cloud POS Item called "Latte" (rather than a Matrix Product with 'Size' as the Matrix Component Items).
You could then use a Price Modifier to determine the Size of the Latte being purchased and what that will cost. That definitely will work and it will also take less time to create your End Products in Cloud POS.
However, there is always compromise required when deciding how to structure your data.
Using the simplified set-up method described above, it is likely that the number of Modifier Options offered at the point of sale will make for a less end-user-friendly experience.
My recommendation is that you consider who will be using Task Pad to sell your End Products and your overall Customer Experience.
It's critical that what you design is easy for your team to use (they'll be using it every day, after all) and doesn't make for a poor customer experience. To which end, I'd say that the more effort up-front will result in a better overall outcome.
Start small - test just a few Categories, Modifiers and End Products first and then, if you're happy with the direction you are heading in ... continue on with confidence.
OK ... that's the theory.
The rest of this HOWTO article will help you put this into practice and build your Cloud POS Task Pad ...
Setting up your Task Pad Categories
Locating the Task Pad Setup screen in Cloud POS Back Office

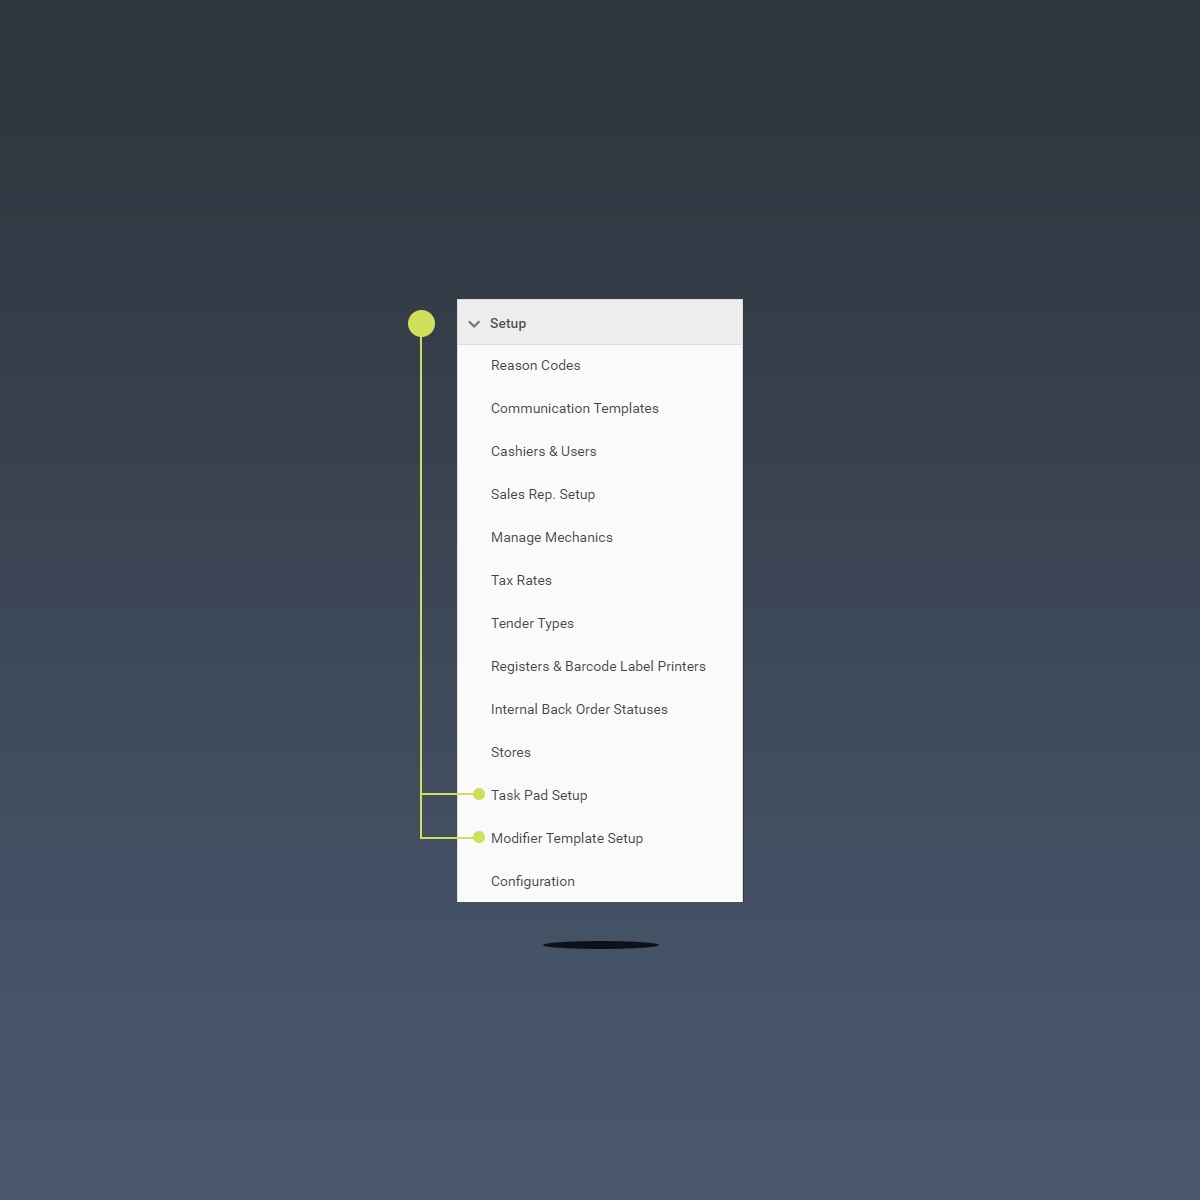
From within Cloud POS Back Office, locate the Setup section within the main navigation (you will need to click the heading to view the Setup options).
Locate Task Pad Setup option within the Setup section and click to access the Task Pad Setup screens.
Creating a New Task Pad Category
Task Pad Categories are created within a simple, hierarchical structure. The first thing to do is create a New Top Level Category.
But, before that, let's explore the Task Pad Setup screen layout :
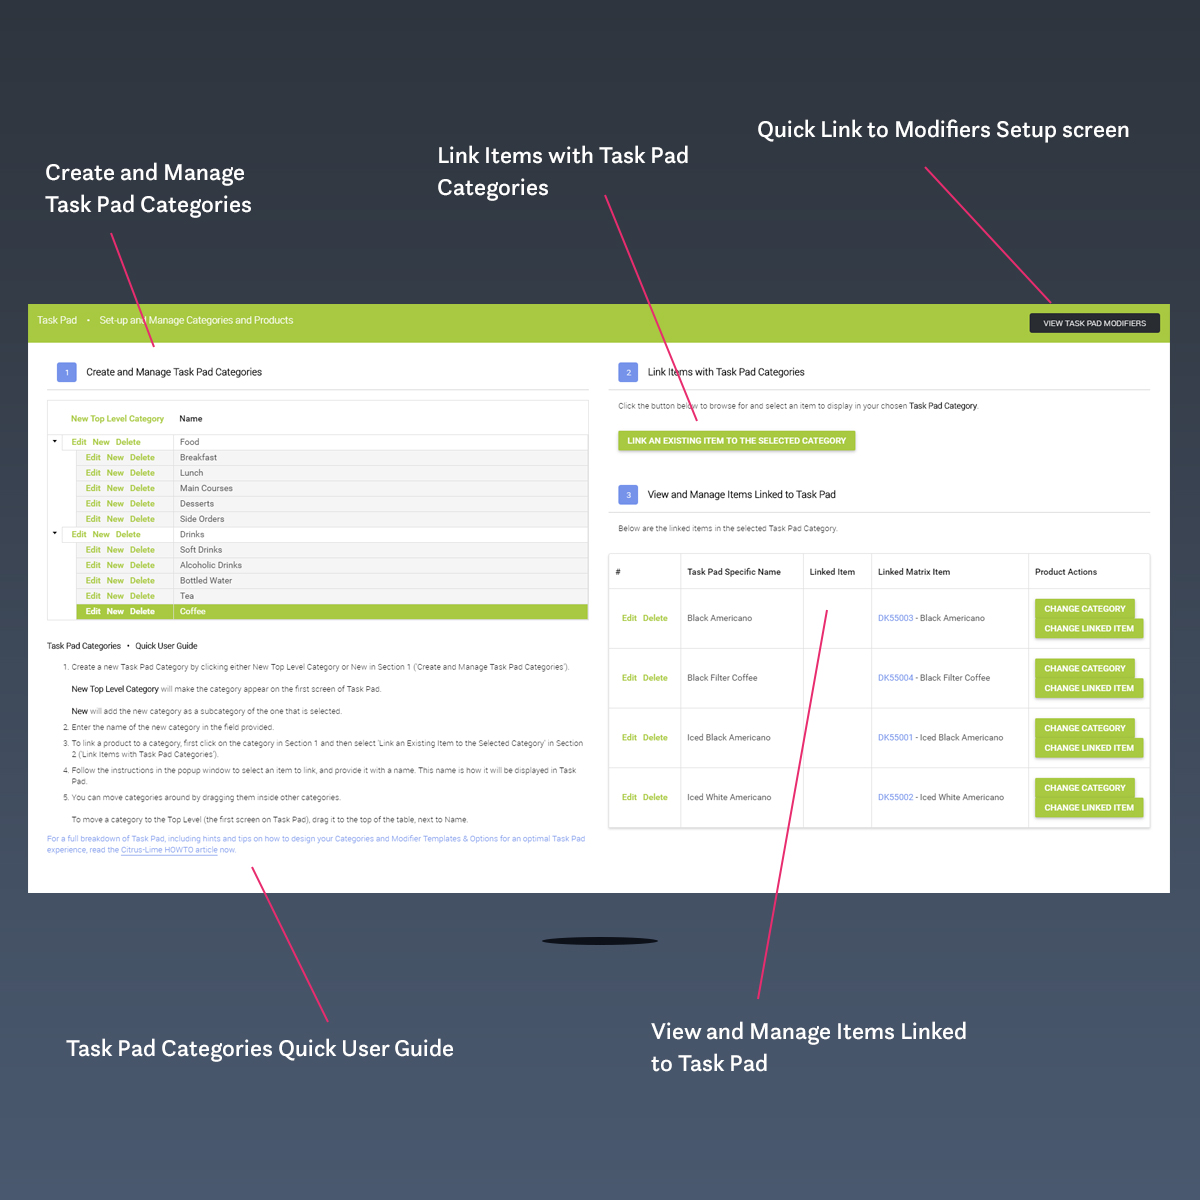
Section #01 : Create and Manage Task Pad Categories
From here, you can build and manage your Task Pad Categories hierarchy :
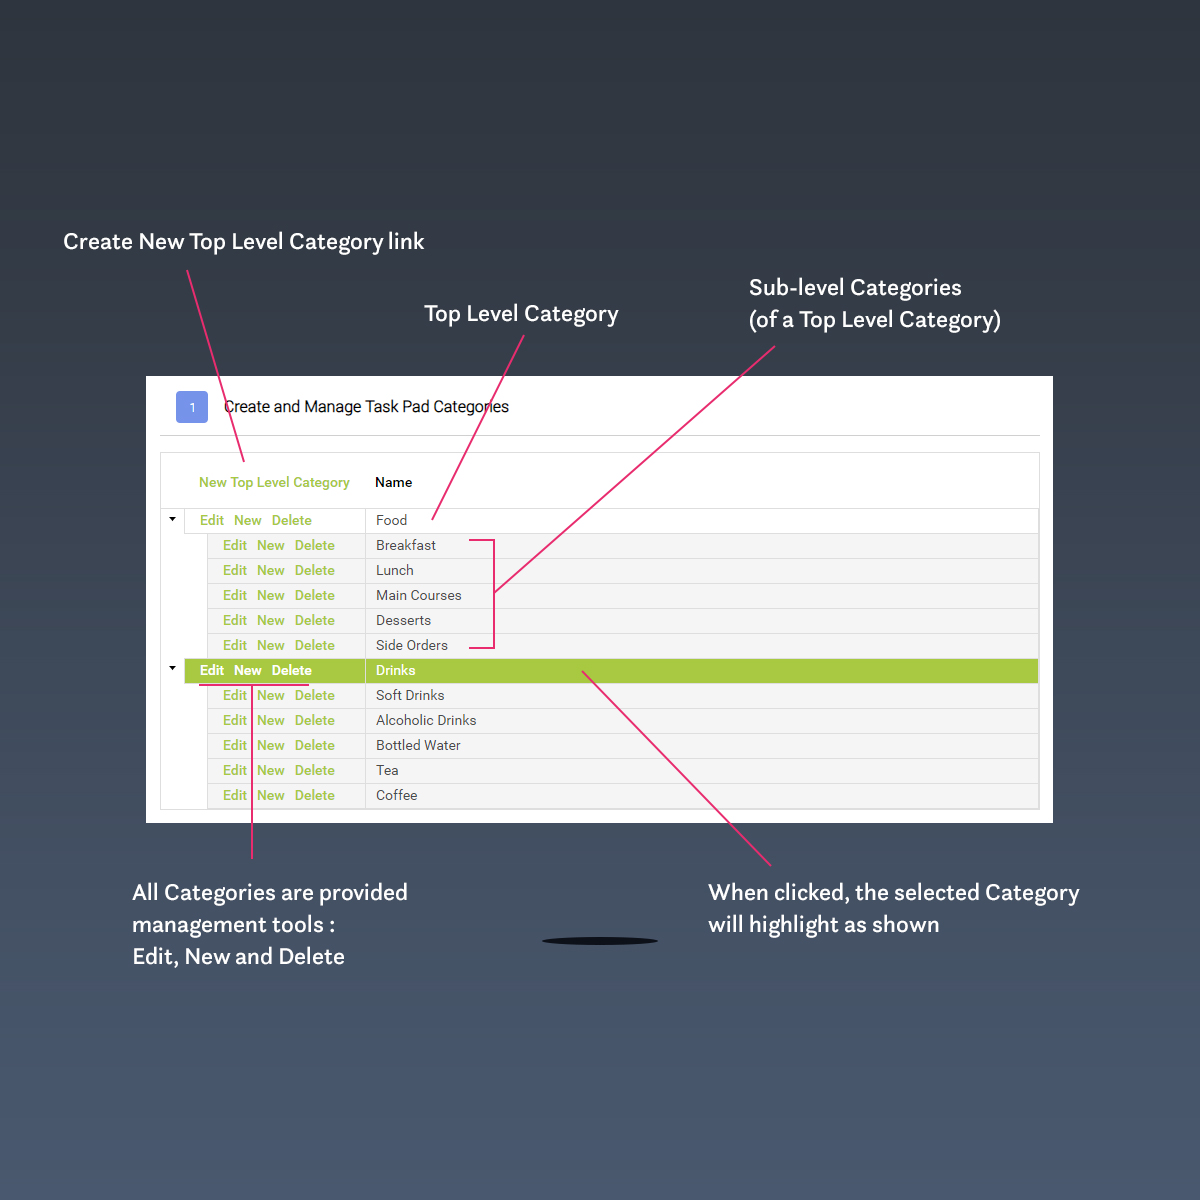
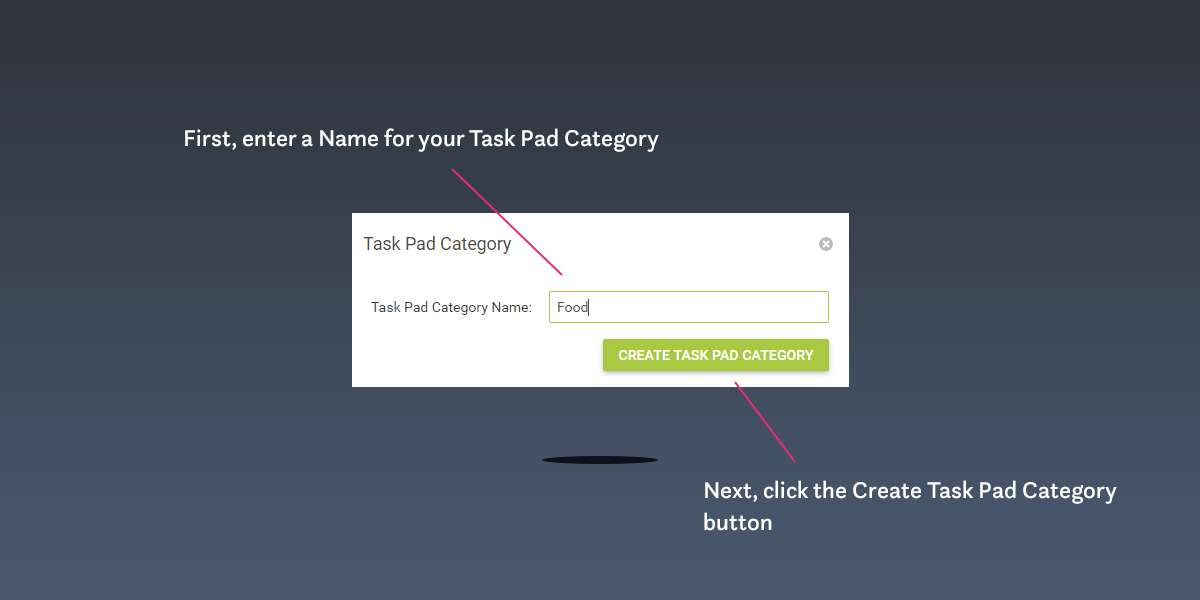
To begin, click the New Top Level Category link. A dialog box will be presented for you to name your category. Enter the name in the field provided and then click the Create Task Pad Category button.
Your newly created Top Level Category will be presented in the grid display in Section 1 of the Task Pad Setup screen.
Repeat this process to create each of your Top Level Categories (up to a maximum of 8 times).
Once you have created all of your Top Level Categories, you can begin the Sub-level Category creation process.
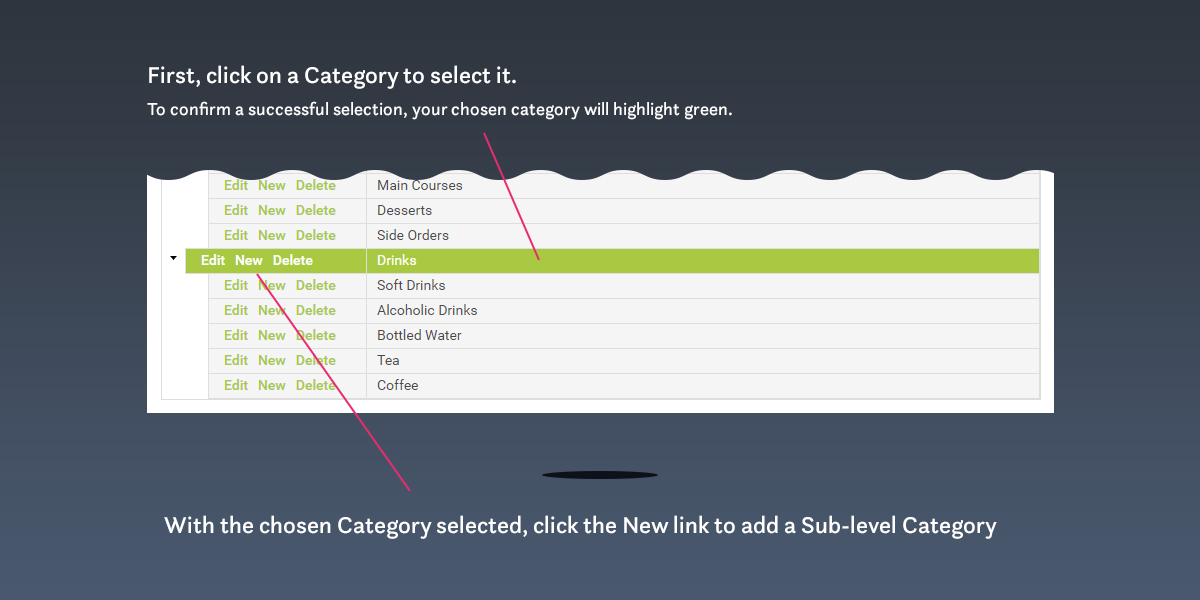
To create a Sub-level Category, select the Top Level Category that you wish to create Sub-level Categories in. The Top Level Category will highlight in green. On the Top Level Category, locate the New option and click it.
Similar to the Top Level Category creation process, a dialog box will be presented for you to name your Sub-level Category. Note that, for Sub-level Categories, the dialog box is presented directly beneath the category you have selected to add a Sub-level Category to.
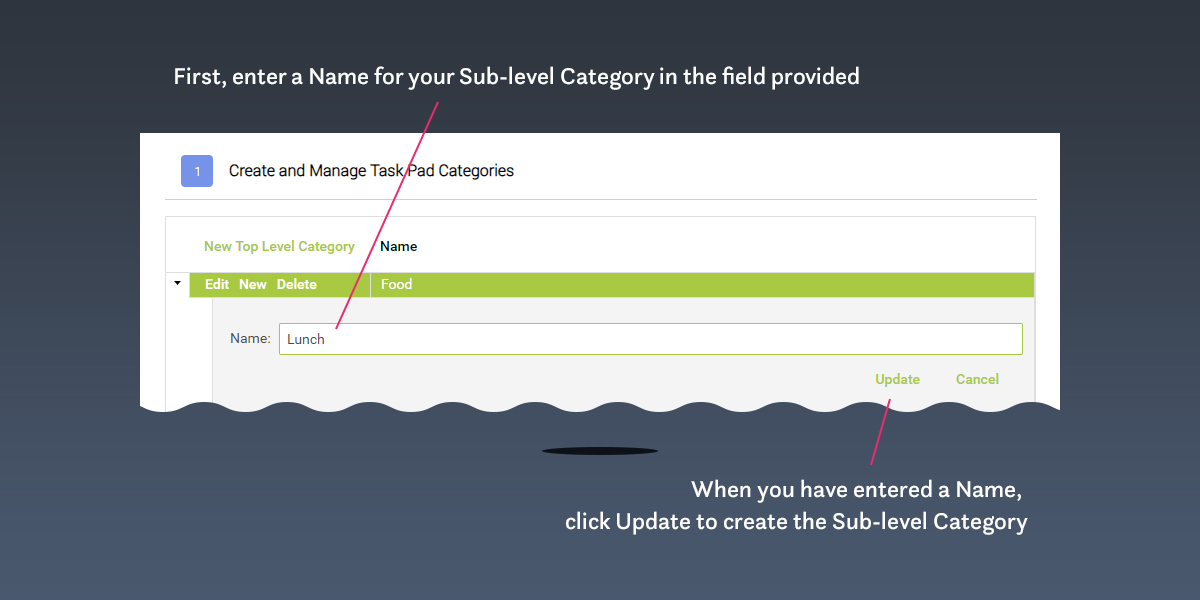
Once presented, enter the Name of your Sub-Level Category in the field provided and then click the Update button.
Repeat this process to create all of your Sub-Level Categories (up to a maximum of 8 times).
Section #02 : Link End Products with Task Pad End-level Categories
End-level Categories can be thought of as the 'final destination' in your Category tree.
Top Level Category > Sub-level Category > End-level Category
A real-world example might be :
Drinks > Hot Drinks > Coffees
End-level Categories are where you should link the End Products that you wish to make available via Task Pad.
Before proceeding with End Product Linking ...Linking an End Product with an End-level Category is straight-forward, but I recommend that you create your Modifier Templates and Modifier Options before linking items with Task Pad.
It may also be necessary (if you haven't done so already and intend to create new Cloud POD Items as End Products) to create the Cloud POS Items that you need to populate Task Pad with.
Jump to section :
Setting up your Task Pad Modifier Templates and Options
Jump to section :
Creating End Products for use with Task Pad
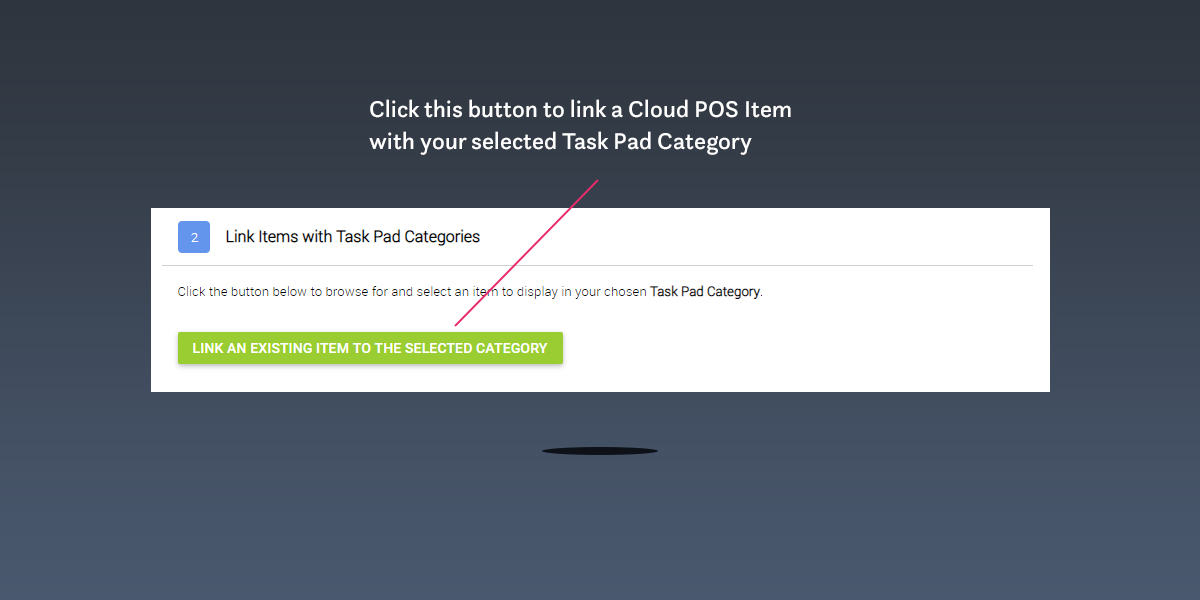
To link an End Product with Task Pad, click the Link an Existing Item to the Selected Category button on the Task Pad Setup screen.
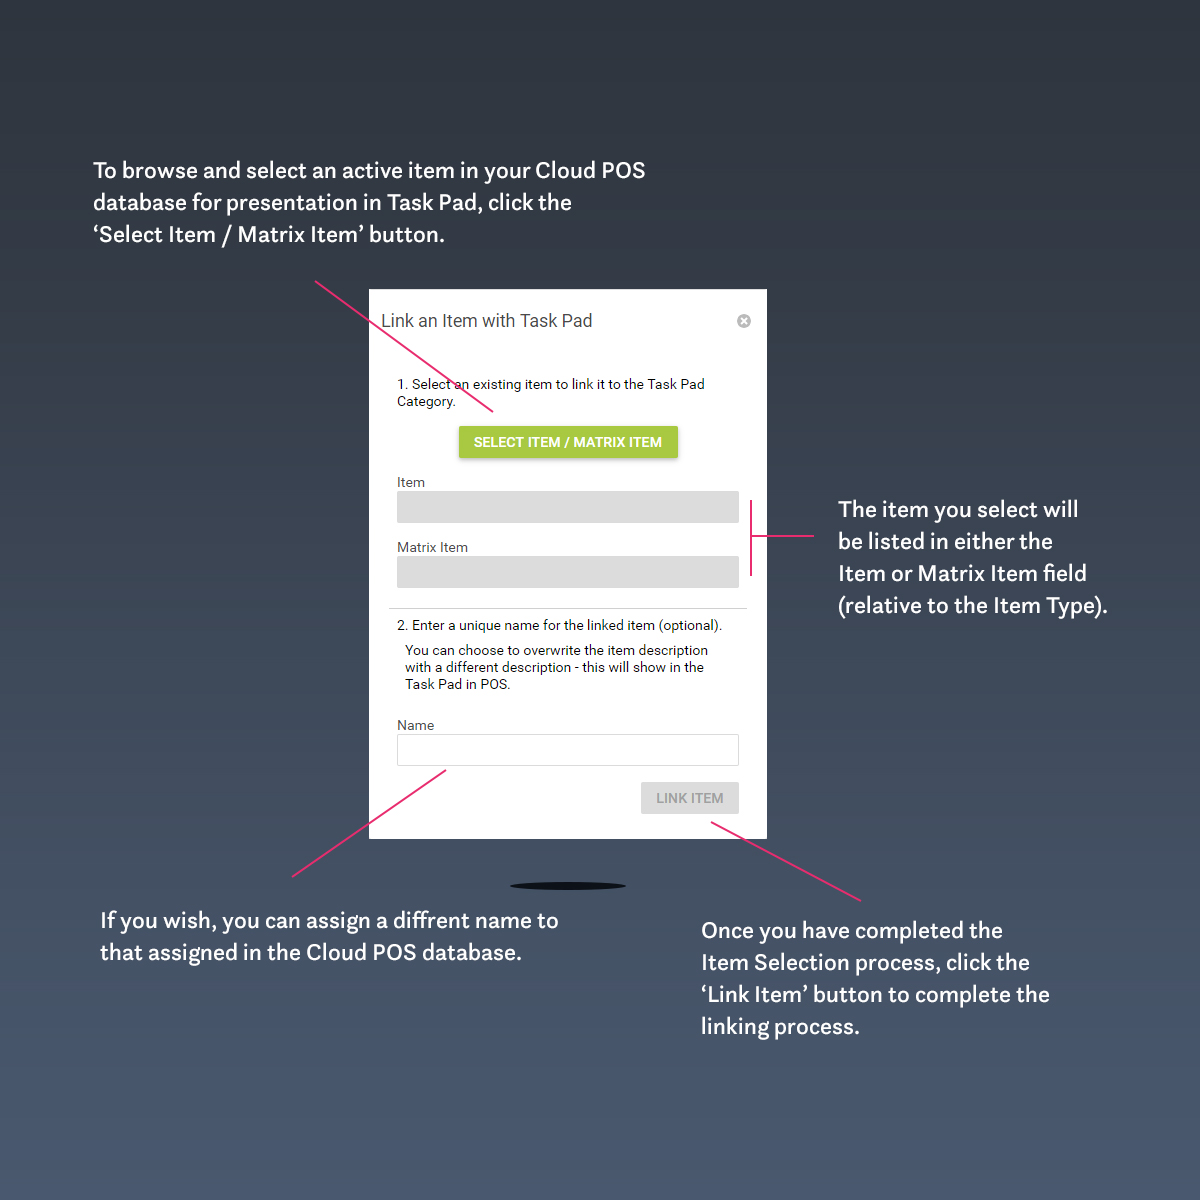
A panel will be presented inviting you to browse active items in the Cloud POS product database. To do so, first click the Select Item / Matrix Item button.
A second panel (Item Select Panel) will be displayed containing your active items. You can page through all available active items or refine your search using any combination the Filters and Search Fields presented :
- Filter on Item Type
- Search on Item Lookup Code, Description, Brand, Department and Category.
To execute a search, press the Return key on your keyboard.
When you have identified the item you wish to link with Task Pad, click to highlight the row (the selected row will highlight in Dark Blue) and click the Select Item button at the foot of the panel.
The Item Select Panel will close automatically and the Link an Item with Task Pad panel will be available for you to complete the linking process.
Your selected item will be listed in either the Item or Matrix Item field (dependent on the Item Type you have chosen to link with Task Pad).
If you wish, you can assign a different name to the item for presentation in Task Pad.
Once you have completed Item Selection process, click the Link Item button (now displayed as an active button) to complete the Item Linking Process.
Repeat the steps for linking items as required (remembering to select the relevant categories as you progress through the items you wish to link with Task Pad).
Section #03 : View and Manage Items Linked to Task Pad
All items linked with Task Pad are able to be viewed and managed via the View and Manage Items Linked to Task Pad section of the Task Pad Setup screen.
To view an item that has been linked to Task Pad, you must first select a category from Section #01 (Create and Manage Task Pad Categories).
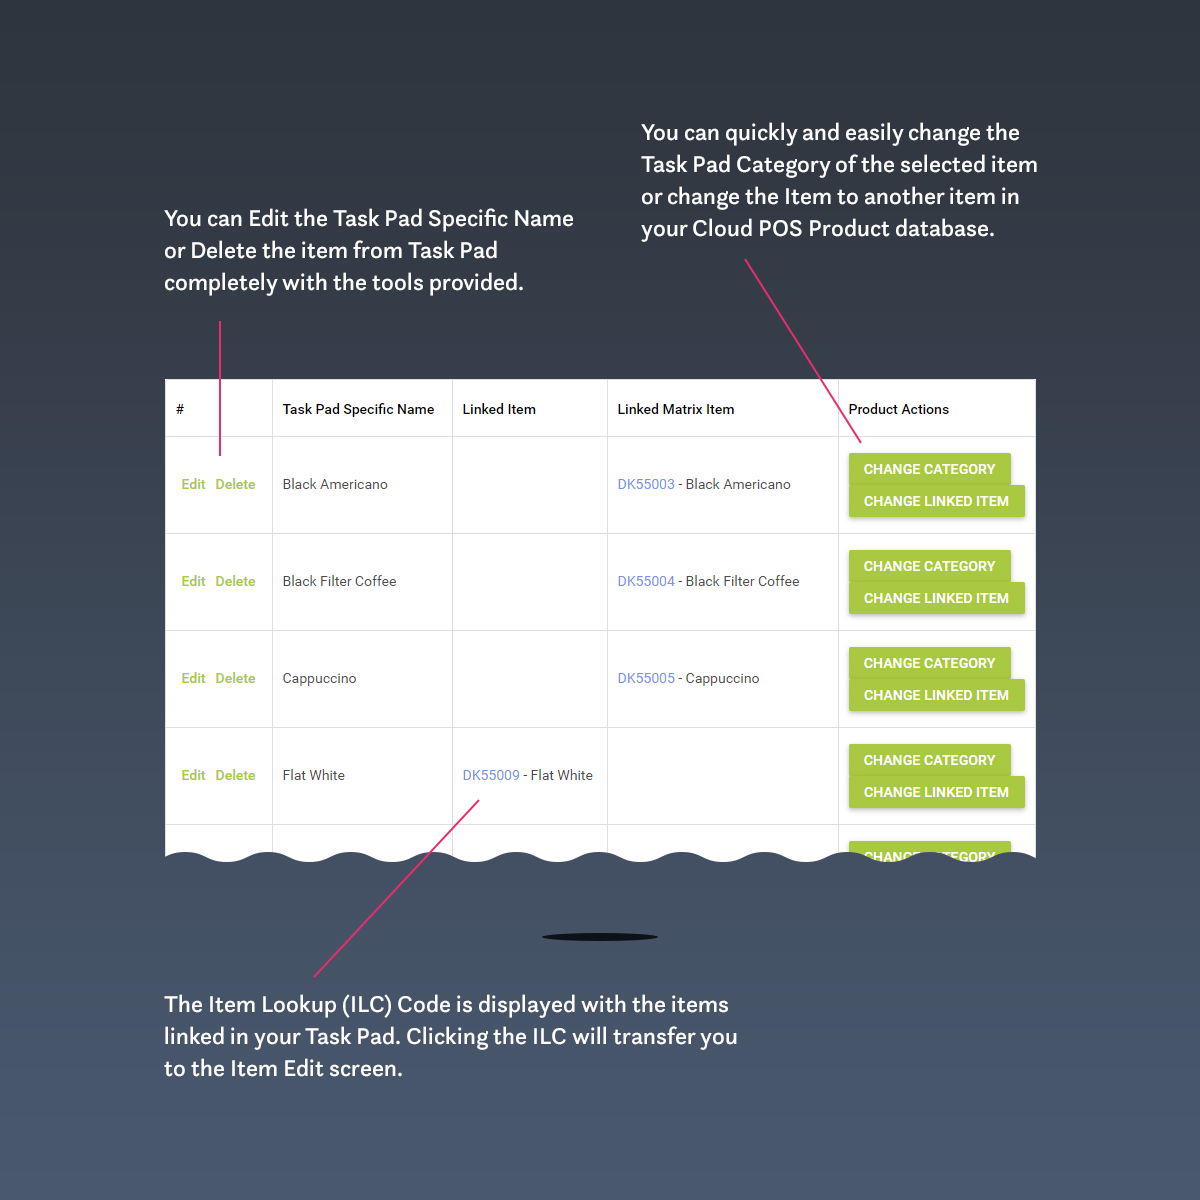
From within the View and Manage Items Linked to Task Pad section, using the buttons and links provided, you can :
- Edit the name of the item as displayed in Task Pad;
- Delete the item from the selected Task Pad category*;
- View the Task Pad Specific Name, Linked Item (or Matrix Item) and associated Item Lookup Code;
- Change the Task Pad Category for the selected item;
- Change the Linked Item to another active item in your Cloud POS Product Database;
- Transfer directly to the Item Edit screen of a selected Task Pad Item (by clicking the listed ILC).
* Note that, by design, deleting an item from your Task Pad will not delete the item from your Cloud POS Product Database.
Setting up your Task Pad Modifier Templates and Options
Remember ...
Modifier Options can be thought of as the means with which to personalise a product (or service) for your customer. Modifier Options are not inventory-tracked Cloud POS Items and come in two forms ... Notes and Price Modifiers.
To create a Task Pad Modifier, you must access the Modifier Template Setup screen in Cloud POS Back Office.
To do so, open the main Back Office navigation and locate the Modifier Template Setup option contained within the Setup section.
Note : If you are within the Task Pad Setup screen already, a button is provided in the top-right area of the screen to quickly transfer you the Modifier Template Setup screen.
Creating Modifier Templates and Modifier Options is simple but, before proceeding, let's familiarise ourselves with the features of the Modifier Template Setup screen :
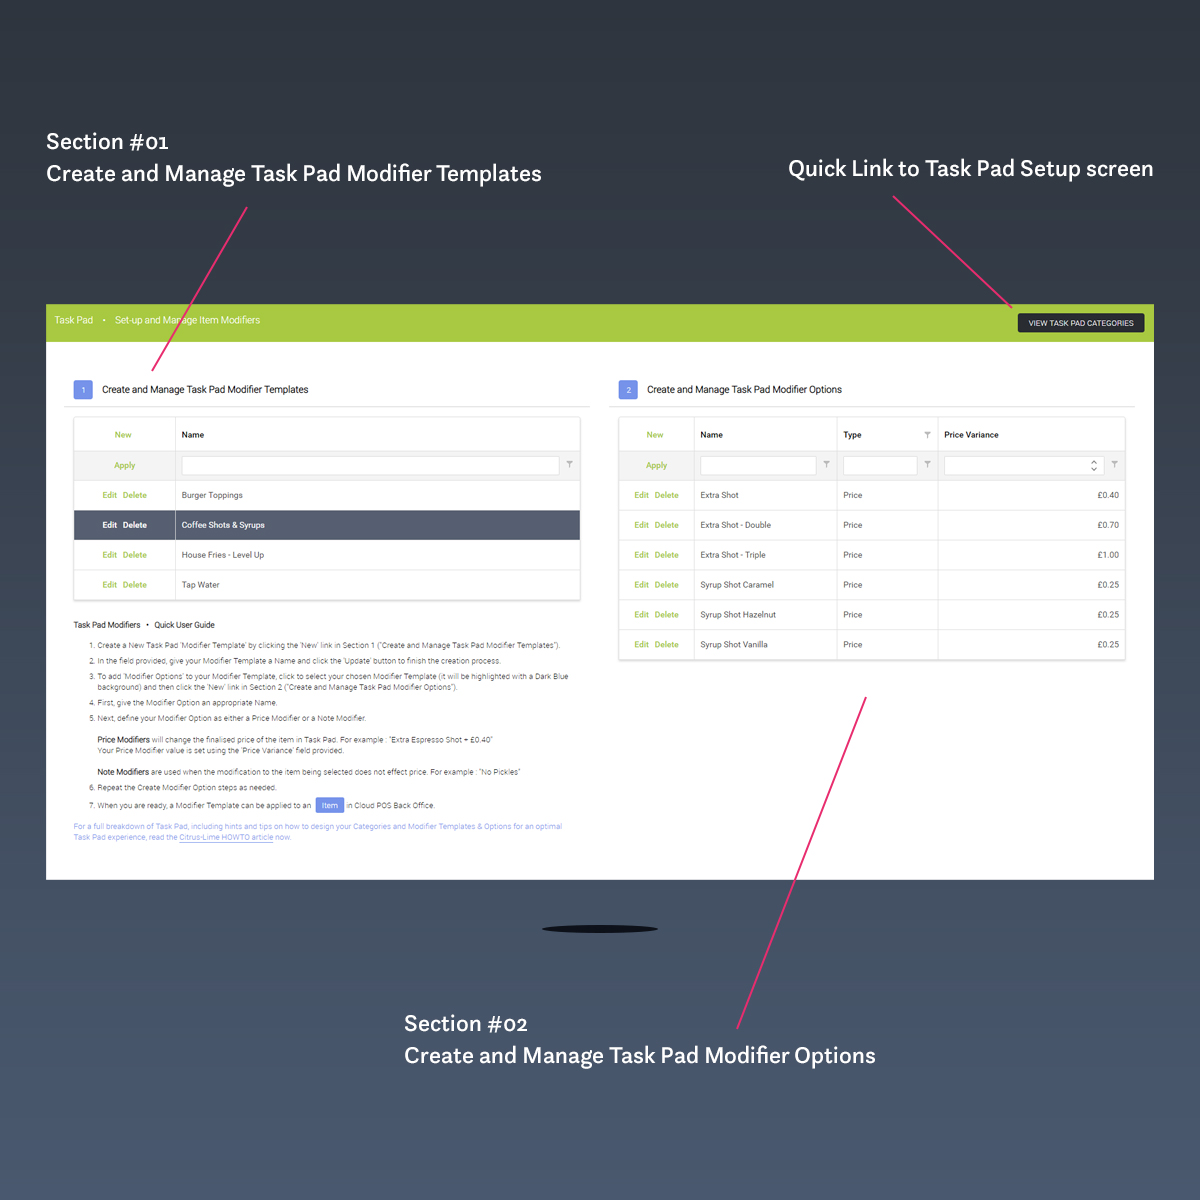
Section #01 : Create and Manage Task Pad Modifier Templates
Task Pad Modifier Templates are created to give context to all of the Modifier Options that you will link within it.
For example, if you are planning to offer Coffee and "Extra Espresso Shots" and "Syrup Flavours" will be available as part of your product personalisation service, then a logical Modifier Template name would be Coffee Shots & Syrups.
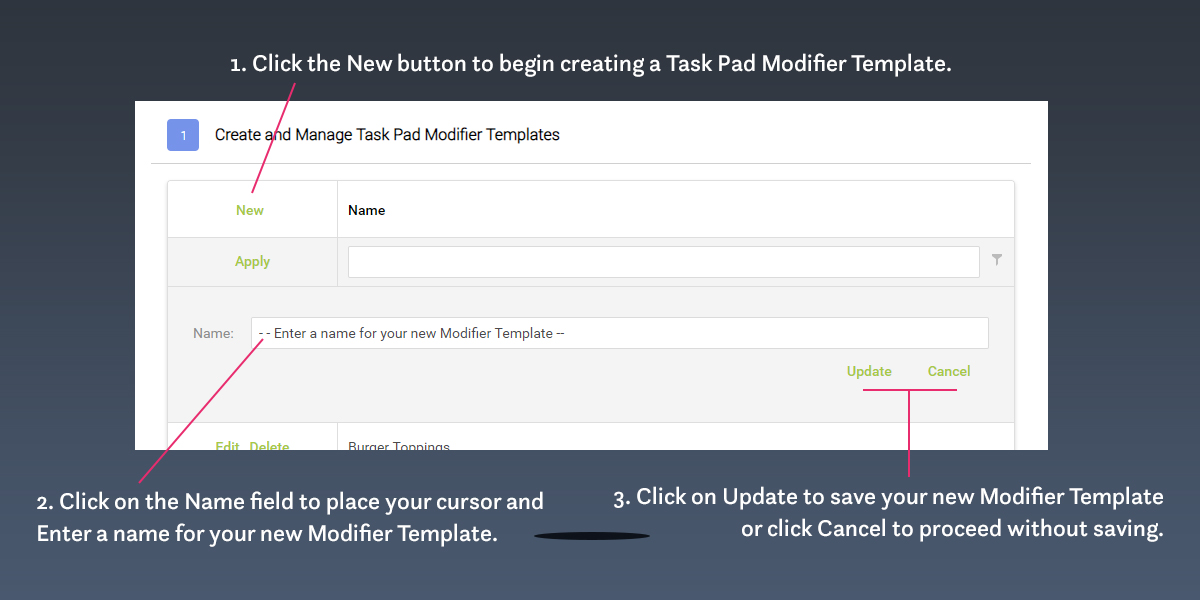
To create a Task Pad Modifier Template, locate and click the New link within Section #01 of the Modifier Template Setup screen.
Once clicked, a panel will be displayed directly beneath. Enter a Name for your Modifier Template and click the Update link to complete the creation process. If you change, your mind, click the Cancel link to close the panel without saving.
Repeat the Create New Modifier Template steps as required.
If you want to delete a Modifier Template from your Task Pad, simply locate the correct Modifier Template from the grid in Section #01 and click the Delete link provided. If you have created a sizeable number of Modifier Templates, you may need to page though the grid or, alternatively, use the Search & Filter tools provided.
To search for a Modifier Template in your grid, click the search field provided to place your cursor, type a search term associated with the Modifier Template Name and press Return on your keyboard. The Modifier Template grid will refresh to display a refined selection of Modifier Templates containing your specified search term.
Note that deleting a Modifier Template will also delete all of the Modifier Options that have been linked with the Modifier Template you are choosing to delete. The Delete process will also remove the association with any Cloud POS Items that you have established prior.
Section #02 : Create and Manage Task Pad Modifier Options
To create Task Pad Modifier Options within a specific Task Pad Modifier Template, first locate your chosen Modifier Template within the grid in Section #01 (Create and Manage Task Pad Modifier Templates) and click to select it (the grid row will highlight in Dark Blue).
Once selected, the grid in Section #02 (Create and Manage Task Pad Modifier Options) will refresh to display any previously associated Modifier Options.
Note : If the grid is blank following the selection of a Modifier Template, then this indicates that are no Modifier Options yet associated.
Before creating a New Modifier Option within your selected Modifier Template, let's familiarise ourselves with the features of the Modifier Options grid displayed in Section #02 :
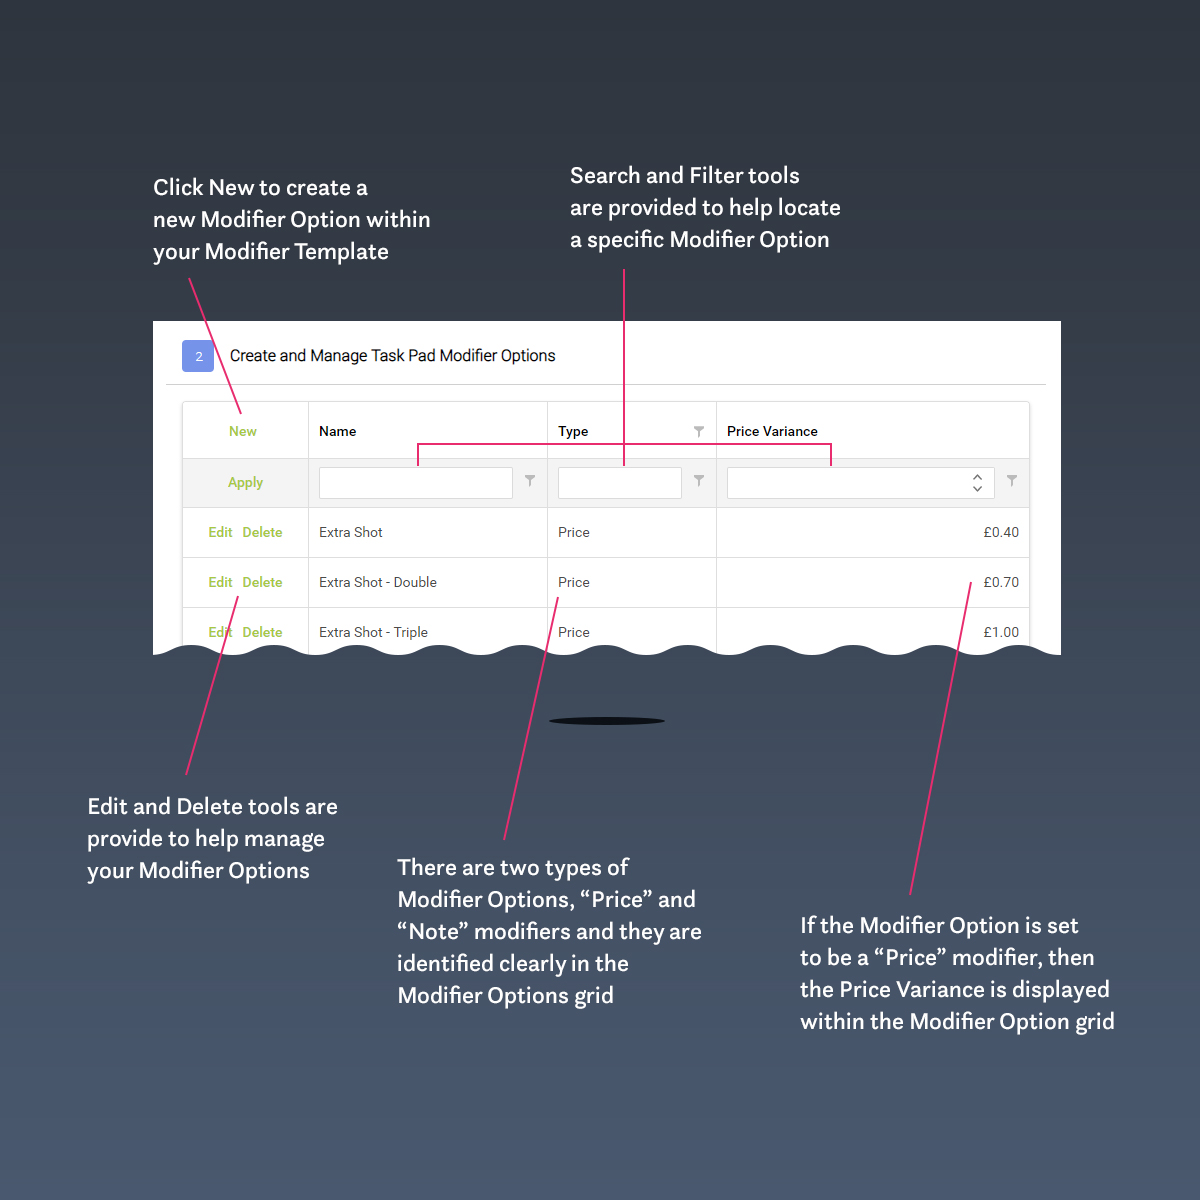
To create a new Modifier Option, locate and click the New link within the Modifier Option grid in Section #02.
Once you have clicked the New link, a panel will be presented directly beneath.
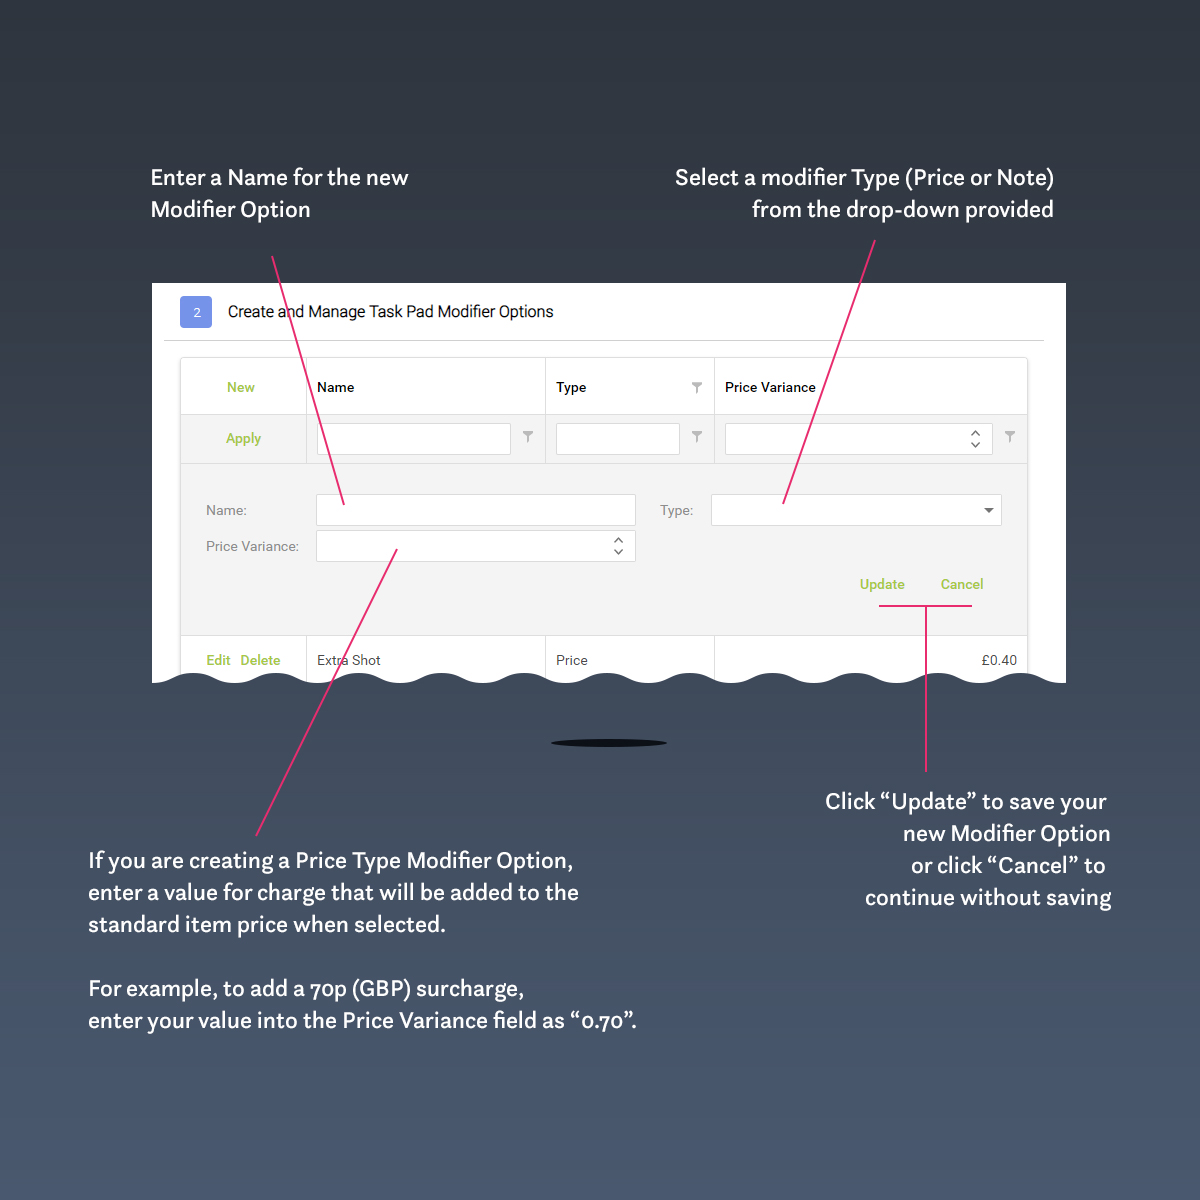
- Enter a Name for your Modifier Option;
- Select the Type of Modifier Option you wish to create (Price or Note) from the drop-down list provided;
- If you are creating a Price Modifier, enter a Price Variance into the field provided. For example, if your Price Modifier attracts a 70p (GBP) surcharge, enter your Price Variance value as "0.70".
Once you have set the desired properties of your Modifier Option, click the Update link to save and continue. If you want to continue without saving, click the Cancel link.
Repeat the New Modifier Option steps as required.
Creating End Products for use with Task Pad
What is meant by "End Products"?
End Products are essentially Cloud POS Items created for use within Task Pad.
For example, let's consider a "Latte". There's different ways to approach this but, in my opinion, I would consider a "Latte" to be a Product Type, not an End Product. In traditional Cloud POS parlance, a Latte would be a Matrix Parent. The Matrix Components of Latte would be relative to the Size.
Which Cloud POS Item Types are best for Task Pad?
Ultimately, you can elect to display any Cloud POS item type within Task Pad. Task Pad is effectively an alternative way to organise, browse and select items to add to a Cloud POS transaction.
However, dependent on your intended use of Task Pad, certain item types are more logical than others.
In a Cafe setting, there will typically be a mixture of Made to Order and CPG* products on the menu.
* CPG = Consumer Packaged Goods - an example of a CPG item would be Canned Drinks (ie. Diet Coke ... other carbonate diet drinks are available!).
Typically, items that are Made to Order are not Inventory Tracked in the same fashion as CPG items.
Therefore, it is advisable to create your Cloud POS Item as Non-Inventory.
If there are no Dimension aspects to consider with your menu item (such as Size), then you should create your Cloud POS Item as a Standard, Non-Inventory item.
However, if (for example) Size is a consideration of the menu item, you might consider creating our Cloud POS Item as a Matrix Item and generating Component Items from the application of a Matrix Template.
The alternative is to create individual Standard, Non-Inventory items for each size variant of the menu item.
Each approach has benefits and compromise in the initial set-up process but I believe that, where dimensions such as size are relevant, a Matrix Item is the optimal approach as the selection process within Task Pad is made simple for the end user (as there are fewer overall products to select from within the user interface, speeding up the ordering time and improving the customer experience).
However, at present, when creating Matrix Component Items in Cloud POS Back Office, it is not possible to generate the component items automatically as Non-Inventory items.
Following the generating of the components, each resulting item will need to be opened and converted to a Non-Inventory item. This is not a complicated process but will add a small amount of time for you initially. However, it's a one-off task that will benefit the end user in a meaningful way and increase your Customer Experience.
Remember that Cloud POS Items can be deactivated but not deleted. With that in mind, you are advised to plan your item types before creating them.
Applying Task Pad Modifier Templates to End Products
The method of applying a Task Pad Modifier Template to an End Product is always the same however, depending on the Type of Cloud POS Item you are electing to apply a Modifier Template to, the location of the feature on the Item Card can vary.
In all instances, you must first locate the Item within Back Office.

Expanding the main navigation in Back Office, locate the Items option within the Create & Manage Items section and click to access the Browse Items screen.
Using the tools provided in the Browse Items screen, locate the Cloud POS Item you wish to apply a Task Pad Modifier Template to and click to open the Edit Item screen.
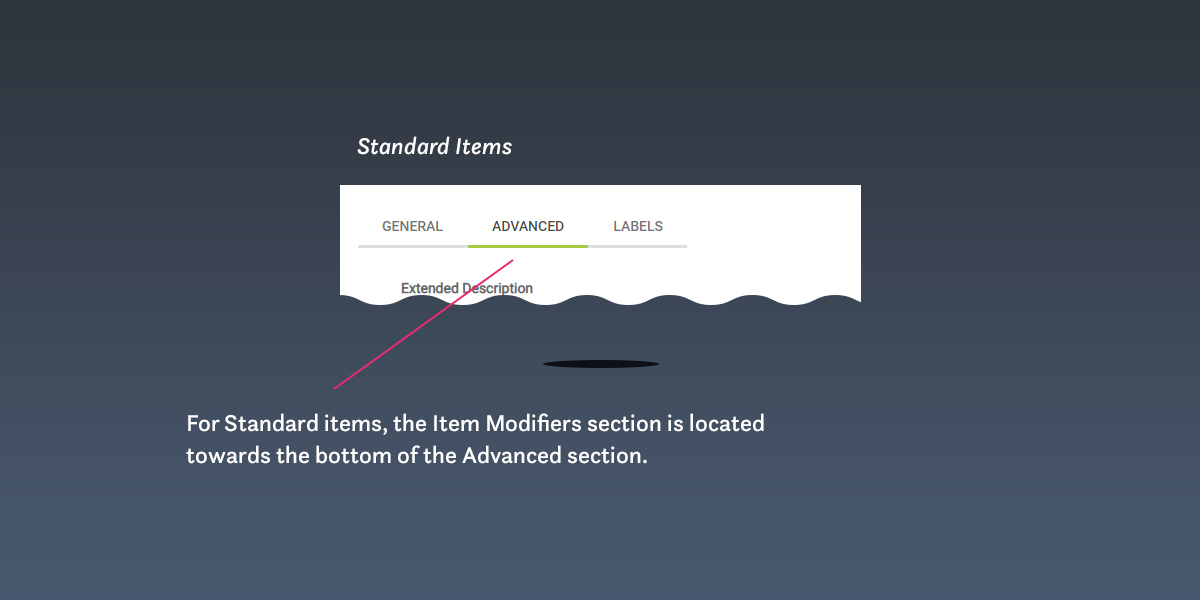
Standard Items : Locating the Item Modifiers section on the Edit Item screen
Click the Advanced tab on the Edit Item screen and, once loaded, scroll towards the bottom of the screen to locate the Item Modifiers section and select a Modifier Template to apply.
Matrix Parent Items : Locating the Item Modifiers section of the Edit Item screen
There are no tab sections within the Edit Item screen of a Matrix Parent Item. To locate the Item Modifiers section, simply scroll towards the bottom of the screen.
Applying Modifier Templates to a Cloud POS Item
Once you have located the Item Modifiers section of the Edit Item screen, applying a Modifier Template is quick and easy.
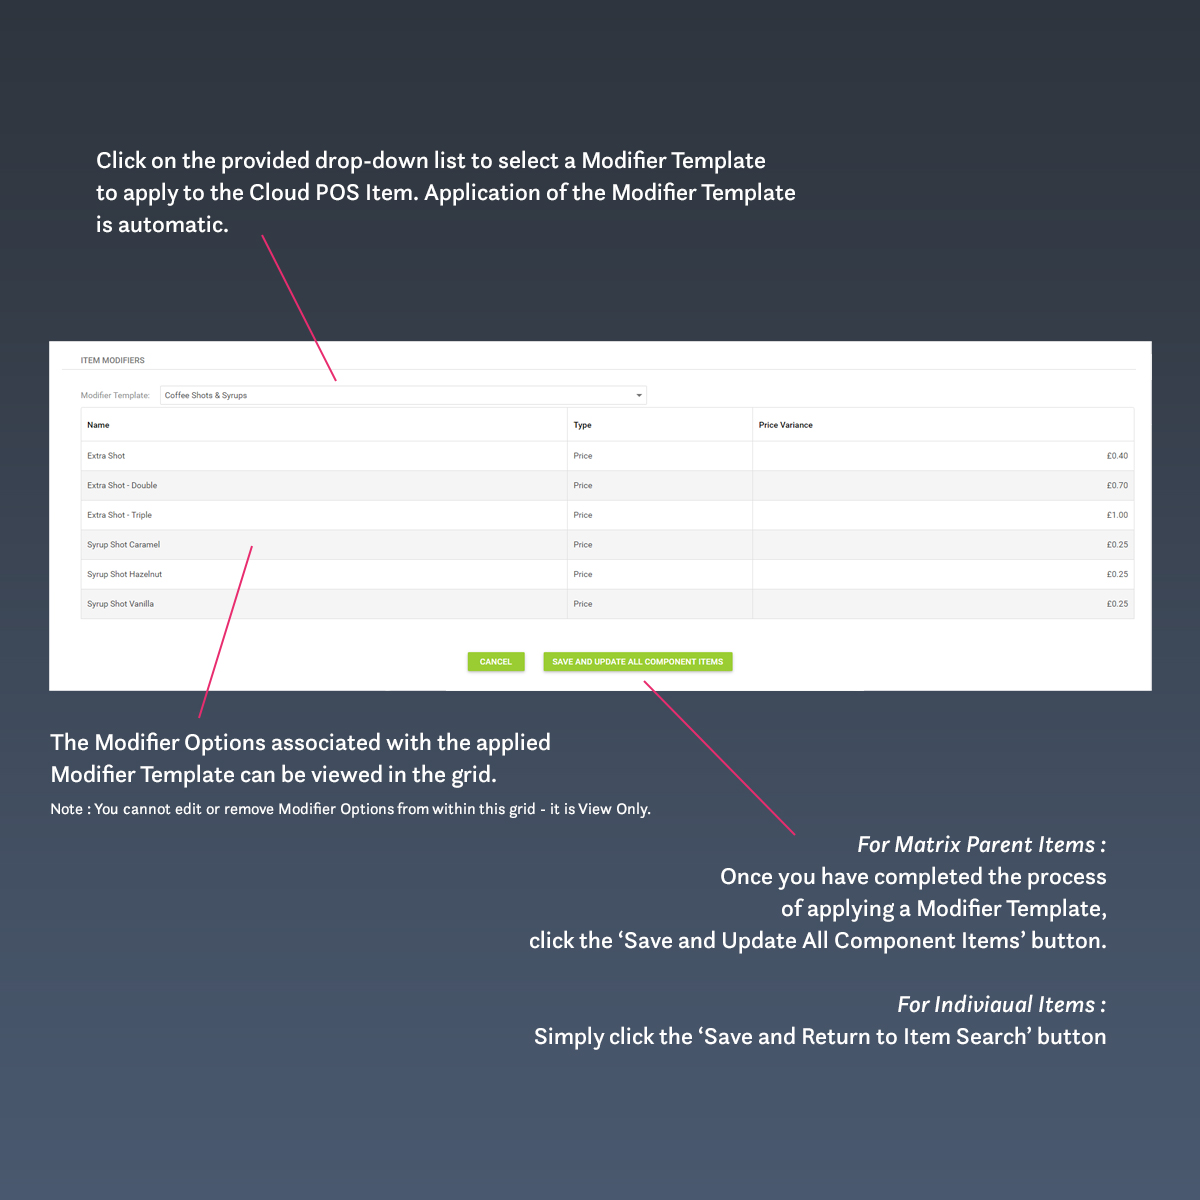
Simply select the required Modifier Template from the drop-down list provided and the Modifier Template will automatically apply. The Modifier Options associated with the applied Modifier Template will be presented in a grid (below the Modifier Template drop-down).
Note that you cannot edit or remove Modifier Options from this grid - it is View Only.
Replacing an applied Modifier Template from a Cloud POS Item
To Replace an applied Modifier Template from a Cloud POS Item, simply make another selection from the Modifier Template drop-down on the Edit Item screen.
Removing an applied Modifier Template from a Cloud POS Item
To Remove an applied Modifier Template from a Cloud POS Item, simply select the None option from the Modifier Template on the Edit Item screen.
For Modifier Templates applied to Matrix Parent Items, the Replace or Remove steps will be applied to all Matrix Component Items automatically.
Task Pad Set-up : Hints and Tips
Can't see the changes you've made in Task Pad?
Task Pad is loaded when the Cloud POS Till is loaded and doesn't update until Cloud POS is loaded again. To view any changes you make to Task Pad, including New Task Pad Categories or Linked Items, you must restart your Cloud POS browser session.
Can't see some items in Task Pad (even though you've restarted your Cloud POS session)?
When setting up or modifying Task Pad in Back Office, it is possible that you forgot to Link your Items with a Task Pad Category. It's easily done. Select a Task Pad Category in Section #01 of the Task Pad Setup screen in Back Office and check the grid in Section #02 to ensure all expected items have been linked. If you need to link items, remember to restart your Cloud POS browser session.
Want to configure Task Pad to load by default?
Within Back Office, Task Pad can be configured to load automatically as the default Cloud POS till screen. This is perfect if you have Cloud POS lanes dedicated to your Cafe (or other Quick Service Environment) setting.
To configure Cloud POS in this manner :
- In Back Office, locate the Setup section of the main navigation and select the Registers & Barcode Label Printers option.
- Click the Edit option on the Register you wish to configure;
- From within the Edit screen, locate the Settings section;
- Within the Settings section, locate Automatically show the Task Pad after every transaction and check the tick-box labelled Show Task Pad Automatically;
- Scroll to bottom of the Edit screen and click the Save button.
When you restart your Cloud POS browser session, Task Pad will automatically be presented as the default Cloud POS Till Screen.
Want to quickly access Task Pad from the standard Cloud POS Till Screen?
Task Pad is easily accessed from the Actions menu in the Cloud POS but, if you're a fan of keyboard shortcuts, you can quickly access Task Pad by pressing ALT+T on your keyboard.
If you want to drop out of Task Pad quickly and return to the standard Cloud POS Till Screen, you can do that by pressing the ESC key on your keyboard.