In this article, we look at the setup and basic functionality of a Dojo card terminal.
This terminal can be integrated with Cloud POS, enabling you to accept integrated payments and avoid the need to manually key in amounts. This is faster, simpler and reduces the possibility of errors.
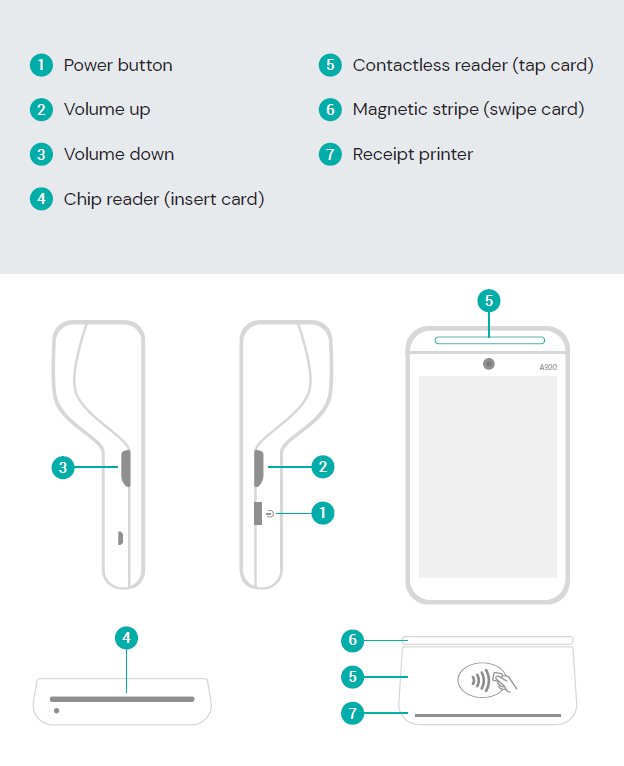
Understanding the terminal functions
Getting Started
1) Remove the battery protection sticker
Open the back of the card terminal to remove the battery and peel off the protective sticker.
2) Power up
Connect the USB cable to the power adapter and plug it into the charging base.
To power on the terminal, hold down the power button for 2-4 seconds.
3) Connect to Wi-Fi
You’ll need to connect to Wi-Fi to set up your terminal — follow the steps on-screen. Make sure your Wi-Fi is password protected. Once connected, you’ll need to enter the activation code you were sent by Dojo to complete the setup. Please note that Citrus-Lime do not receive these activation codes.
If you cannot connect to Wi-Fi, please refer to the ‘Frequently Asked Questions’ below.
Checking your version
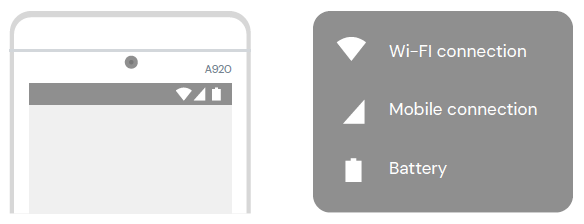
To check what version your Dojo terminal is on, and view the connection set up, go to Menu > Settings > About.
Select the arrow in the top left to return to Settings.
Setting up the terminal in the Cloud POS Back Office
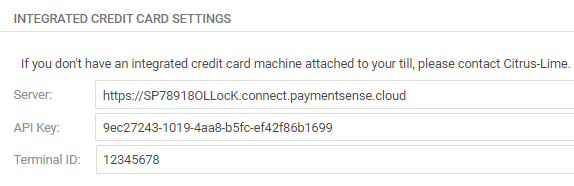
Dojo will provide Citrus-Lime with an email containing a URL, API Key and Terminal ID(s) which are entered into the register configuration in the Cloud POS Back Office.
The Terminal ID must match that of the terminal physically located by the register, i.e., if Terminal ID 12345678 is to be used with Till 01, ensure that is the Terminal ID entered into the configuration for Till 01 in the Back Office. You can view these settings by navigating to Setup > Registers & Barcode Label Printers and then clicking ‘Edit’ beside the relevant register.
The URL must be prefixed by https:// in the configuration. It will look something like this:
When the card terminal is online and in Integrated Mode, you should see a green tick box indicating that it's ready to use with Cloud POS:

Note that this tick box is for display only — you cannot tick / untick this box manually to connect or disconnect the card terminal from Cloud POS. If the tick box is not selected, please refer to the ‘Frequently Asked Questions’ section below.
Need help?
If you have received a new Dojo terminal, but the details above are blank when you view them in the Cloud POS Back Office, please contact the Citrus-Lime Support Team.
Enabling Integrated Payments
To toggle on the features to accept integrated payments via Cloud POS, carry out the following steps on the card terminal screen:
- Select Menu
- Select Settings
- Select Integrated Payments
- Enter Supervisor Code (this will have been provided by Dojo)
- Toggle on Pay At Counter
- Toggle off Gratuity
- Toggle off Pay At Table
- Use the arrow (top left) to get back to the Settings screen
- Select Non-Integrated Payments
- Enter Supervisor Code
- Toggle off Non-integrated Payments
- Use the arrow (top left) to go back to Settings
- Select Menu (3 line dashes top left)
- Select Integrated Sale to take payments via Cloud POS
Taking a payment over the phone (a 'Card Not Present' transaction)
To be able to accept payments over the phone on the card terminal, you will need to have Manually Keyed Transactions enabled. You should only need to set this up once per card terminal.
- Select Menu
- Select Settings
- Select Manually Keyed Transactions
- Enter Supervisor Code
- Toggle on Enable manually keyed transactions
- Use the arrow (top left) to go back to Settings
- Select Menu (3 line dashes top left)
- Select Integrated Sale to take payments via Cloud POS
For instructions on how to process a ‘Card Not Present’ transaction on a Dojo terminal, please refer to this article: How do I carry out a Card Not Present transaction using a Dojo terminal?
Viewing previous transactions
A week of transactions is stored on the card terminal. You can go back and email or reprint receipts for the business or customers.
- Select Menu (3 line dashes top left).
- Select Transactions.
- Select the transaction you wish to view.
- Select Receipt.
- You now have the option to Email Receipt or Print Receipt.
If you select Email Receipt, you'll need to type in the email address to which you wish to send the receipt.
Remember you can also print or email itemised receipts from Cloud POS.
Rebooting the Dojo terminal
Press and hold the power button (located on the right-hand side of the terminal):
You'll see four options:
- Airplane mode
- Vibration
- Reboot
- Power Off
Select Power Off, then press and hold the power button on the side of the card terminal to turn the card terminal back on.
Contacting Dojo Customer Service
The Dojo Customer Service team can be contacted on 0800 044 3550.
They can access the card terminal remotely to diagnose any issues.
Frequently Asked Questions
Will the terminal work without being connected to Wi-Fi?
Yes. The card terminals come with a SIM card included, so if you are not connected to Wi-Fi, you will have a 4G connection.
If your Wi-Fi connection goes down, your terminal can switch to mobile data so payments aren’t interrupted. If you don’t already have mobile connectivity enabled, contact Dojo to get this set up.
You can also switch the Wi-Fi connection at any point by going to Menu > Settings > Wi-Fi Settings > Select a Wi-Fi Connection.
What should I do if ‘Pin Pad Online?’ isn't ticked in the Back Office?
First, check your terminal connection steps in the ‘Getting Started' section above. Next, check the Terminal ID against your register matches the ID shown on your terminal. Follow this article if you're not sure how to check the Terminal ID:
How do I find the Terminal ID (TID) on a Dojo terminal?
If the Terminal ID in the Back Office is correct, and the terminal is connected to the internet, but ‘Pin Pad Online?’ is still not ticked, please contact the Citrus-Lime Support Team.
How can I check the Terminal ID (TID) of my Dojo terminal?
Please follow the steps in this article to check your TID:
How do I find the Terminal ID (TID) on a Dojo terminal?
If the Terminal ID entered in the Back Office is correct, and the terminal is connected to the internet, but ‘Pin Pad Online?’ is still not ticked, please contact the Citrus-Lime Support Team.
Can I use the terminal separately from Cloud POS?
Yes - you can switch your terminal into ‘Non-integrated mode’, if needed. When you turn this function on, your card payments must be manually keyed into the card terminal, and you should use the ‘Manual Credit Card’ tender type in Cloud POS.
- Select Menu
- Select Settings
- Select Non-Integrated Payments
- Enter Supervisor Code
- Toggle on Non-Integrated Payments
- Toggle on Sales
- Toggle on Refunds
- Use the arrow (top left) to get back to the Settings screen
- Select Integrated Payments
- Enter Supervisor Code
- Toggle off Pay At Counter
- Use the arrow (top left) to go back to Settings
- Select Menu (3 line dashes top left)
- Select either Sale to take a payment, or Refund to make a refund.
The card terminal always needs to have an enabled payment option.
If you want to switch to Non-Integrated mode, you'll need to enable this before you disable Integrated mode, and vice versa.
We do not advise having Integrated Payments and Non-Integrated Payments both enabled at any time except when you are switching between modes.