If you have an e-commerce site integrated with Cloud POS, you'll find that when a customer successfully places an order online, this will automatically download to your Cloud POS system.
From the Point Of Sale (POS), there are a number of functions you can carry out to help you save time and ensure accuracy whilst you prepare the customer's order for shipment or collection.
In this article, we look at the fundamental procedures involved in processing a web order in Cloud POS.
You can also watch a video guide to processing web orders here:
Where do I find web orders in POS?
Orders placed on your e-commerce site will automatically download to Cloud POS. Web orders are created as Work Orders in the Cloud POS platform, so you'll find these in POS by clicking the Recall Orders button from the bottom menu bar:
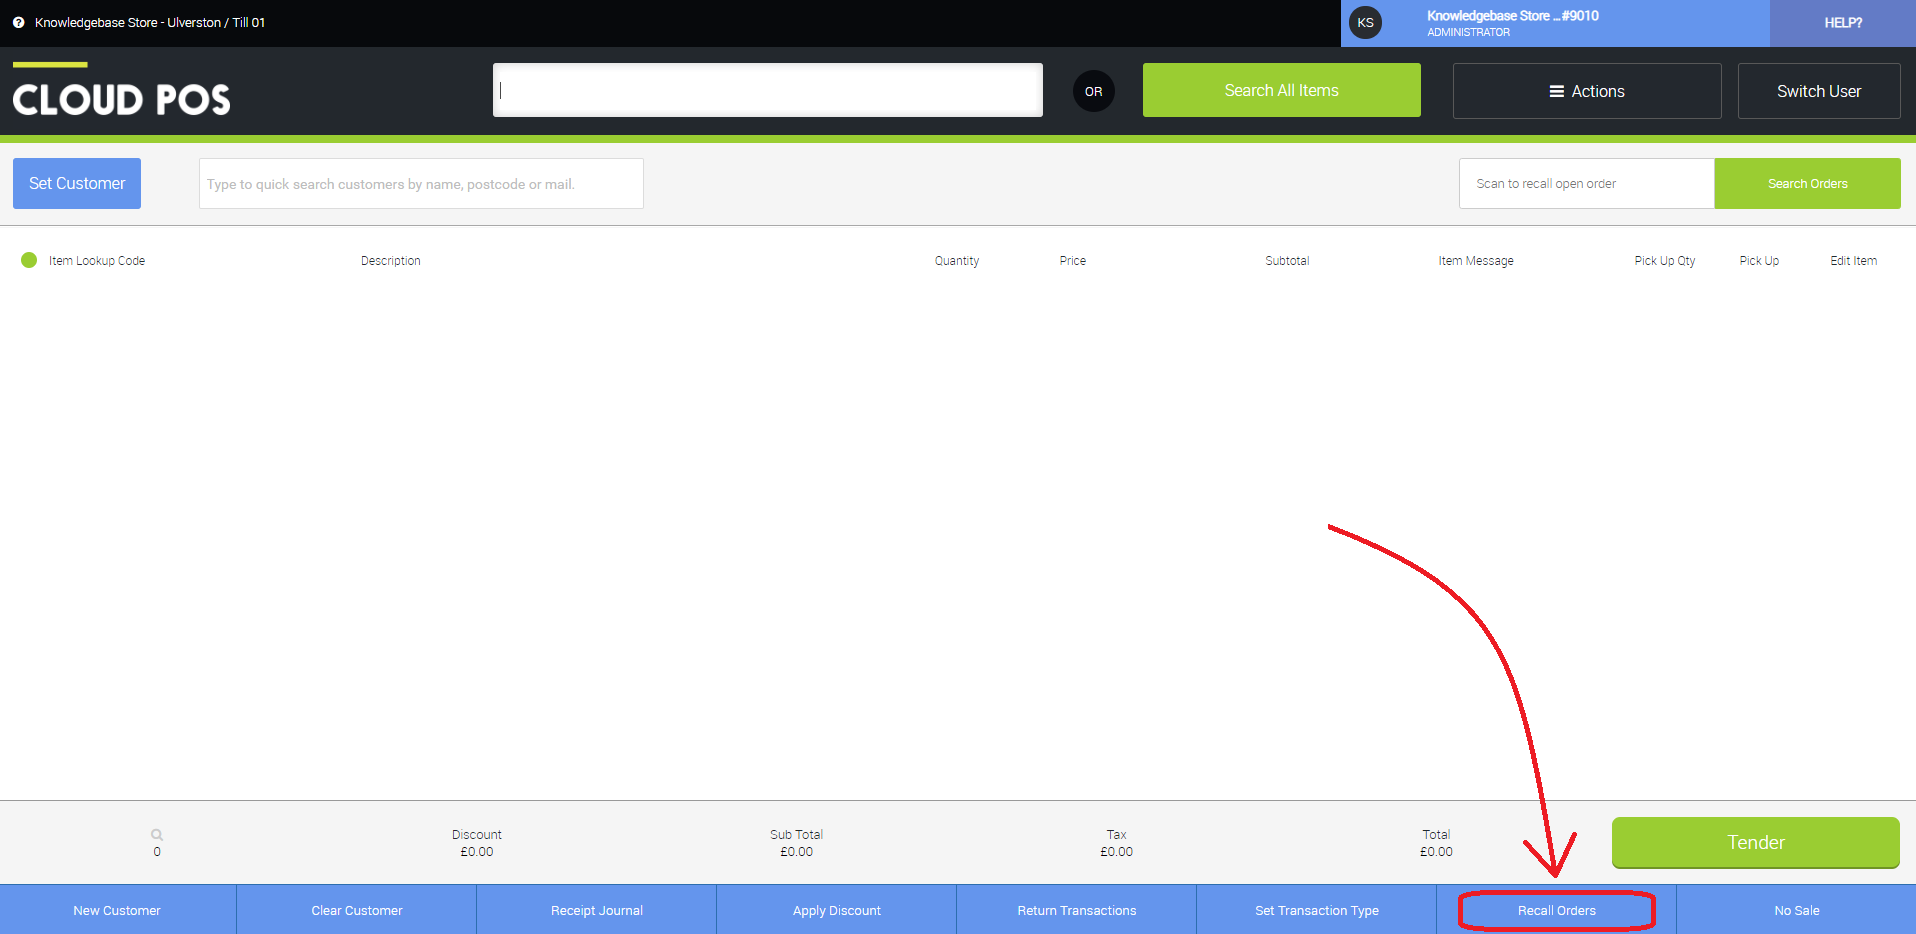
Once you've clicked to Recall Orders, you see a list of all open orders at this store. This will include Work Orders, Workshop Jobs, Layaways, and Quotes.
All web orders download with a reference 'Web Order No. ', so to focus purely on web orders, you may find it helpful to type 'Web' into the Reference field and Apply this filter.

To open the Work Order, you can either double-click on the line, or highlight the line and click the button marked Recall Selected Order.
Scan Items for Pick-up (Optional)
If you're already familiar with Work Orders created in-store, then you'll notice a difference in that when you recall a Work Order that was created by an e-commerce transaction, you're presented with an initial screen, as in the example below:
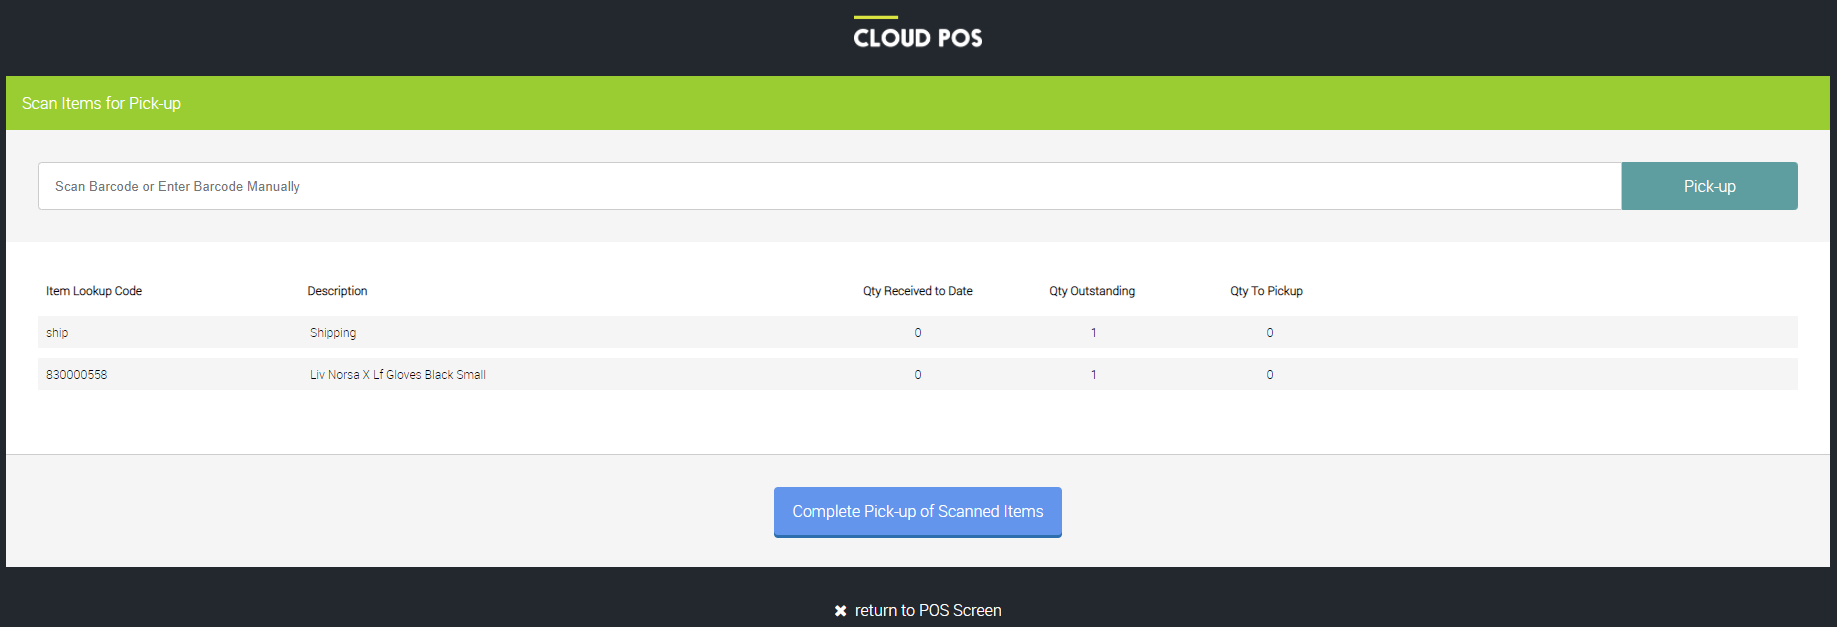
Using this functionality is entirely optional. It does allow you to check that the item(s) you are preparing for the order exactly match what the customer ordered, but you can bypass this step by clicking the button marked Complete Pick-up of Scanned Items.
If you don't intend to scan items for pick up, skip to the section below titled Printing a shipping label.
Within this screen, you have the option to scan the items that are included on the order. You do not need to scan non-inventory items such as shipping.
As you scan an item, the corresponding line will be highlighted in green and the Qty to Pickup field will update by the quantity you have scanned:
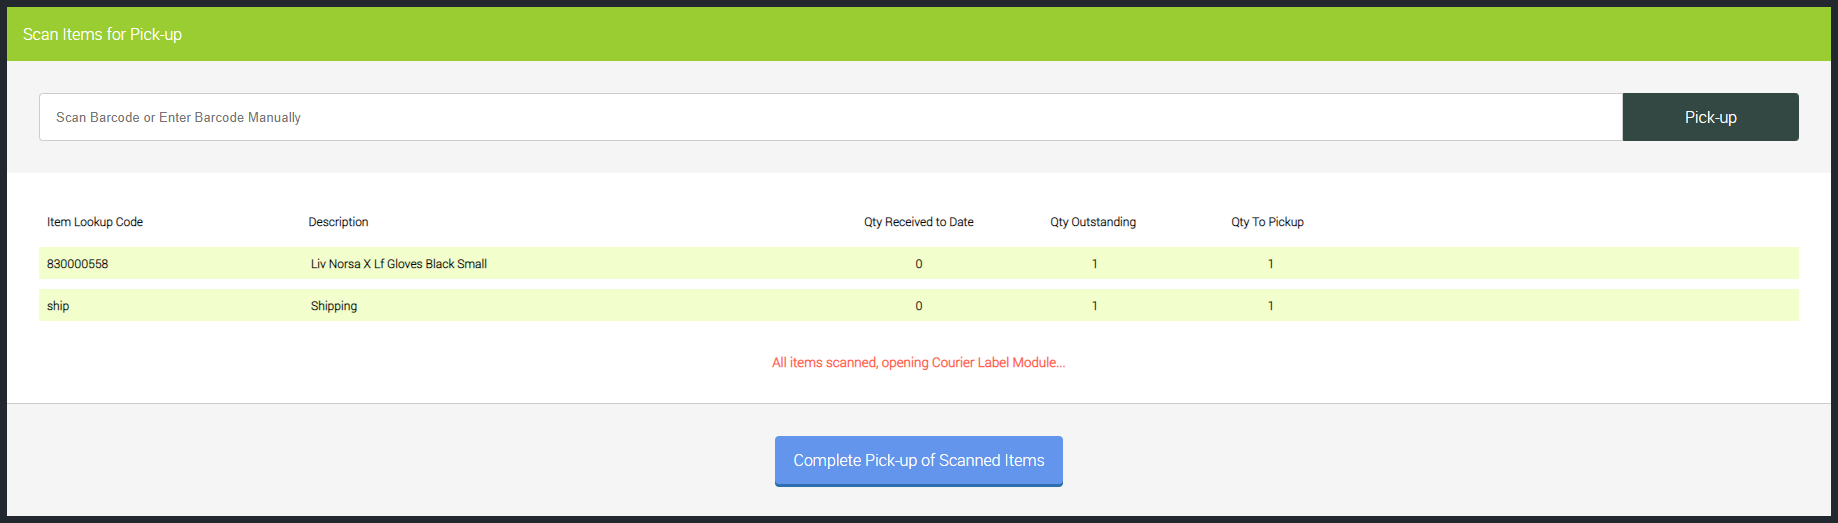
When you have scanned in all the items on the order, the Courier Integration window will then open automatically, allowing you to print a shipping label for this order if necessary.
If you would like to print a label, you can skip to the section below, titled The Courier Integration window, to find out how to do this.
Printing a shipping label (Optional)
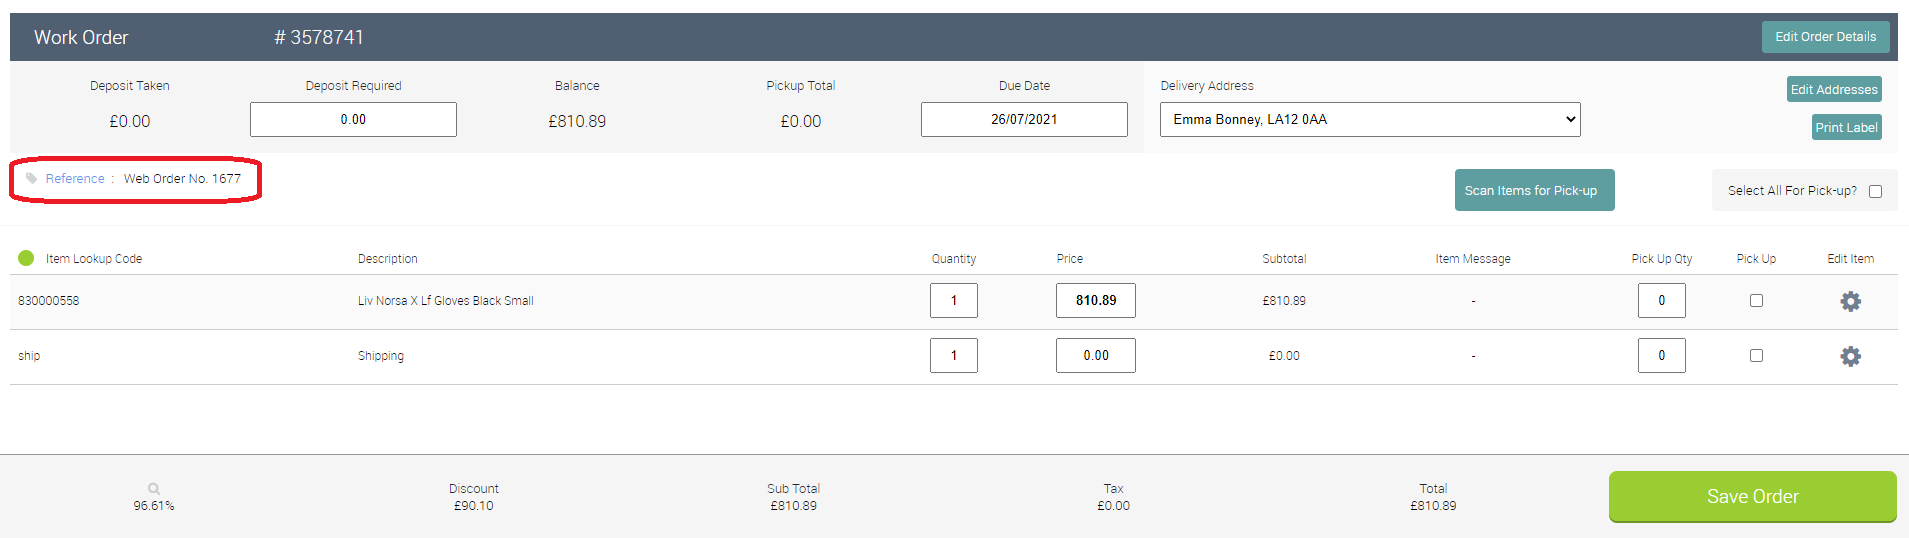
If you chose not to scan in the items for pick up and instead clicked Complete Pick-up of Scanned Items, this will take you to the general POS screen and the customer's order will be visible, with the reference showing the web order number.
You'll also arrive on the same screen if you scanned in the items and generated a courier label, as we described in the section above.
At this point, you may wish to print a shipping label, if you have integrated courier services available and the order is due to be delivered to the customer.
(If you don't plan on printing a shipping label, jump to the section below titled Picking up the items on the order)
Under the section titled Delivery Address, use the dropdown to select the relevant address or use the Edit Addresses button to add a new delivery address if the correct one is not available. If the customer has not specified a different delivery address, the billing address will be available to select:

Once you have set the Delivery Address, click the Print Label button and this will open the Courier Integration window.
The Courier Integration window (Optional)
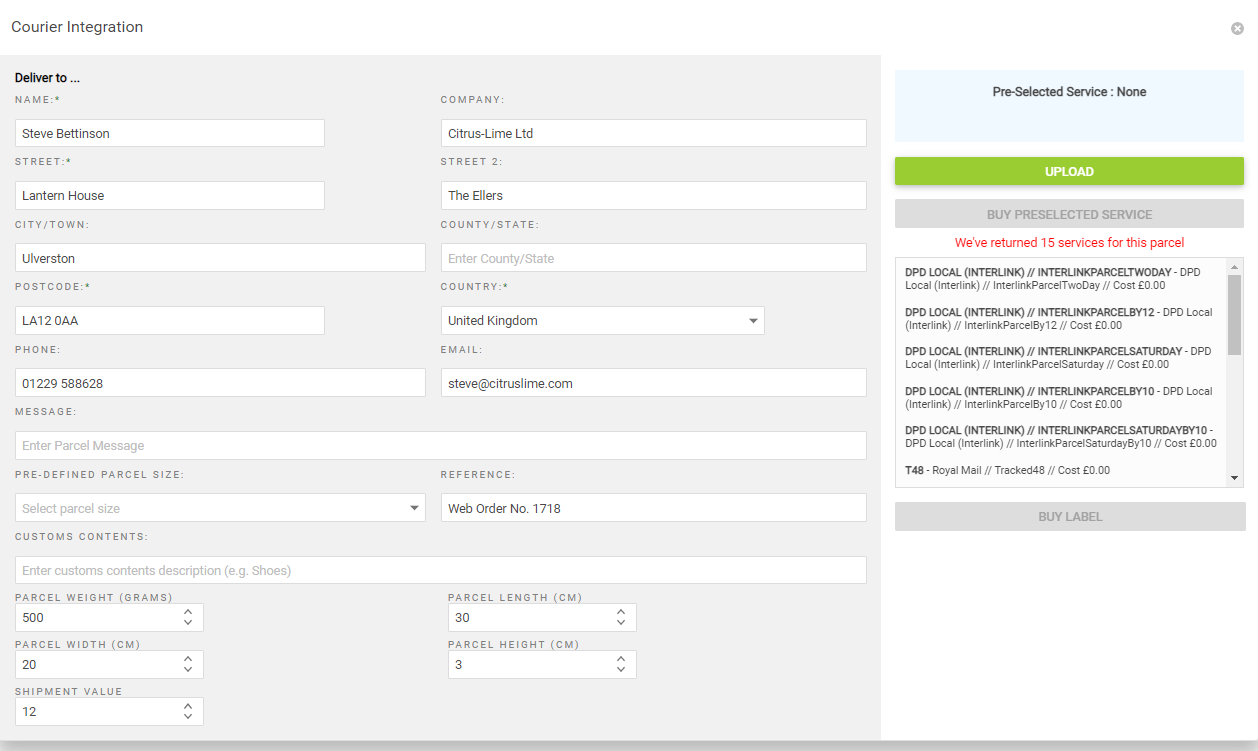
With the Courier Integration screen visible, you should now double-check the address information and enter any weight and size information.
You now have two options for selecting the courier service to use to send the shipment.
You may find that the customer has preselected the service they require when they checked out on your e-commerce site. If this is the case, you'll see an indication of this towards the top right of the Courier Integration window:
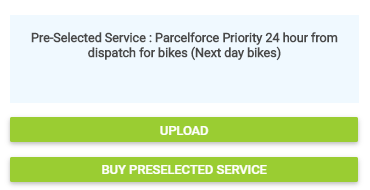
In this instance, you can click the Buy Preselected Service button and a label will print for the courier service the customer selected.
Alternatively, you can use the Upload option to manually select a service. The dimensions and weight of the shipment will dictate which courier services you can use, so once you've added this information, click Upload to update the shipping options.
NOTE: If you change any of the details within the Courier Integration screen you will need to click Upload again for these changes to register.
You then need to select the shipping service you wish to use and click the button entitled Buy Label.
A pop-up window will open in which the label is previewed, and the label will print from the courier label printer which is associated with the register you are working upon.
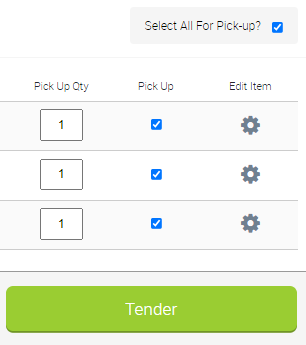
Picking up the items on the order
In almost all situations where a web order is concerned, you will be despatching - or the customer will be collecting - all items on the order at once.
This being the case, you can save time by clicking the Select All For Pick-up checkbox:
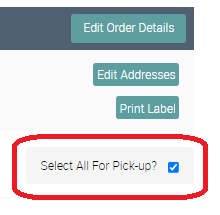
Once you do this, you'll see the Save Order button in the bottom right corner of the screen becomes retitled Tender:
Tendering the transaction
Clicking the Tender button will move you onto the Tender Transaction page. Here you'll see that the value of the transaction is already populated in the tender field that corresponds to the payment method used by the customer:
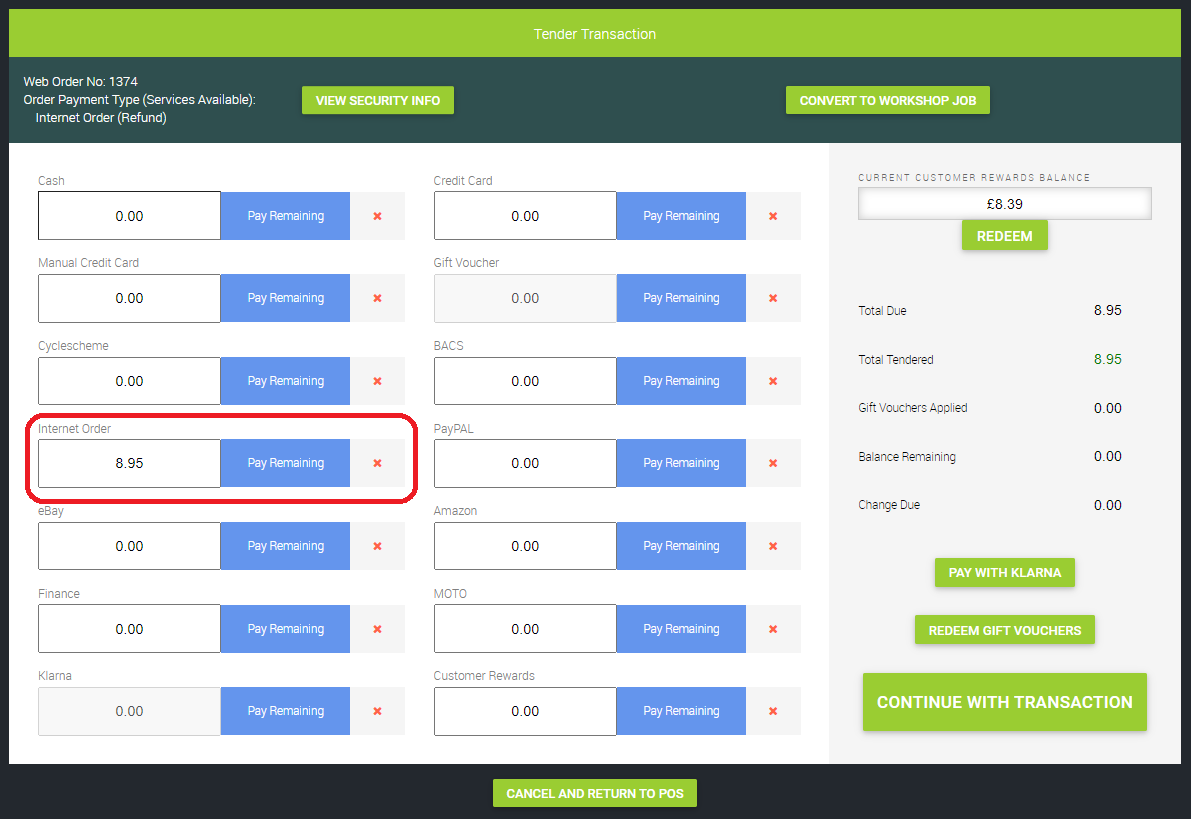
In the example above, the customer has paid by credit or debit card, so the Internet Order tender type is auto-populated. If the customer had paid by PayPal, that tender type would be populated instead.
This same principle applies to Klarna, Mobile Payment (Apple Pay), and Cyclescheme Voucher tender types, which will be auto-populated when those payment methods are used.
Note that if you have added items to the order, the tender field will only display the value that the customer paid when they placed their original order. You will need to manually take the remaining payment for the value they owe.
At this point, it is strongly recommended that you click the 'View Security Info' button and review the information that is displayed:

The security checking rules you have in place on the payment method will dictate the results you see here, but an order will not complete on the e-commerce site if the security checks you have specified are not passed.
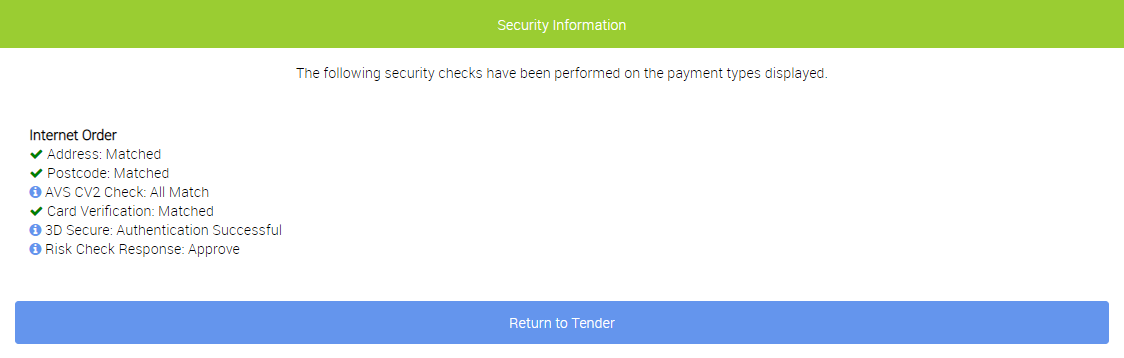
Once you're happy with the results you see, click Return to Tender and this will take you back to the Tender Transaction screen.
When you are ready to finish the transaction, click the Continue With Transaction button.
On the following screen, make your selections from the options to print a receipt, pop the cash drawer and send an e-receipt.
Finally, click Complete Transaction to finish processing the order.
Changing items on the order
If a customer makes contact prior to you preparing the order and asks to amend an item on the order, you can follow the guidance in this article:
Exchanging items on a web order I've not yet processed
Cancelling an order before dispatch
Guidance on how to remove items from an order, or cancel an entire order before you've dispatched it, is documented here:
How do I use integrated e-commerce refunds?