Setting up a Signature for use with the Customer Communications feature is simple and removes the need for you to remember to add pertinent information that the recipient (your customer) may find useful.
It's basically the same principle as your email signature. You wouldn't want to be laboured with writing that every time you sent an email so we've sought to give you the same efficient solution in Citrus-Lime POS, too.
There are two types of Signature that Citrus-Lime POS creates for you.
- Email Signature
- SMS Signature
The Email Signature, along with your name, is complete with Store Address, Telephone, Email, Web Address and Google Map information.
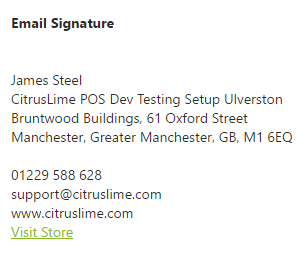
Figure 1 : Example of an Email Signature
The SMS Signature is simply a combination of your name and the store name.
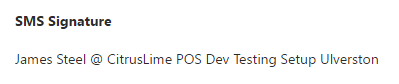
Figure 2 : Example of an SMS Signature
Step One : Setting Up the Store Details for use with your Signature
The first step is to ensure that your Store information is fully described. To check this information, you need to be in Citrus-Lime Back Office. If you aren't there now, open a new tab in your browser and log-in to the Back Office now.
Open the menu (left hand side of the screen) and select Stores from the Setup section :
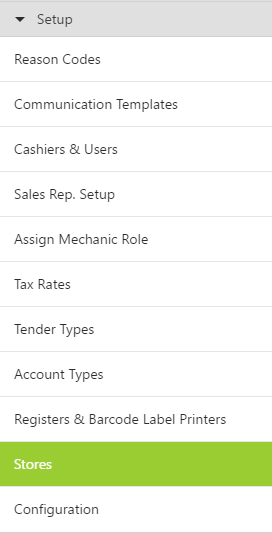
Figure 3 : Select Stores from the Setup section of the Back Office menu
Clicking on Stores will open the Stores summary page.
Note : If you are a multi-site user, then all of the stores associated with your Citrus-Lime POS account will be listed here and you should repeat these set-up steps for each of the stores listed on the summary screen.
Select a Store from the listings on the summary screen. To edit the details associated with that store, click on the Edit link.

Figure 4 : Click the Edit link to view and edit the details of an individual store listing
Now you are on the Store details screen, you can check over the details of that store and ensure that all the information is present and correct.
The signature is comprised of the following Store Details :
- Store Name
- Address (Lines 1 and 2)
- City
- State
- Country
- Postcode
- Phone Number
- Customer Services Email
- Web Address
- Google Map Link
In all instances, if the information is not included, the resulting signature is able to reformat appropriately. We recommend that you populate as much of this information as is possible to ensure that your customer's experience is a positive one. For example, including a Google Map link means that your new customers can easily locate the store. This is particularly pertinent if you offer a Click & Collect service via your Citrus-Lime Ecommerce online store.
Quick Diversion : Acquiring a Google Map Link
Adding a Google Map Link is easy. Simply visit Google Maps and search for your business name or postcode.
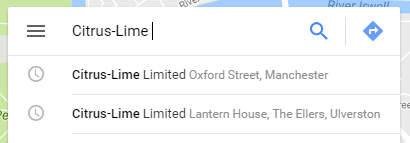
Figure 5 : Search Google Maps for your Business Name or Postcode
Once Google Maps zooms in to drop the pin, you will be given more details about your location.
Using the options Google provides, click on the SHARE icon :

Figure 6 : Click the Share icon to grab your Google Map Link
A new panel will open with the Google Map Link ready for you. It is already highlighted so all you need to do is press Ctrl+C (to Copy, you can also hover your mouse cursor over the link text, right-click with your mouse and select Copy from the menu that appears) and you are ready to paste the link into the provide field on the Store page of Citrus-Lime Back Office :
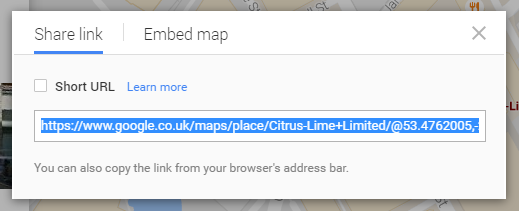
Figure 7 : Copy this link from Google Maps ready for pasting to the provide field in Citrus-Lime Back Office
Return to the browser tab displaying Citrus-Lime Back Office and locate the Google Map Link section on the Store details page.
Highlight the field and past your copied Google Map Link in (Ctrl+V to paste or highlight the field with a click, then right-click with your mouse and select Paste from the menu that appears).
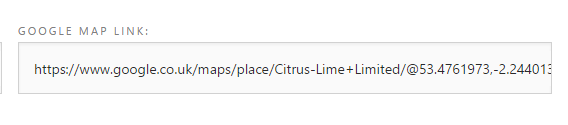
Figure 8 : Paste the copied Google Map Link in to the provided field
Once you are happy that all of the relevant information about your store has been added, scroll to the bottom of the Store details page and click the Save button.
Step Two : Adding or Editing Personal Details for use with Customer Communications Signatures
From the Citrus-Lime Back Office menu, select Cashiers & Users from the Setup section :
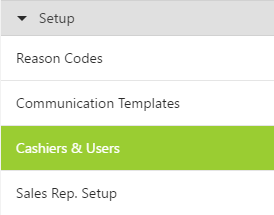
Figure 9 : Select Cashiers & Users from the Setup section of the main menu
From the list of Cashiers & Users that you are presented with, select the Edit link to access more details about that user :
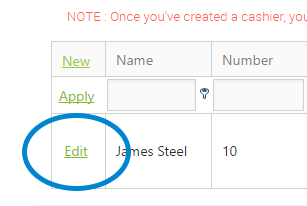
Figure 10 : Click the Edit link to access more details about an individual user
In reality, all you need to do here is check that the Name details are correct. Your 'house style' may be to only use Forenames, for example.
However, from with the Edit panel, you can preview both of your Signatures (Email and SMS) to confirm for yourself that they are accurate and fit for purpose :
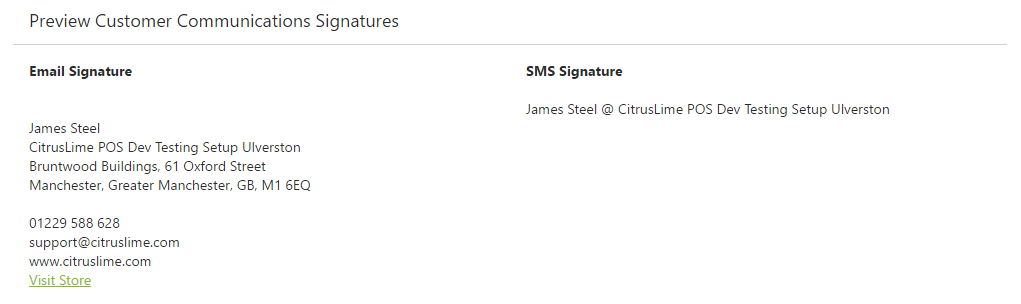
Figure 11 : Preview your (or a colleague's) Email and SMS Signature from within the Edit panel of the Cashiers & Users screen
Once you are satisfied that the Signatures are correct, click the Update link provided to confirm the details.
If you are required to ensure that all of your colleagues Signatures are correct, then simply repeat the steps described in Step Two of this document.
Note that you can change the Store to which a Cashier/User is assigned. If you need to change this, then you can select the correct store from the drop-down list provided. To see the Signature in the newly revised form, you must click the Update link to confirm the changes and then re-open the Cashier/User record using the Edit link once more.