In this article, we look at the setup and basic functionality of a Dojo card machine.
This terminal can be integrated with Cloud POS, enabling the retailer to accept integrated payments and avoid the need to manually key in amounts into a stand-alone PDQ. This has the advantage of being faster, simpler, and reduces the possibility of keying errors.
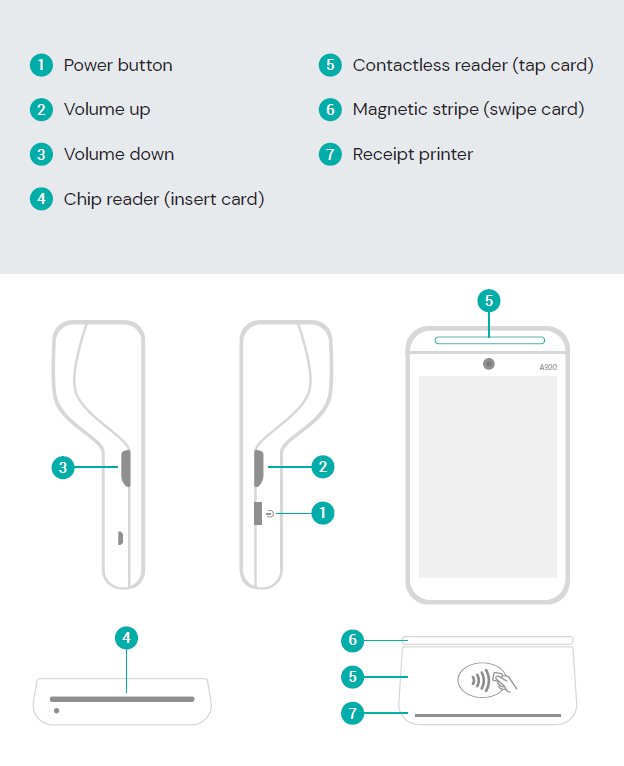
Card Machine Functions
Getting Started
1) Remove the battery protection sticker
Open the back of the card machine to remove the battery and peel off the protective sticker.
2) Power up
Connect the USB cable to the power adapter and plug into the charging base. To power on the machine, hold down the power button for 2-4 seconds.
NOTE: If your charging base is to be cabled into your wired network, plug the ethernet cable into the port labelled RS232, not the LAN port.
3) Connect to Wi-Fi
You’ll need to connect to Wi-Fi to set up your machine - follow the steps on-screen. Make sure your Wi-Fi is password protected. Once connected, you’ll need to enter the activation code you were sent by Dojo to complete the setup.
Will the machine work without being connected to the Wi-Fi?
Yes. The card machines come with a SIM included so if you are not connected to the Wi-Fi, you will have a 4G connection.
If your Wi-Fi connection goes down, your machine can switch to mobile data so payments aren’t interrupted. If you don’t already have mobile connectivity enabled, contact Dojo to get this up and running.
You can also switch the Wi-Fi connection at any point by going to Menu > Settings > Wi-Fi Settings > Select a Wi-Fi Connection.
Check your Version
To check what version your Dojo Go is on, and view the connection set up, go to Menu > Settings > About.
Select the arrow in the top left to return to Settings.
Setting Up in Cloud POS Backoffice
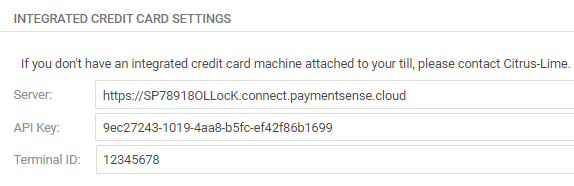
Dojo will provide Citrus-Lime with an email containing a URL, API Key and Terminal ID(s) which are entered into the Register configuration in Cloud POS backoffice.
The Terminal ID must match that of the terminal physically located by the register, i.e., if Terminal ID 12345678 is to be used with Till 01, ensure that is the Terminal ID entered into the configuration for Till 01 in Cloud POS backoffice.
The URL must be prefixed by https:// in the configuration:
When the card machine is online and in Integrated Mode, you should see a green tick box indicating that it's ready to use with Cloud POS:

Note that this tick box is for display only; you cannot tick / untick this box manually to connect or disconnect the card machine from Cloud POS.
Enable Integrated Payments
To toggle on the features in order to accept integrated payments via Cloud POS, carry out the following steps on the card machine touchscreen:
- Select Menu
- Select Settings
- Select Integrated Payments
- Enter Supervisor Code (this will have been provided by Dojo)
- Toggle on Pay At Counter
- Toggle off Gratuity
- Toggle off Pay At Table
- Use the arrow (top left) to get back to the Settings screen
- Select Non-Integrated Payments
- Enter Supervisor Code
- Toggle off Non-integrated Payments
- Use the arrow (top left) to go back to Settings
- Select Menu (3 line dashes top left)
- Select Integrated Sale to take payments via Cloud POS
Enable Non-Integrated Payments
Select this option if you need to use the card machine in standalone mode (not linked to Cloud POS - when you turn this function on your card payments must be manually keyed into the card machine):
- Select Menu
- Select Settings
- Select Non-Integrated Payments
- Enter Supervisor Code
- Toggle on Non-Integrated Payments
- Toggle on Sales
- Toggle on Refunds
- Use the arrow (top left) to get back to the Settings screen
- Select Integrated Payments
- Enter Supervisor Code
- Toggle off Pay At Counter
- Use the arrow (top left) to go back to Settings
- Select Menu (3 line dashes top left)
- Select either Sale to take a payment, or Refund to make a refund.
How To Take A Payment Over The Phone
Setting up the card machine to accept manually keyed transactions
To be able to accept payments over the phone via the card machine, you will need to have Manually Keyed Transactions enabled on the card machine. You should only need to set this up once per card machine.
- Select Menu
- Select Settings
- Select Manually Keyed Transactions
- Enter Supervisor Code
- Toggle on Enable manually keyed transactions
- Use the arrow (top left) to go back to Settings
- Select Menu (3 line dashes top left)
- Select Integrated Sale to take payments via Cloud POS
Processing a Card Not Present transaction
- Process a transaction as normal in Cloud POS;
- Select the Credit Card tender type;
- Enter the value of the payment to be taken by card payment.
- Click Continue With Transaction;
- Make your selections for printing receipts, opening the cash drawer and sending an e-receipt;
- Click Complete Transaction;
- The card machine will now prompt for a card to be presented or inserted;
- Tap the three dots in the top left corner of the card machine screen and select Card Not Present;
- Type in the Card Number and click Next;
- Type in the Expiry Date and click Next;
- Type in the CVV (digits from the back of the card) and click Next;
- Type in the Postcode;
- Type in the First Line Of Address and click Pay;
- If the payment is accepted, the transaction will show Done on the card machine and will complete in Cloud POS.
Viewing Transactions
A full week of transactions is stored on the card machine. You can go back and email or reprint receipts for the business or customers.
- Select Menu (3 line dashes top left)
- Select Transactions
- Select the transaction you wish to view
- Select Receipt
- You now have the option to Email Receipt or Print Receipt
If you select Email Receipt, you'll need to type in the email address to which you wish to send the receipt.
Rebooting The Card Machine
Press and hold the power button (located on the right-hand side of the machine):
You'll see four options:
- Airplane mode
- Vibration
- Reboot
- Power Off
Select Power Off, then press and hold the power button on the side of the card machine to turn the card machine back on.
Dojo Customer Service
The Dojo Customer Service team can be contacted on 0800 044 3550.
They are able to dial into the card machine remotely to diagnose any issues.