
Download the Citrus-Lime Cloud POS Stock Take Assistant
The Citrus-Lime Cloud POS Stock Take Assistant is available for download via the App Store (iOS Users). The app is free to download and free to use.
Download the Cloud POS Stock Take Assistant for iOS
Home Screen
When you launch the Cloud POS Stock Take Assistant on your mobile device, you will be presented with the Home screen.
From here, you can quickly :
- Create a New Stock Take;
- Access the Help & Support section to learn more about Rolling and Annual Stock Takes;
- Access the Stock Take Scheduler and set the date of your Next Stock Take and how far in advance you'd like to be reminded of the event;
- Access and manage the existing Stock Takes list.
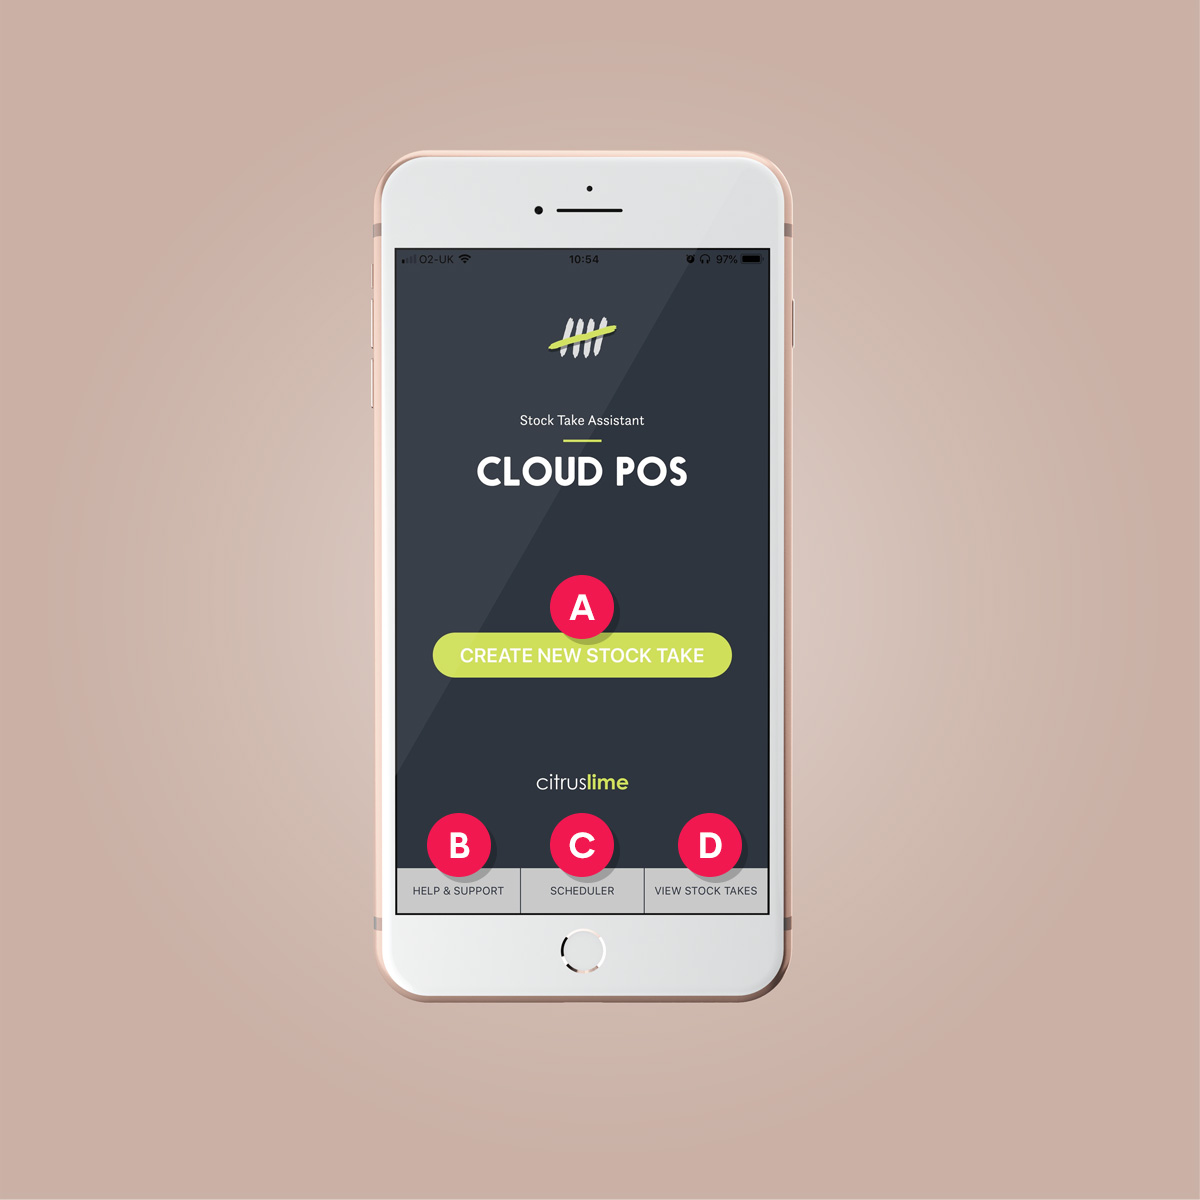
Click or tap the image above to open a larger version in a new tab.
[A] Create a New Stock Take
[B] Help & Support tab
[C] Scheduler tab
[D] View Stock Takes tab
Help & Support Screen
If you are new to Stock Takes, the Help & Support screen provides links to information on how best to prepare and conduct Stock Takes [A]. With contributions written by our Retail Support Team specialists, the advice we offer is based on real-world retail experiences and covers both Rolling Stock Takes (which we highly recommend) and Annual Stock Takes, too. There's also a a brief overview of the Terms of Use for this application [B] and a link through to this very document [C].
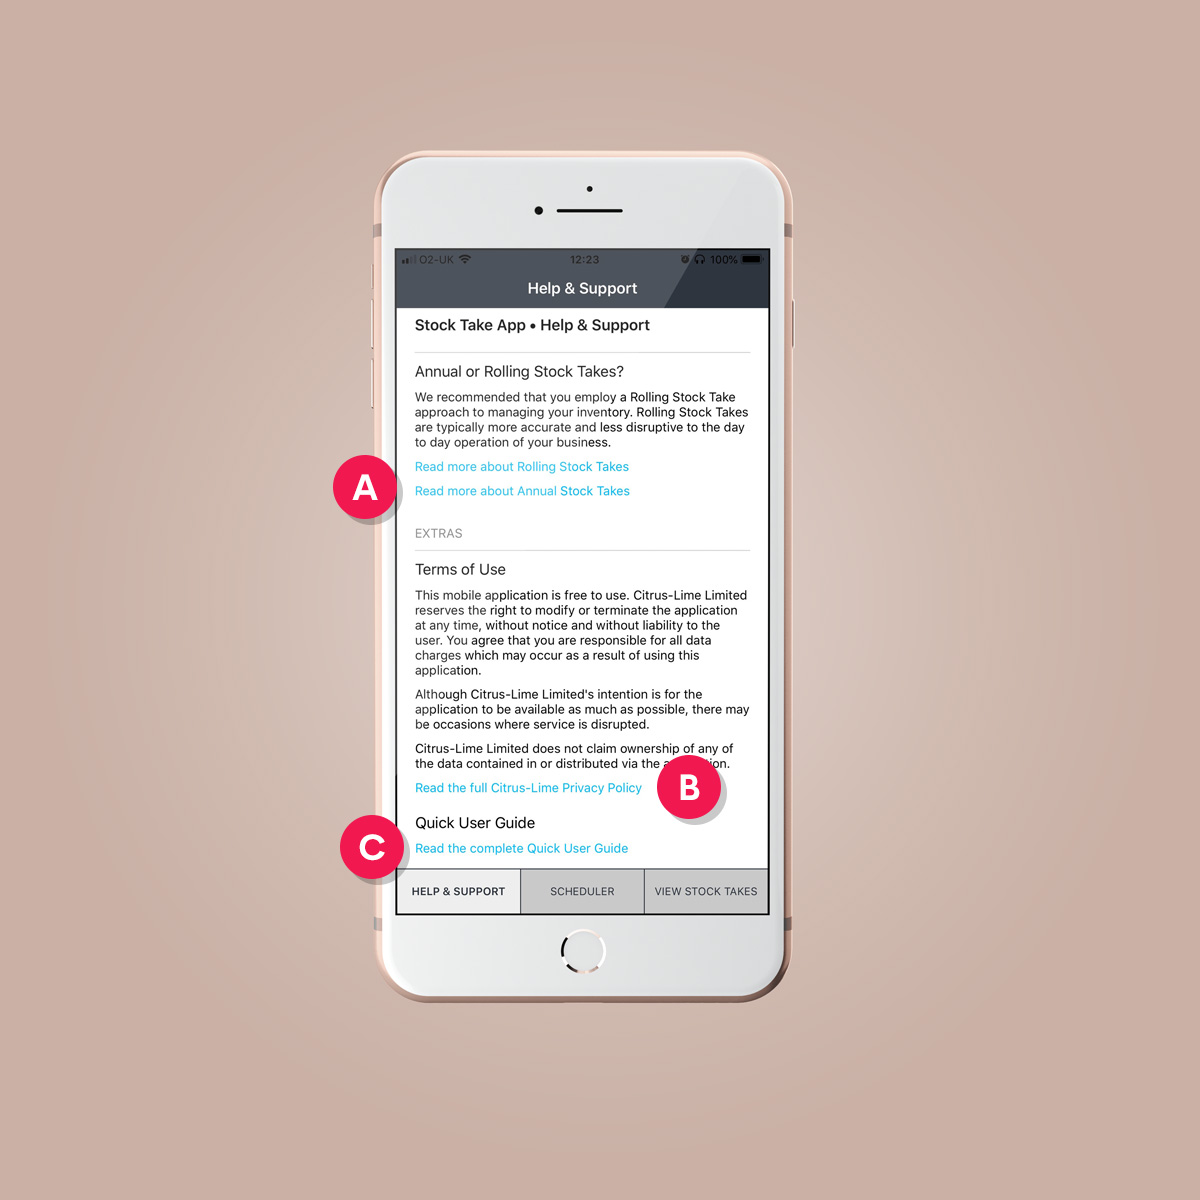
Click or tap the image above to open a larger version in a new tab.
[A] Links to information and advice on Rolling and Annual Stock Takes
[B] Link to the Citrus-Lime Privacy Policy
[C] Link to the Quick User Guide on howto.citruslime.com
Scheduler Screen
The Scheduler screen provides tool for you to set the date of your Next Stock Take and also provides you with a feature that allows your phone to send you a reminder in advance of the scheduled date.
(i) To Set the date of your Next Stock Take ...
Tap the Schedule you Next Stock Take button [A] to access your device's calendar widget, choose the date of your next Stock Take and click OK.
(ii) To Enable Reminders on your device ...
Tap the toggle icon [B] so that it is coloured green. This enables Push Notifications* on your device.
A Push Notification is a message that pops up on a mobile device. App publishers can send them at any time; users don't have to be in the app or using their devices to receive them.
To disable reminders, simply tap the toggle icon [B] again so that it is coloured grey.
(iii) To set a Recurring Reminder Schedule on your device ...
Tap the 3 DAYS, 7 DAYS or 14 DAYS button. Dependent on the option your choose, a Push Notification will be sent to your device accordingly.
For example, if your Next Stock Take has been scheduled for 18 JUNE, then your device will display a Push Notification on your device on 15 JUNE (3 DAYS prior), 11 JUNE (7 DAYS prior) or 04 JUNE (14 DAYS prior).
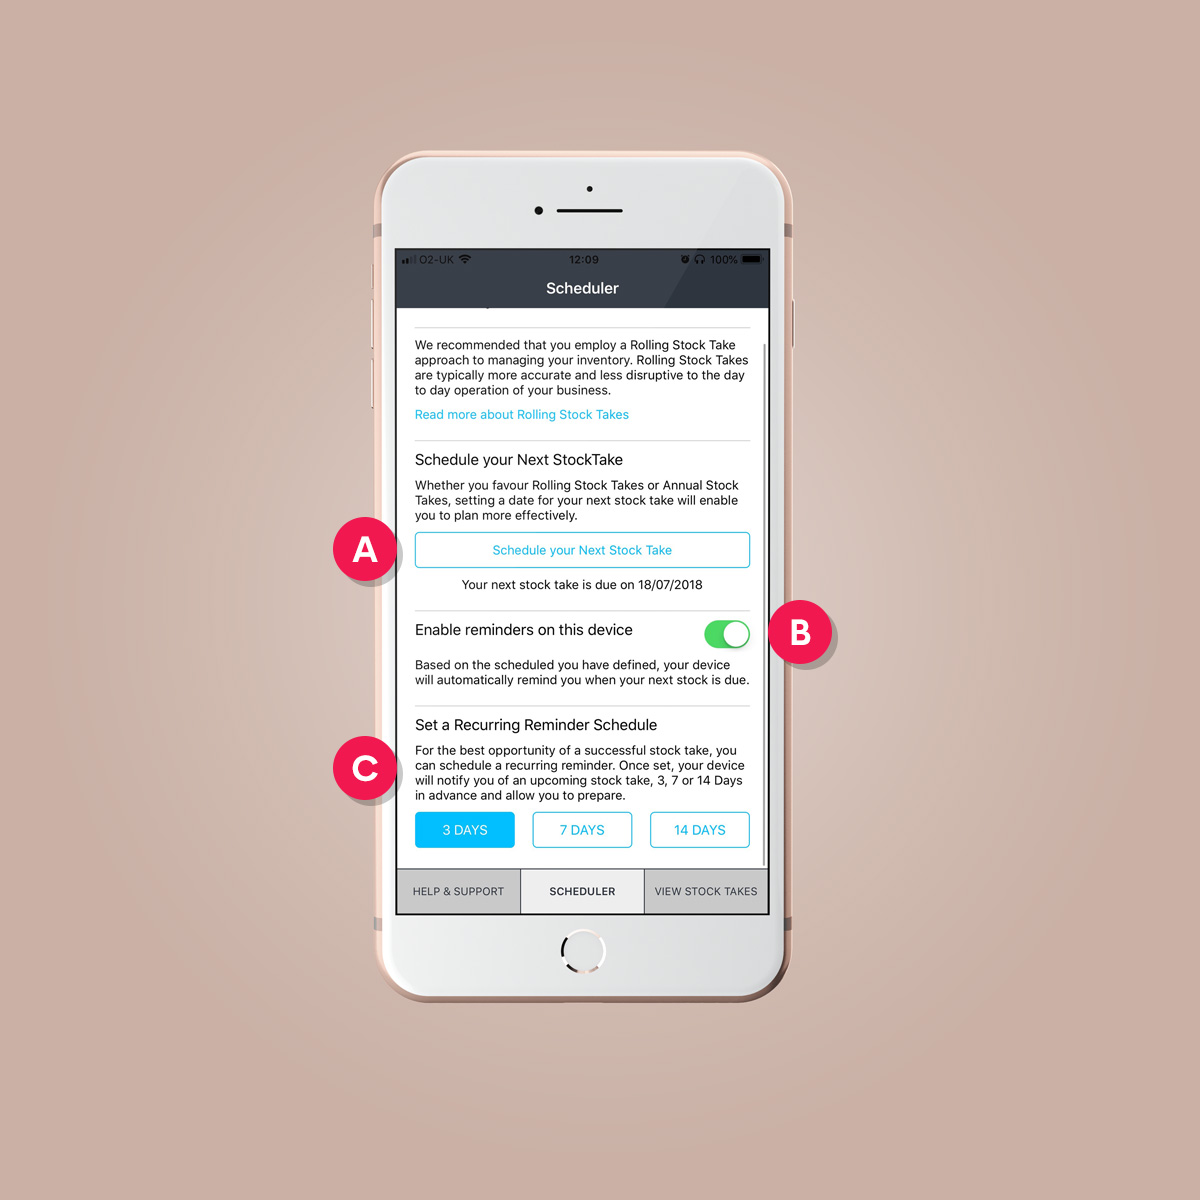
Click or tap the image above to open a larger version in a new tab.
[A] Schedule Next Stock Take
[B] Enable Reminders (Push Notifications)
[C] Set Recurring Reminder Schedule
View Stock Takes Screen
On the View Stock Takes screen, you can view, edit and manage all Open or Completed Stock Takes.
Stock Takes are indicated as either 'Open' or 'Completed' using a basic 'traffic light' system. A key for this is provided on the Stock Take List screen [B].
When you mark a Stock Take Complete, the green icon is converted to a red icon.
Note : You can toggle the status of a Stock Take at any time and completed Stock Takes remain editable. Marking a Stock Take as 'Complete' does not restrict your access or use of that Stock Take.
To change the status of a Stock Take, tap the EDIT icon [D] to expand the Edit Panel.
You can open any Stock Take from within the Edit Panel or quickly access the Stock Take by tapping the Stock Take Description [C].
Each Stock Take listed here indicates the Stock Take Staus (Open or Complete), the number of Items associated with the Stock Take, the Description (aka Name) of your Stock Take and the Date the Stock Take was opened.
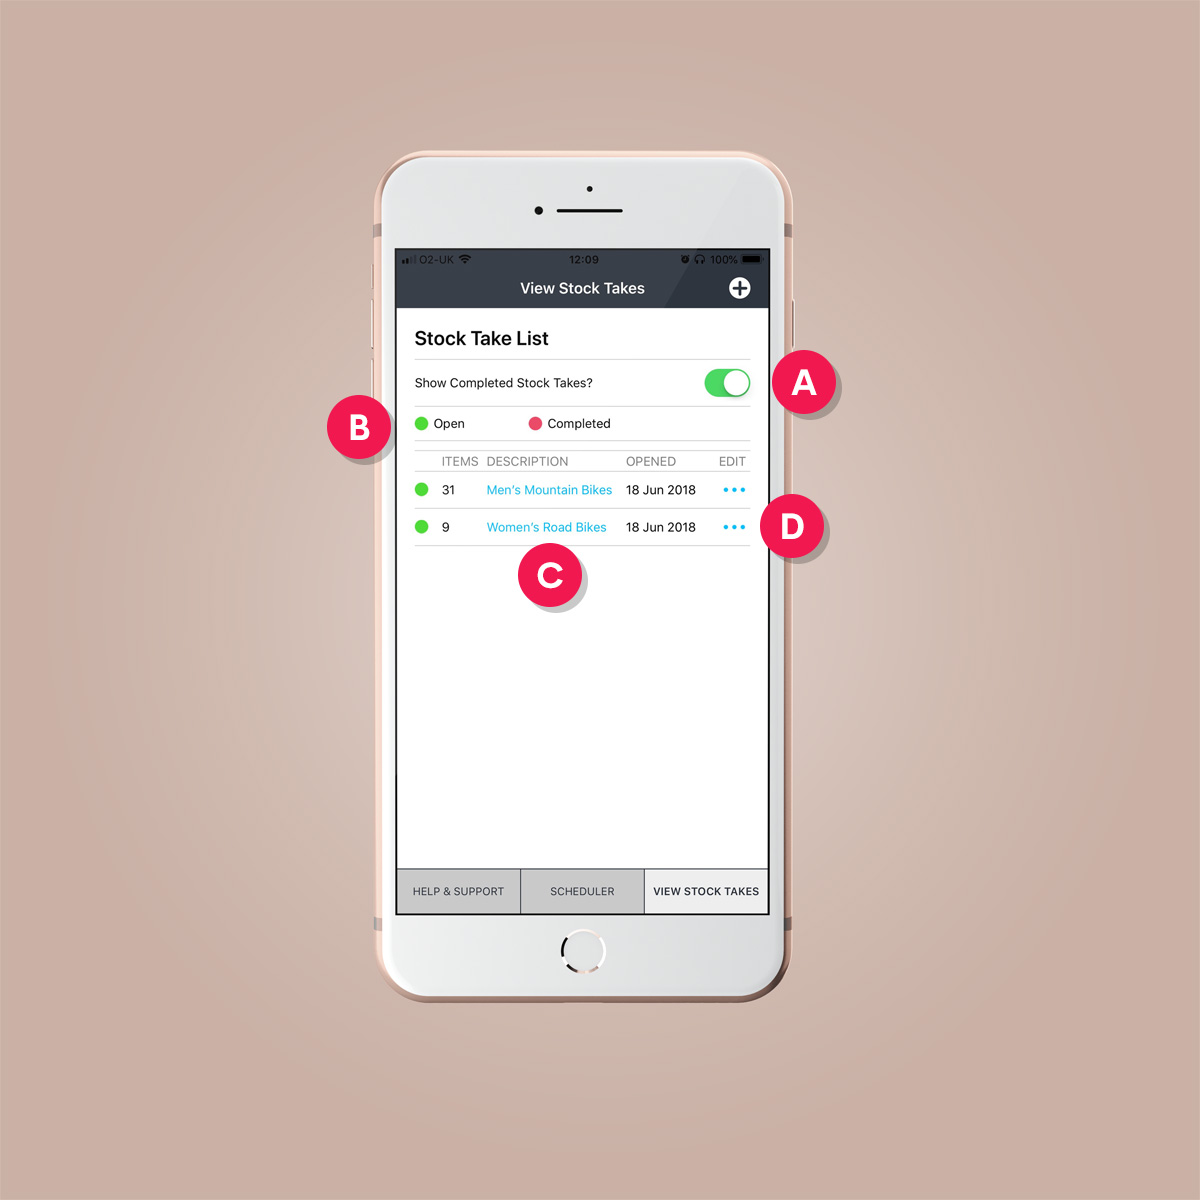
Click or tap the image above to open a larger version in a new tab.
[A] Show or Hide Completed Stock Takes
[B] Open and Closed Stock Take Indicator Key
[C] Quick Access to Stock Take Item List
[D] Open Stock Take Edit Panel
Stock Take Screen - Edit Panel (Open)
For each Stock Take displayed in the Stock Take List screen, you can tap the Edit Icon to display the Edit Panel.
From within the Edit Panel, you can :
- Toggle the status of the Stock Take between Open and Complete;
- Click to Continue with the Stock Take (when not marked as Complete);
- Email a copy of the Stock Take to your Inbox (sent as CSV attachment);
- Delete the Stock Take (there is no undo for this feature).
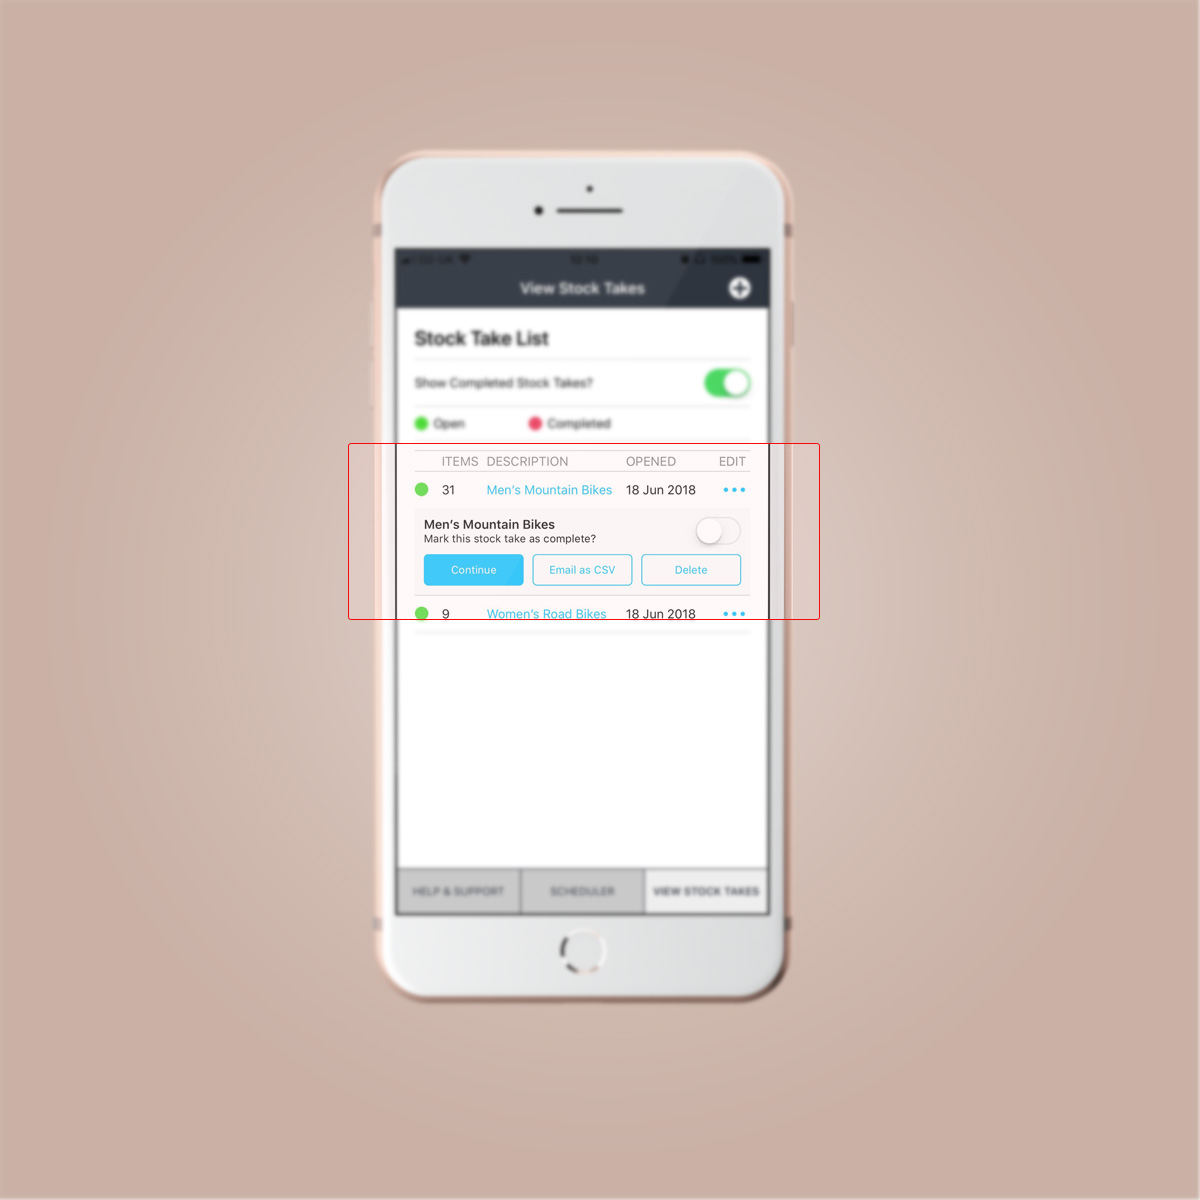
Click or tap the image above to open a larger version in a new tab.
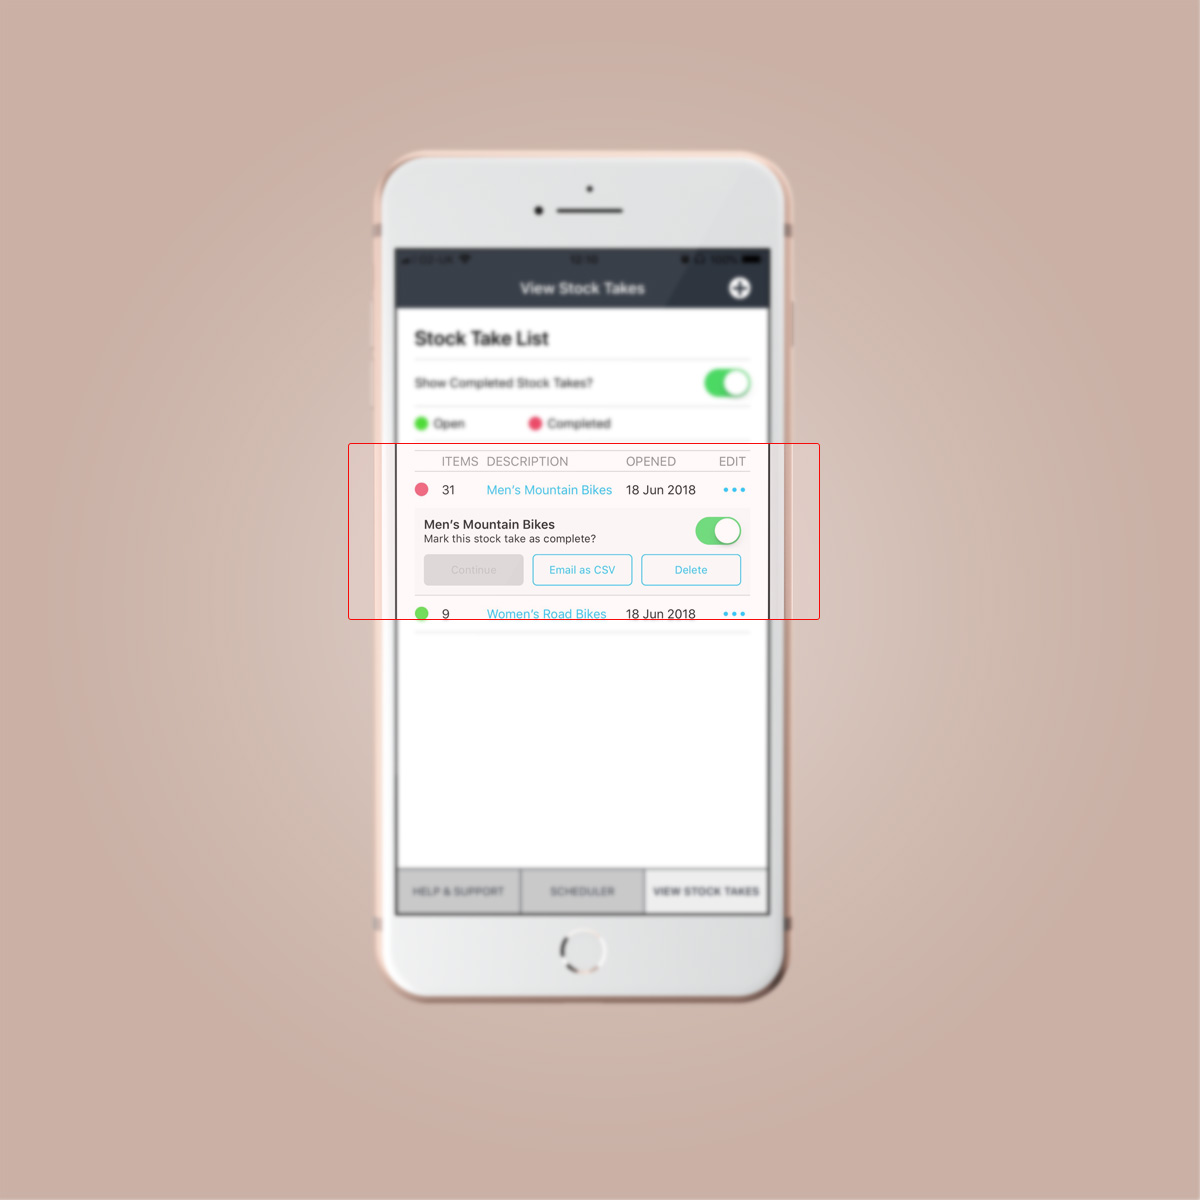
When you mark the Stock Take as Complete, the green icon is updated to a red icon and the Continue button is disabled (see screenshot below). If you want to gain access to the Stock Take after marking it as complete, you can either change the status of the Stock Take by tapping the toggle icon (re-enabling the Continue button) or by tapping the Stock Take Description.
Click or tap the image above to open a larger version in a new tab.
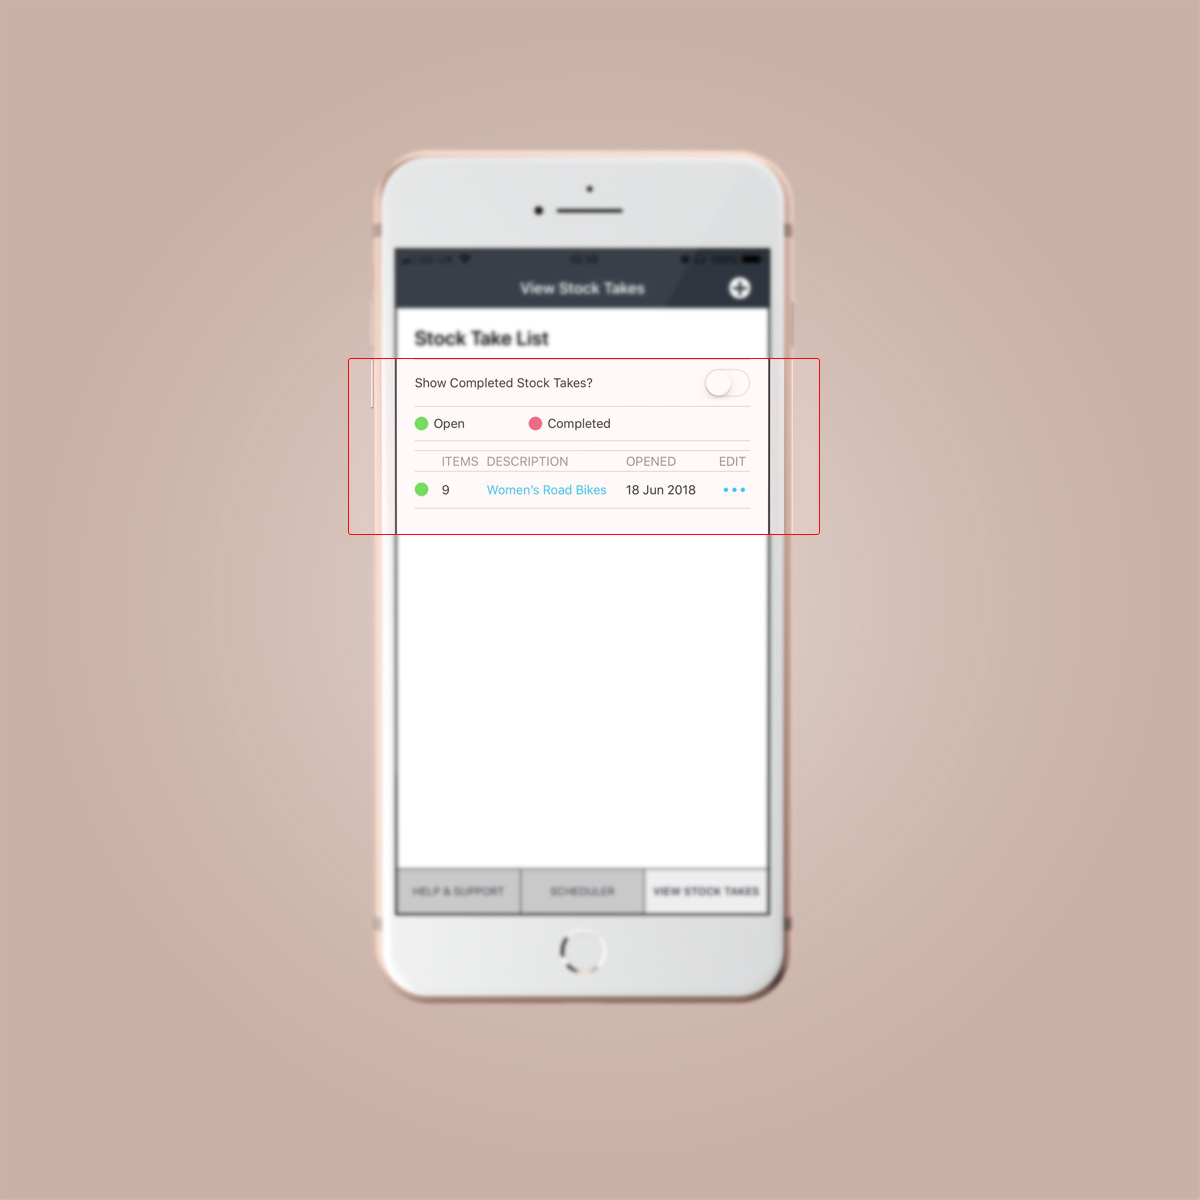
By toggling the Show Completed Stock Takes? to the 'OFF' position (ie: icon is grey), any Completed Stock Takes will be hidden from the list, leaving only Open Stock Takes visible (see screenshot below).
Click or tap the image above to open a larger version in a new tab.
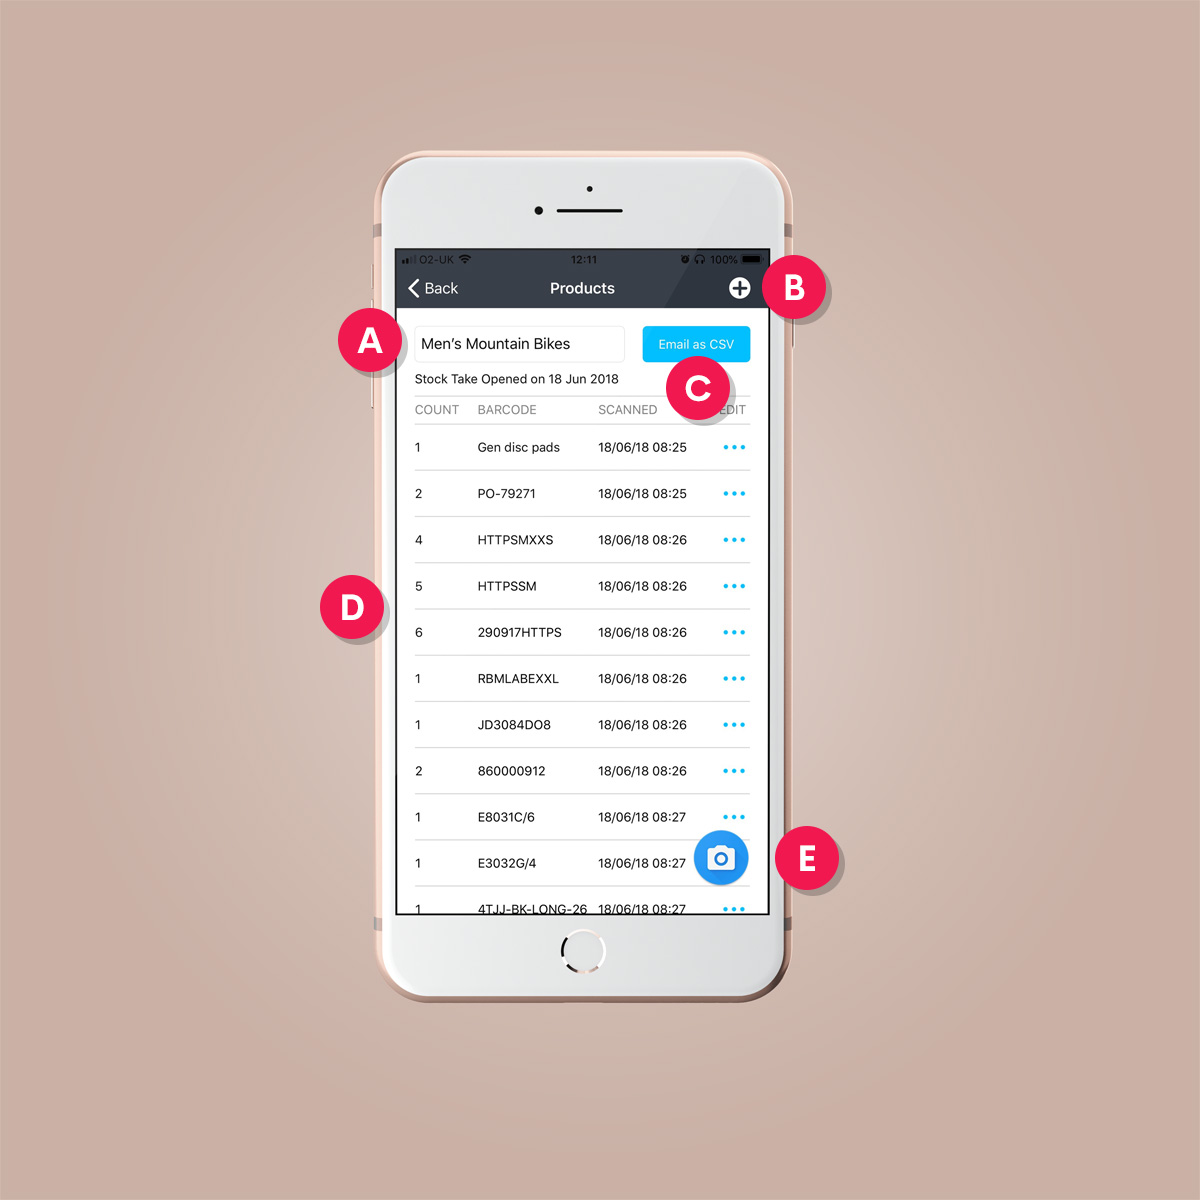
Products Screen
Each Stock Take contains a list of items that you have either added to the Stock Take by scanning a barcode or entering the barcode details manually.
(i) Describe your new Stock Take ...
The first thing to do, when starting a new Stock Take, is to give your Stock Take a unique description (that is clearly descriptive of the contents of your Stock Take). To update the description of your Stock Take, tap the Description Field [A].
Note: The Cloud POS Stock Take Assistant will not allow the same name to be used across multiple Stock Takes and will warn you if this is occuring. By default, your Stock Take will be described generically, using the term "New Stock Take". If you create multiple Stock Takes before giving them unique descriptions, then each subsequent Stock Take will be numbered (as 'New Stock Take 2', 'New Stock Take 3' and so on).
(ii) Add Items to your Stock Take ...
You can add items to your Stock Take in two ways :
- Manual Data Entry
- Barcode Scanning
To add item data to your Stock Take using the built-in barcode scanner, tap the Camera Icon [E] in the bottom-right corner of the screen.
To enter item data manually, tapping the '+' (plus) icon in the top-right corner of the screen [B] will add a new Item Row to your Stock Take and display the Item Edit Panel. From within the Item Edit Panel, you can enter the Barcode value and a Quantity.
Note : You may be required to grant access to your device's Camera before you are able to scan a barcode.
For every item added to the Stock Take, an Item Row is created and displayed on this screen [D].
If you have completed adding items to your Stock Take, tap the Email as CSV button [C] (to the right of the Description Field) and follow the on-screen instructions.
Click or tap the image above to open a larger version in a new tab.
[A] Description Field
[B] Manual Item Data Entry
[C] Email as CSV button
[D] Item Data Rows
[E] Camera Access (for Barcode Scanning using device camera)
Products Screen - Edit Panel (Open)
Tapping the Edit icon on an Item Row will reveal the Edit Panel. From within the Edit Panel, you can :
- Update the Barcode value and the Quantity;
- Apply the new Quantity Count;
- Remove the Item Row
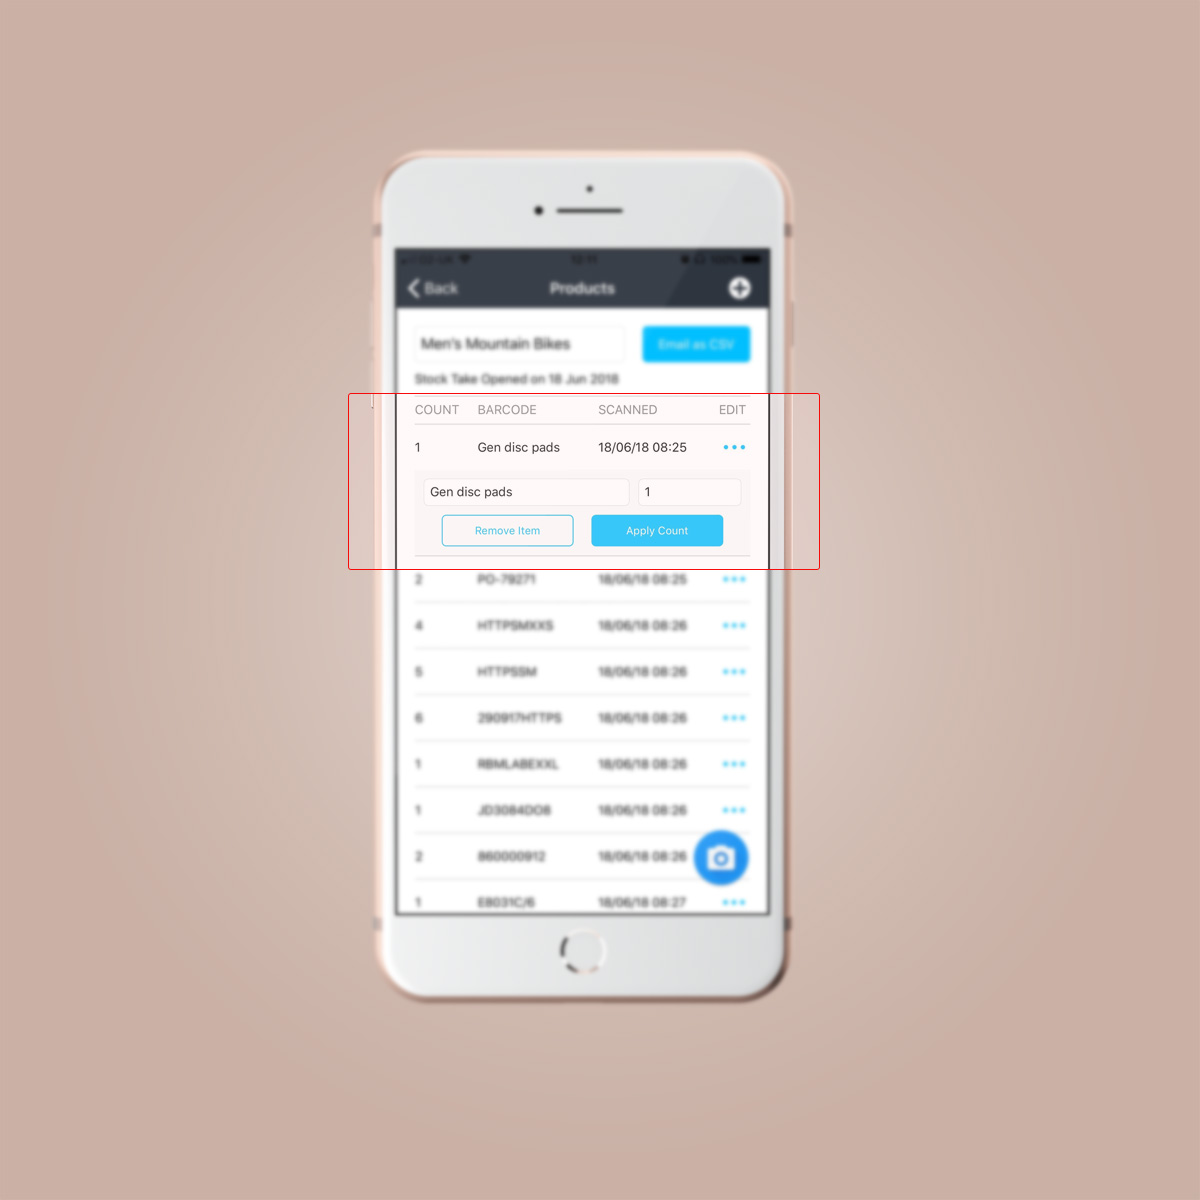
Click or tap the image above to open a larger version in a new tab.
Send a copy of your Stock Take using 'Email as CSV'
When you are finished with your Stock Take (all items have been added), you are ready to send a copy of the data (as a CSV email attachment) for import to Cloud POS.
Tapping the 'Email as CSV' button will open a panel (see screenshot below) into which you are required to enter your email address (or the email address you want the Stock Take CSV file to be sent to).
Once you have entered your nominated email address, tap the Export as CSV option and the Cloud POS Stock Assistant will send a copy out from the app.

Click or tap the image above to open a larger version in a new tab.
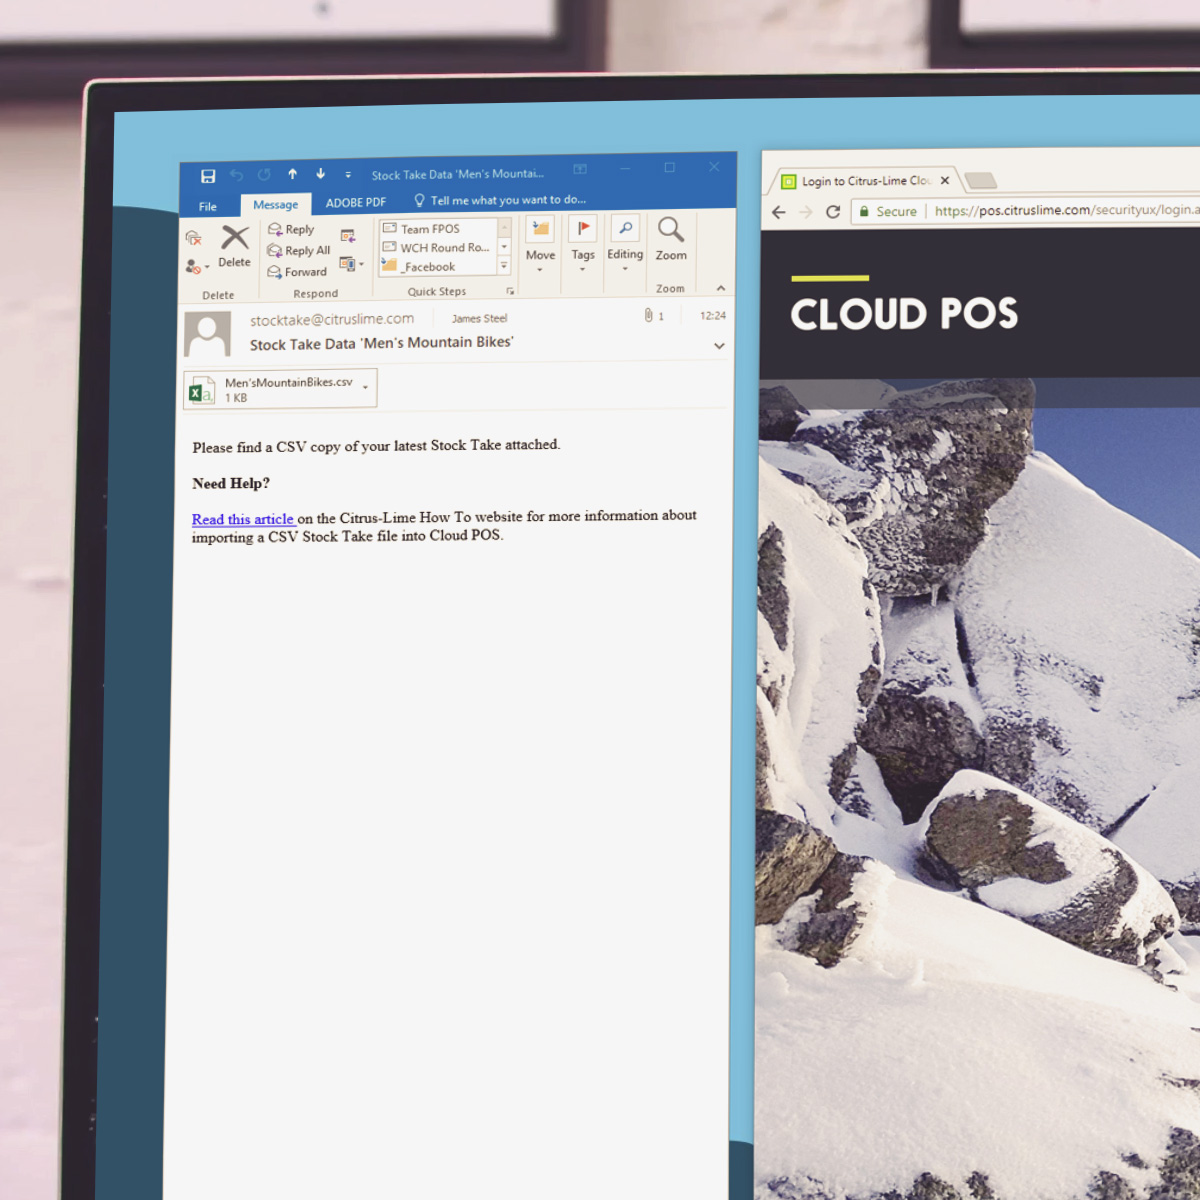
Use Email as CSV feature to deliver Stock Take file for Import
Open the Inbox for the email address you have sent your Stock Take CSV file to and you should see that you have received and email from stocktake@citruslime.com.
Attached to that email is a CSV file. This CSV file will be named the same as the description you gave to the Stock Take within the Cloud POS Stock Take Assistant.
If you are unsure what to do with the attached Stock Take CSV file, follow the instructions given within the email (see screenshot below for example).
Click or tap the image above to open a larger version in a new tab.
Scan Product Screen
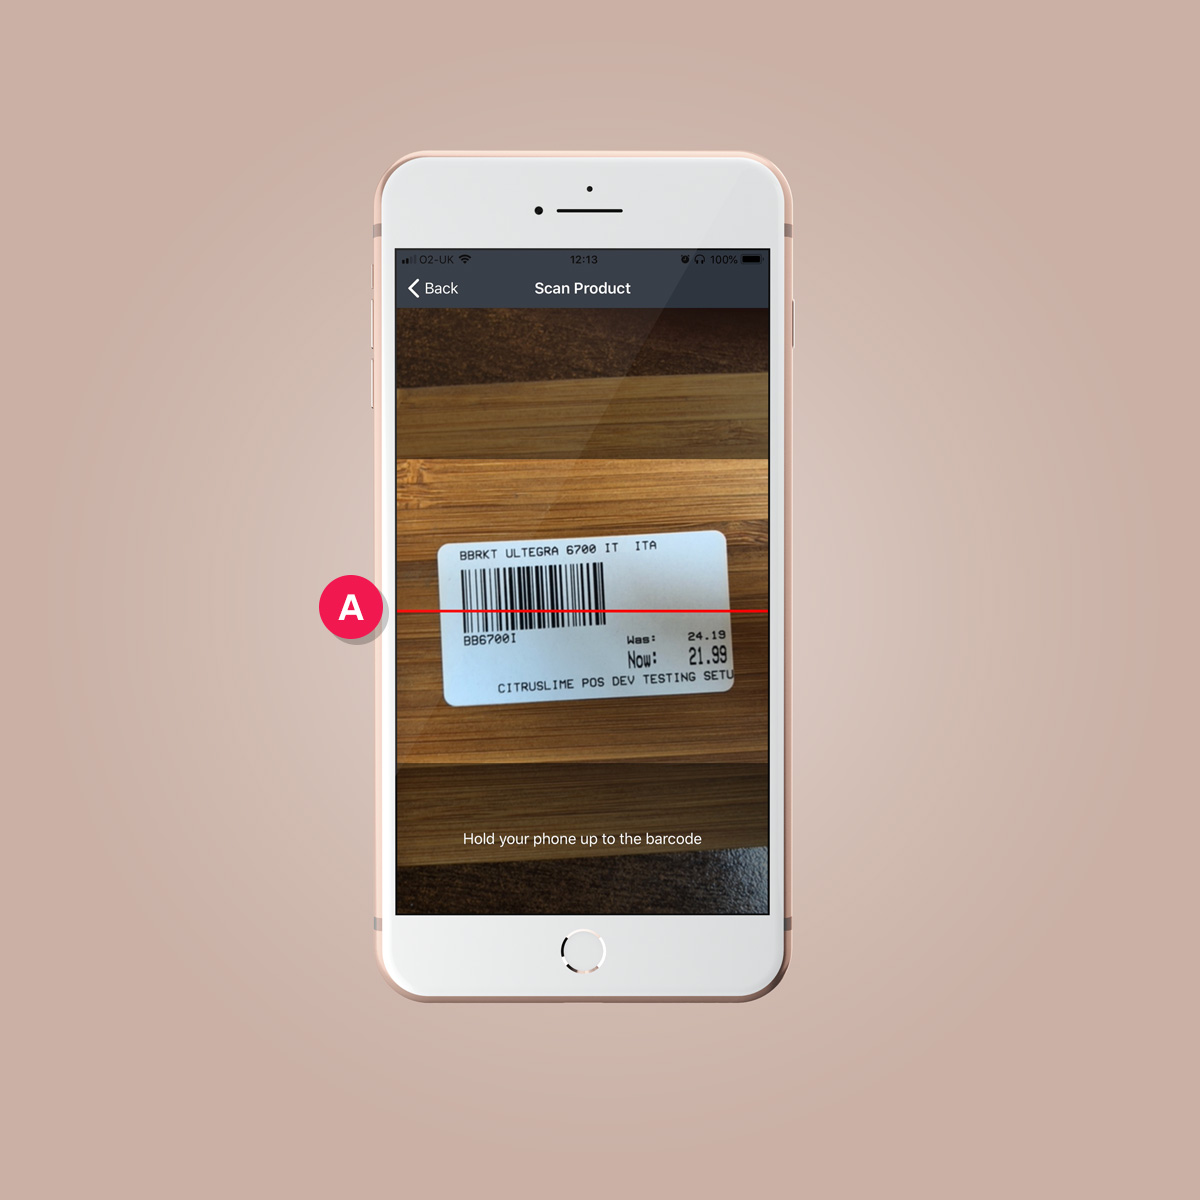
When using your device camera to scan a barcode, line the barcode up with the horizontal red line [A] (see screenshot below).
Note : A successful scan will trigger an audible sound in your device (assuming that you do not have your device muted).
Click or tap the image above to open a larger version in a new tab.
[A] Scan Line
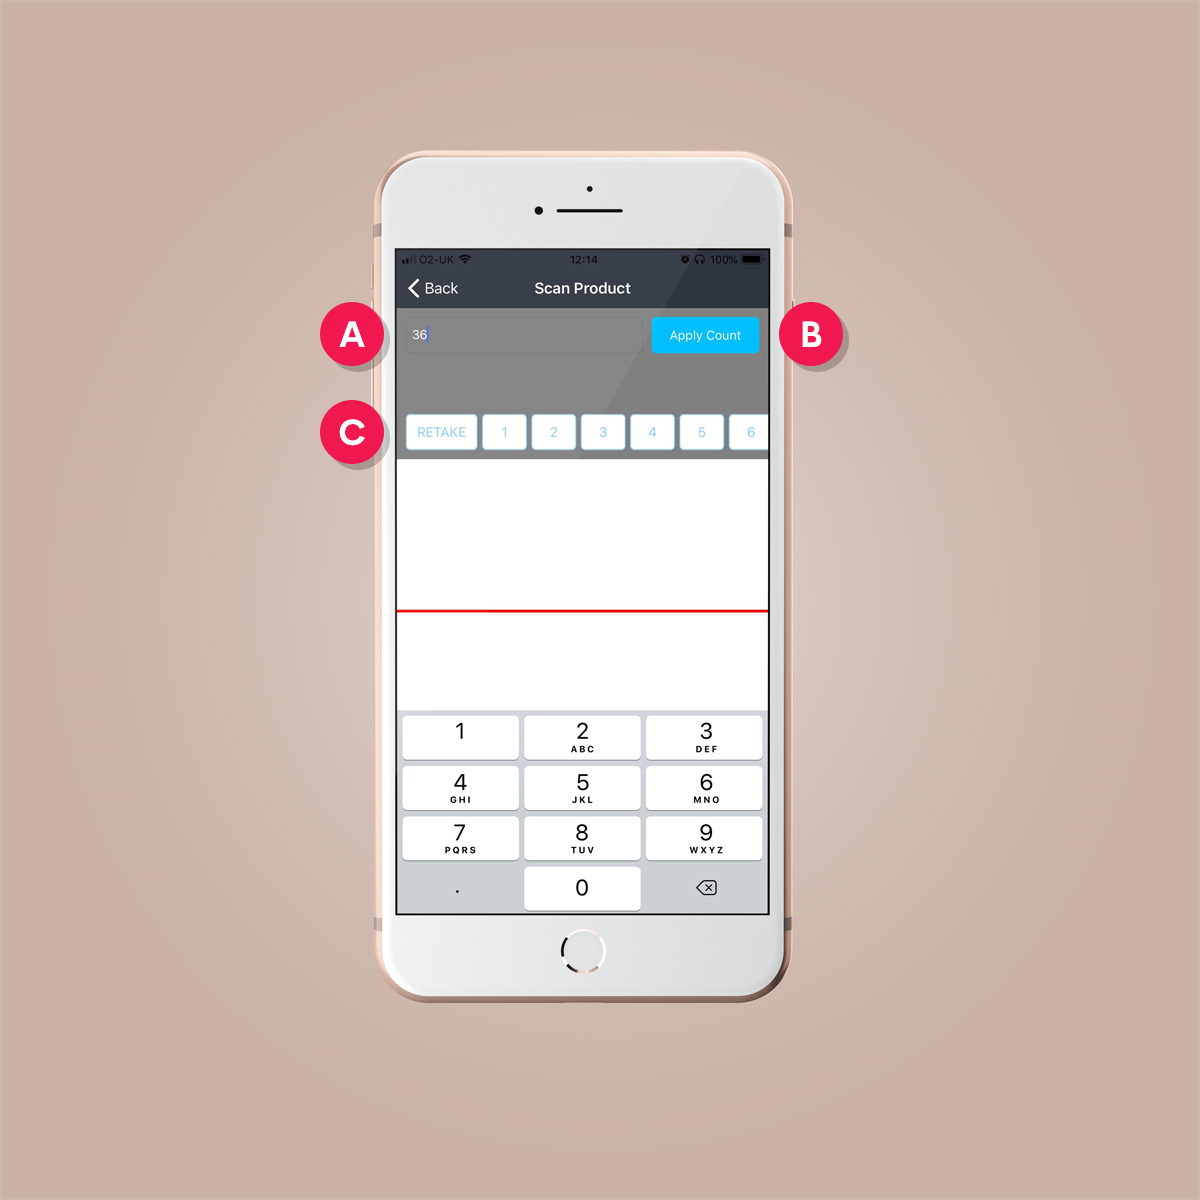
Following a successful scan, you will be presented with on-screen options for :
- Manual Count Entry
- Retake Scan
- Quick Count Entry
If you enter a manual count, simply highlight the Manual Count Entry Field [A] and, using the native user interface or your device, enter the quantity value and press the Apply Count button [B].
If you want to Retake the scan, tap the Retake button [C] or, if you have a quantity between 1 and 20, you can use the Quick Count Entry buttons provided [C].
The Scan Product screen will refresh and then reset, ready for you to scan your next item.
Click or tap the image above to open a larger version in a new tab.
[A] Manual Count Entry Field
[B] Apply Count button
[C] Retake and Quick Count Entry buttons
Terms of Use
This mobile application is free to use. Citrus-Lime Limited reserves the right to modify or terminate the application at any time, without notice and without liability to the user. You agree that you are responsible for all data charges which may occur as a result of using this application. Although Citrus-Lime Limited’s intention is for the application to be available as much as possible, there may be occasions where service is disrupted. Citrus-Lime Limited does not claim ownership of any of the data contained in or distributed via the application.
Read the full Citrus-Lime Privacy Policy
