If you have a café as part of your retail store, customers may wish to put their food and/or drinks on a tab. This article explains a recommended process for handling this request.
Overview
The recommended process is as follows:
- When creating a tab, create it as a Layaway in Cloud POS.
- Add the required food/drink items to the Layaway, saving each time an addition is made. Using Task Pad (see below) is also recommended.
- When the customer is ready to pay, recall the Layaway, select the items for Pick-Up and then tender.
- Use 'dummy' customer records for the tabs, with one order/tab running per 'customer' at a time.
Cloud POS Task Pad
Task Pad is a great way to manage your food and drink products within a café setting. If you are not already using Task Pad in your café, have a read of the following article: How do I use Task Pad?
The Support Team will also be happy to advise you on your setup.
Step 1: Creating some 'café customers'
We would recommend setting up some 'dummy' customer records in Cloud POS specifically for this purpose. This is because:
- You can easily create tabs for walk-in café customers, without needing to ask for their name/details.
- You can keep track of which tab is for which table (see naming ideas below).
- When more than one staff member is working in the café, they can quickly locate an open tab by simply looking for the appropriate table number in the customer name.
Of course, if you would prefer to attach the tab to a 'real' customer record, that is fine too. If a café customer is someone who also buys from you in store/online, you may wish to create their tab order against their own record.
In the Cloud POS Back Office, navigate to Customers, Receipts & Orders > Customers.
Click New, top-left of the table, to create a new customer record.
Complete just the First Name and Last Name fields. There are a number of ways you could do this, depending on your café layout. For example, the first name could be 'Table 1', and the surname could be 'Tab', producing 'Table 1 Tab' and so on. If you do not use table numbers, it may be easier to have a structure such as first name = 'Customer', surname = 'Tab 1', producing 'Customer Tab 1'.
Click Create at the bottom of the screen to create each new customer record.
These are simply customer records to allow you to create the tabs in Step 2. Create as many as you feel you may need, depending on how many tabs you think you may have open at one time.
If you prefer, you can create customer records in bulk using the Customer Import/Export Tool. You will find this under Import Tools in your Cloud POS Back Office menu. There is some further guidance on using this tool here.
Step 2: Create a Layaway
When a customer asks to open a tab for their table:
1) Set the transaction type to a Layaway in the Point of Sale.
2) There is no need to complete any of the comment, reference or due date information unless you would like to. Click Apply and Close when you are ready to proceed.
3) In the customer quick search field, search for the café customer record that you would like to use. For example, you may be looking for 'Table 3 Tab'. Click on the correct record to set this customer.
4) You can now add the relevant food/drink items. If you use Task Pad in your café, the quickest way to launch this is to use Alt + T. If your café till uses Task Pad by default, you can add the food/drink items first, and then click the Close button and follow steps 1 and 2 above.
5) Click Save Order. The tab is now saved in Cloud POS, ready for later.
Step 3: Adding to the tab / Layaway
If the customer would like to add further food/drink items to their tab:
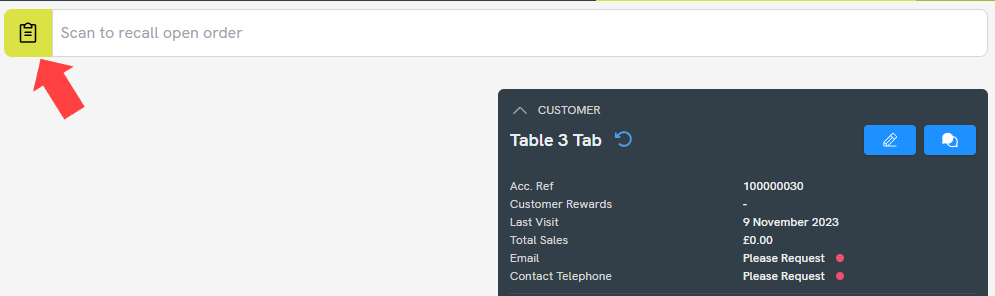
1) First, use the customer quick search field to search for the relevant tab customer, for example, 'Table 3 Tab.'
2) Click the Recall Orders button:
3) Recall the tab using the Select button or double-click on the row in the grid.
4) Add the required food/drink items to the tab. Again, if you need to switch to Task Pad, use Alt + T.
5) Click Save Order.
Step 4: Tendering the tab / Layaway
When the customer is ready to pay for their tab:
1) First, use the customer quick search field to search for the relevant tab customer, for example, 'Table 3 Tab.'
2) Click the Recall Orders button:
3) Recall the tab using the Select button or double-click on the row in the grid.
4) If the customer is paying for all the food/drink items on the tab, tick the Select All For Pick-Up box:
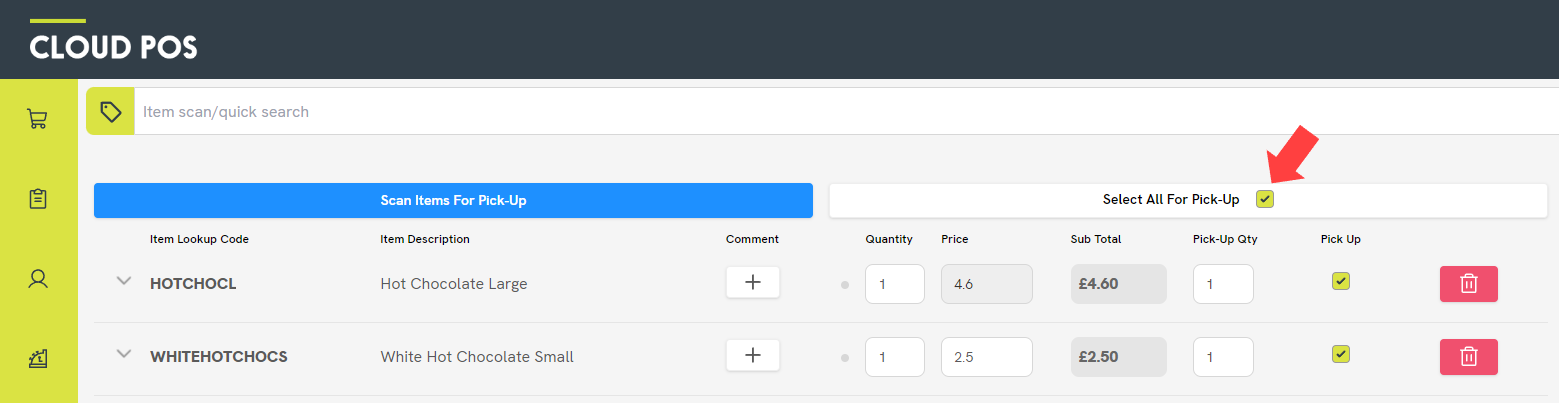
If the customer would like to split payment with another member of their party, use the Pick-Up boxes against each item line to specify which items they are paying for.
5) Click Tender. Choose the appropriate tender type and proceed through the steps to complete the transaction.
If the customer has paid in full, the tab (Layaway) will now close.
If another member of the party needs to pay an outstanding amount, simply repeat steps 1-5 above.
