When activating products on your eCommerce site there are many different features you can use to make the product listing informative and inviting to the consumer. This article covers the key features to make your products compatible with Google standards.
Use the points below as a guide when activating products online.
1) Set up your Item Essentials
Open up Cloud MT, and either enter the item lookup code in the Quick Start box and hit Enter on your keyboard, or click the View All Items button.
On the Product Search page, you can filter in different ways to find the product you wish to activate.

Click Edit next to the Code to open the required product.
You will now be taken to the Product Edit page. The first section on this page is Item Essentials:
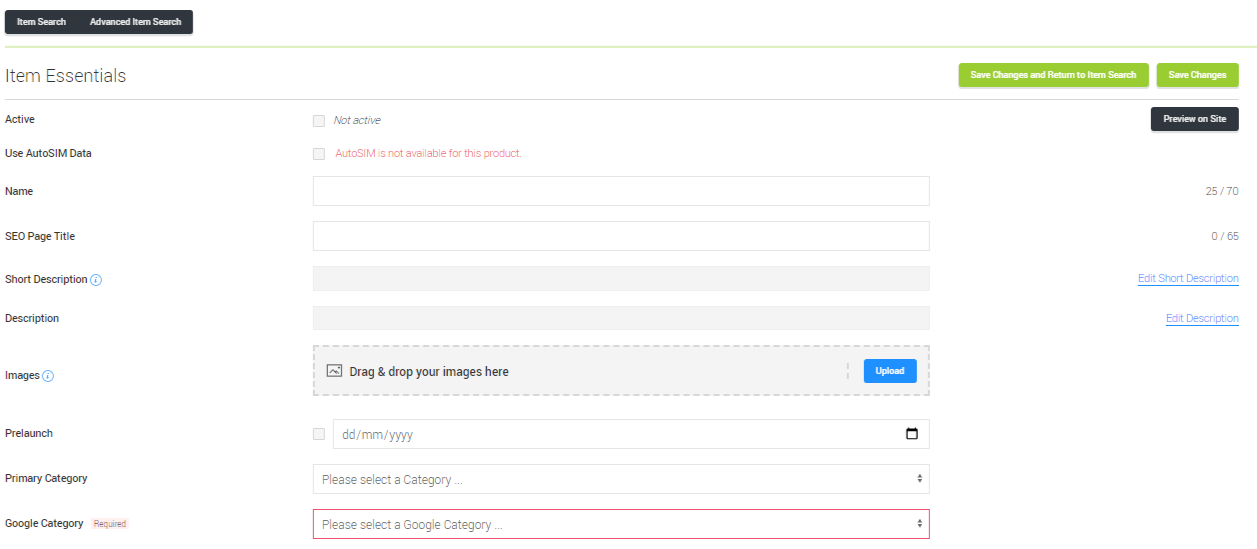
Active: Ticking this box will make the item display on your ecommerce site. Unticking will remove the item from the ecommerce site.
Use Auto SIM Data: If Automatic SIM data is available for the item, ticking this box will means the supplier's product images and descriptions will be automatically used on this item. Be aware that ticking this box will mean any manual changes you make to the images or descriptions will be overwritten by the Auto SIM data.
Name: Some information is fed through to your website from Citrus-Lime Cloud POS, such as the Product Name, Brand, Price and Season. However, where practical, you should consider changing the Name on your website to make it Google-friendly.
The best way to name your product is by using the following format: -
Season + Brand + Style Name + Gender* + Material** + Product Type in Colour
*/** Optional: Use if considered pertinent to the product in question.
For example: -
2020 Giant Defy Advanced 2 Men's Carbon Road Bike in Black
Note: Colour can be interchanged depending on the type of product i.e. flavour.
When the item is displayed on the Product Detail Page on the front end of your e-commerce site, it will be pre-pended with the word 'Information', such as below:
2020 Giant Defy Advanced 2 Men's Carbon Road Bike in Black Information
The reason for this is that this text is served up to Google, so if a potential customer searches for a product name and ‘information’, Google can identify that section and display it in the search results.
SEO Page Title: The text you enter here is what will appear in the page tab in the customer's web browser.
NOTE: The product Name and SEO Page Title fields have some restrictions in place. These fields only allow the following:
- Letters
- Numbers
- Spaces
- .
- :
- +
- -
- /
All non-alphanumeric and non-whitespace characters can only appear once in succession (i.e. a/b/ c is fine but a//b is not).
Description: This information describes the item and will be present as a piece of text on the product page.
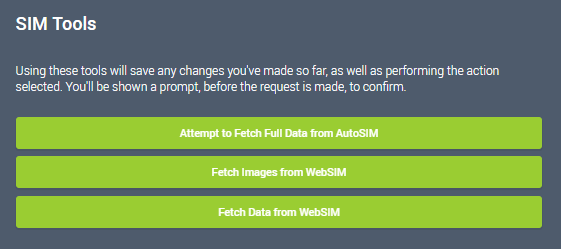
If you have a POSANDWEB SIM licence for the supplier who provides the product, you can use the Supplier Integration Tools to import the supplier's description and / or images from SIM.
If you are adding a description manually, you can add the text here yourself.
NOTE: You are not able to copy and paste text directly from another website. If you copy and paste directly from an online source, it not only copies the text, but also the invisible formatting in the background of the third-party source.
If you wish to take information directly from another website, paste the text into a Word document or Notepad first and then copy it from your document and paste it into Cloud MT.
Images: Add images to your product, by uploading those required. You can upload a maximum of 13 images. We recommend having at least 1 image per product, but the more you can upload the better. If you have imported images using SIM, this is where they will appear. You can drag the images around and change the order in which they will appear on the product page.
Prelaunch: If the item isn't available yet, but you wish to display it on your website and let customers know the date when you expect to have the product in stock, you can use this section to indicate this:

If the expected date passes and stock has still not been received, the date will be removed from the display, as below:

Customers can also click a Notify button and submit their email address, in order to receive an automated notification email once the product comes into stock.
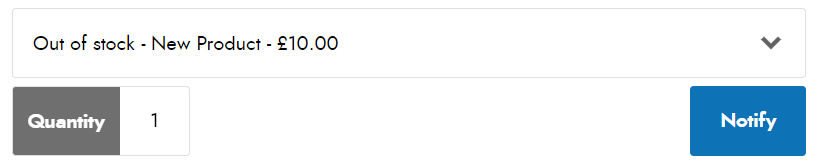
Once stock is received, the pre-launch display will be automatically removed from the item.
NOTE: You can also make use of the pre-order functionality which exists on purchase orders within Cloud POS. This piece of functionality means you can sell products online that you have ordered from the supplier, but haven't received into stock yet.
We describe this in more detail here: Forward Orders
Primary Category: Use the drop-down menu to select the most relevant category. This doesn't need to perfectly match the product in question.
Google Category: Use the drop-down menu to select the most relevant category. Be as accurate as possible in your selection.
2) Set the Find & Filter Options
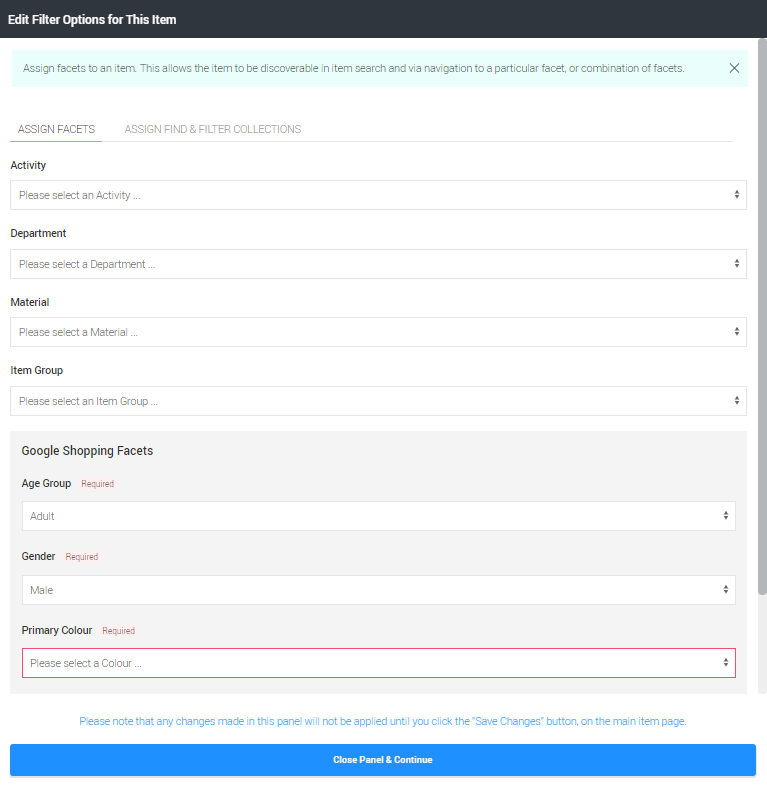
You now need to assign filters. Customers use filter to navigate your website and locate the products which are of interest to them, so it is vital that they are set correctly.
Some of the details in this section are controlled via the information set on the item record in Cloud POS (Brand / Season / Gender).
Click on View all assigned Find & Filter Options and Edit in order to put your product into the relevant department, activity, etc.

This will open an additional window in which you can then set the filter options for the product:
3) Create a Colour Group
Where items are available in different colours, you can set up Colour Groups. This is sometimes referred to as a Colour Picker.
A Colour Group is a way of displaying the same item, across a number of colours on a single product page. When you switch colours, we load colour-specific data into the page, without reloading the page itself. See the Related Article for more information on Creating Colour Groups.
4) Add Extra Item Details
Within this section you can include more details about the product, to provide further information to the customer and help them make more informed purchasing decisions.
Here you can add a technical specification, sizing information, and an additional description.
To embed a YouTube video, locate the video on YouTube and click on Share. Click on Embed and you will be given a URL: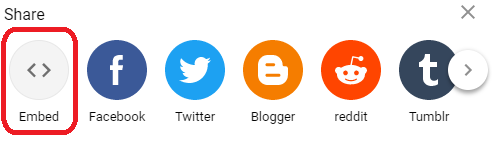
Copy the URL and paste it into the field provided in Cloud MT:

5) Item & Stock Handling
This section is where you can control how the product is available to purchase and dictate certain collection / dispatch options.
Item Attributes & Stock: This section shows how many attributes are within the item, and provides a link through to view the stock quantities.
Delivery Charges Applicable: Configurable to switch on or off shipping charges for the item. Setting this as 'No' will show Free Shipping, and the Cut-Off time for despatch will be 1 hour from the current time.
Click & Collect Only (Block Mail Order): Dictates whether the item can be shipped or is only available for collection in store.
Block Pick-up Services (e.g. DPD Pick-up): When selected, will prevent the item from being collectable from a third-party location.
Delivery Delay: Configurable option to add time into the expected dispatch date. You might use this option to build in time to carry out a PDI for a bike. For example, if you offer next day delivery, have a bike in local stock, and the customer orders before your shipping cut-off, then the platform would offer next day delivery as an option in the checkout. To give your workshop time to PDI the bike before dispatch, you might therefore add in a shipping delay to provide a more accurate dispatch date to the customer.
Stock is Tracked: This links the stock level of the item in Cloud POS to the stock availability shown online, so will almost always need to be set to 'Yes', otherwise it will be possible to sell more of the item than you have in stock.
Backorder & Backorder Delay: Allows the product to be purchased with a lead time, if you do not have it in local or warehouse / supplier stock.
Back in Stock Notifications: Selecting this option will notify when inventory is running low.
Block SIM Stock: Clicking this option will ensure that a product will be unavailable for purchase by your site visitors once all local stock has been sold, even if your suppliers do still have stock. Typically, this feature would be used when clearing stock at a discount and you no longer wish to pull in fresh stock from the supply chain.
Item Weight & Dimensions: Add the packaged weight and dimensions of the item, useful for shipping decisions. This information is not consumer-facing.
6) Special Conditions
This section controls various options for promotions and offering the item for sale on other platforms.
Manage eBay: If you are using the eBay integration, you can prepare the item for eBay listing using this section.
Manage Amazon: If you are using the Amazon integration, you can prepare the item for Amazon listing using this section.
Marketplace Only: Select this option if you are only selling the item in the Marketplace.
Excluded from Another Site: If you are running more than one website from the same ecommerce database (for example, a B2B site and a B2C site, you can use this section to exclude the item from one or more of the websites. An example might be where you want to have all your products available on the B2B website, but only selected merchandise available on the B2C site. In this case, you can exclude most of your product range from the B2C site using this functionality, leaving only the specific items available on both sites.
Uses an Alternative Page Layout: Specify the page layout the product page will use.
Find & Filter Priority Item: Setting this will push this product along with any other priority products to the top of Find and Filter pages, after which the normal sort order will apply.
Block Coupons: Selecting this will prevent coupons from being used to pay or part-pay for the product.
Block Finance: Selecting this will prevent the product from being bought using finance as the payment method.
